

Manage users and security
Permissions are not handed out one by one. They are bundled into roles, each person gets one or more roles, and warehouse scope narrows access further where needed. This page is for administrators: build the roles, create accounts, turn on two-factor authentication, and check who did what.
The access model
Three layers, each with one job:
- Permissions are split by screen and action. There are 211 of them, grouped in the role editor as Dashboard and reports, Catalog, Warehouse and inventory, Fulfillment, Sales and POS, Purchasing and finance, Devices and kiosk, and Administration and security. Within each group, view, create, approve, and cancel are separate permissions.
- Roles are named bundles of permissions. The permissions of several roles add up; there are no "deny" permissions.
- Warehouse scope filters data after permissions are granted: a person who may view stock but is assigned only to branch A sees only A's stock.
Every action passes these checks in order: signed in and active, two-factor policy met, module on, subscription active, feature in the plan, plan limit not reached, warehouse in scope, and finally the permission. The first check that fails decides the message you see. Administrators skip only the last two checks: warehouse and permission.
Built-in roles
Every workspace has six built-in roles. You cannot delete or rename them, and the admin role always keeps every permission.
| Role | Meant for | Permissions |
|---|---|---|
admin | Everything, skips the permission and warehouse checks | All 211 |
manager | Broad access, except system administration | 184 |
warehouse_staff | Inventory and stock work | 78 |
cashier | POS, orders, basic inventory | 36 |
user | Default role: mostly view access plus creating orders | 16 (18 in older workspaces) |
kiosk | The account of a self-checkout device | 19 |
Each system update adds new default permissions to the built-in roles and keeps the permissions you added yourself. In new workspaces the user role no longer includes viewing the user list or pairing devices; older workspaces keep them until an admin removes them.
27 permissions belong to administrators only, for example managing users and roles, API keys, webhooks, apps, workspace links, MQTT, telemetry, and sample data. Managers can assign warehouses to users and roles, but cannot create users or edit roles. Check each permission in the Permission matrix under Administration → Roles.
How warehouse scope works
Learn these rules before you assign anything:
- Administrators always see all warehouses.
- Assigning warehouses directly to a user overrides that person's role-based warehouses entirely.
- Without a list of their own, a user's scope is the combined warehouses of all their roles.
- A role with no warehouses follows Default access: All locations gives every warehouse, No locations until assigned gives none. With All locations, one role with no warehouses gives the user every warehouse, even when their other roles have lists. A user's own list still overrides this.
- Granting a warehouse also grants all its child warehouses and bins. See Catalog and warehouses.
- When Hide records with no location from limited users is on, orders, documents, and other records without a location appear only to users who can use every location.
To make someone see only their own warehouse, assign it to them directly, or make sure none of their roles opens every warehouse.
Create a role
Go to Administration → Roles and press New Role.
Enter a Name and Description. Name it after a real job, for example "Morning cashier", then create it.
Open the Permission matrix tab. Each role is a column. Use Search permissions, filter by Group, or set Show to Differs between roles.
Tick only the permissions the job needs. Grant every permission and Revoke every permission change a whole column. You can edit the matrix only if you may assign role permissions. The admin column is locked.
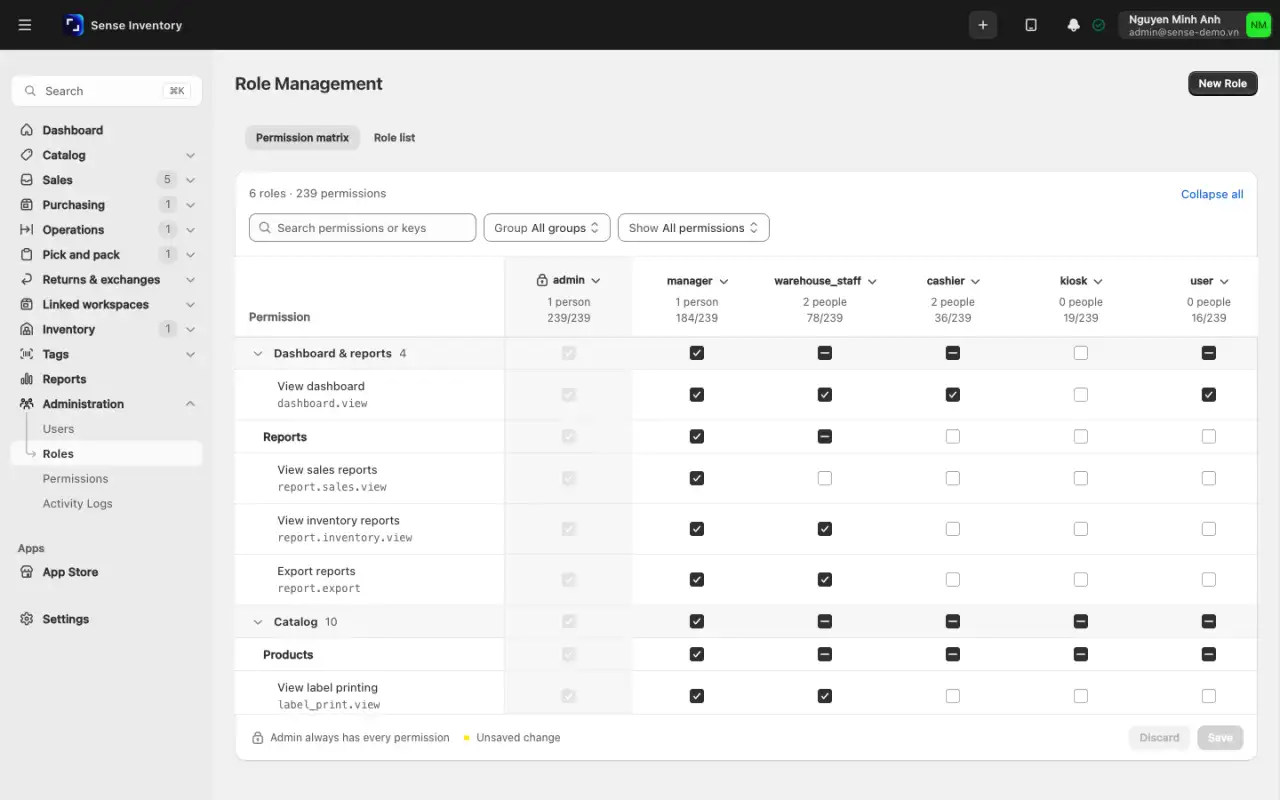
Click Save. Role changes apply on the user's next action. Nobody needs to sign in again.
Sign in with an account that has this role, not an administrator account, and open the main screens. Add any missing permission now, before anyone uses the role for real.
Operational guidance
Creating and approving stock documents are separate permissions. Put them in different roles. When one person creates and approves their own receipts, stock accuracy rests on trust alone. See Purchase and receive.
To limit a role to some warehouses, click Open role details and use its location card, or use Settings → Location access as described below.
Create a user
There is no email invitation. An administrator creates the account with a password and hands it over.
Go to Administration → Users and press New User.
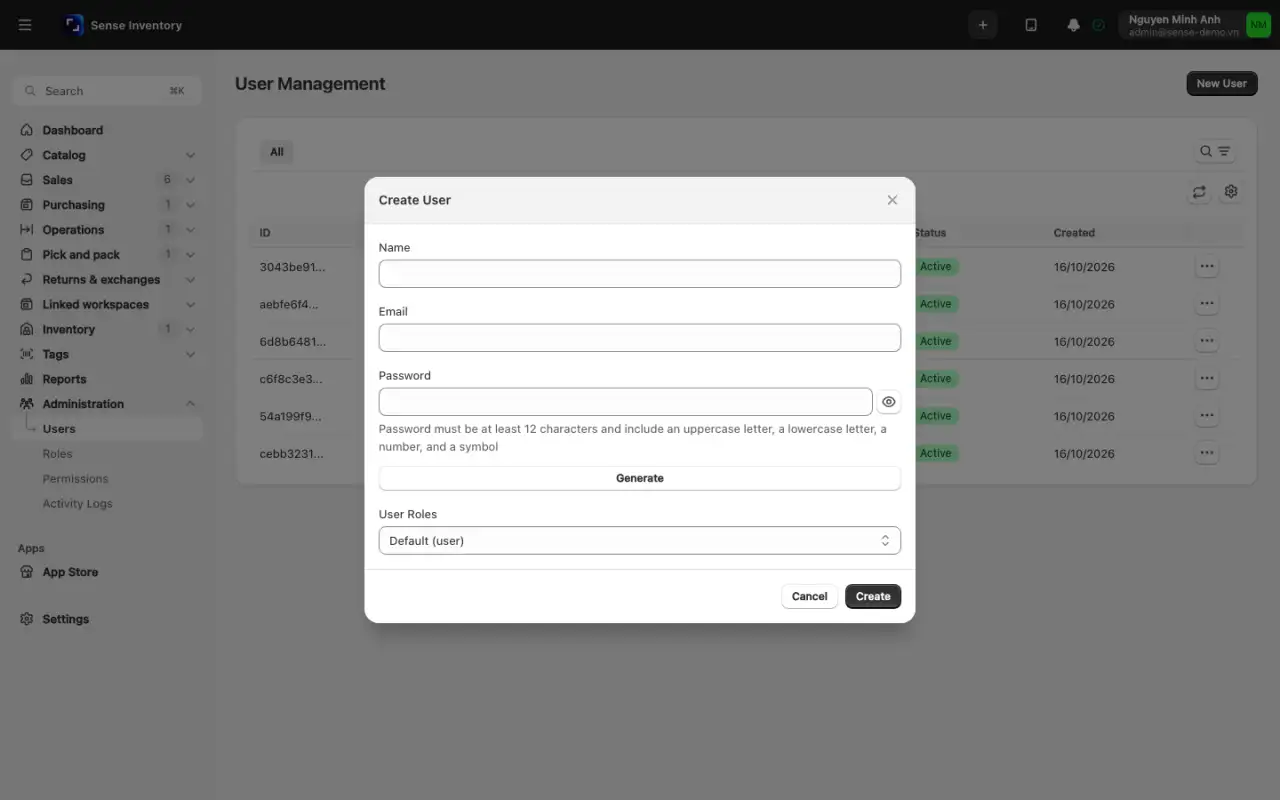
Enter the name, email, and initial password, or click Generate for a strong 20-character password without look-alike characters. A password needs at least 12 characters, with an uppercase letter, a lowercase letter, a number, and a symbol.
Pick one role under User Roles. If you pick none, the account gets the
userrole. Add more roles from the user's page.Click Create. You see "User created successfully". The email and phone number must not belong to any other account, including deleted accounts.
Give the person the email and password through a secure channel, and ask them to change the password from Profile.
When the plan's user limit is reached, you see "Your plan's limit is reached ({current} of {limit})" and cannot add anyone.
Give a user more roles
Go to Administration → Users and click the user.
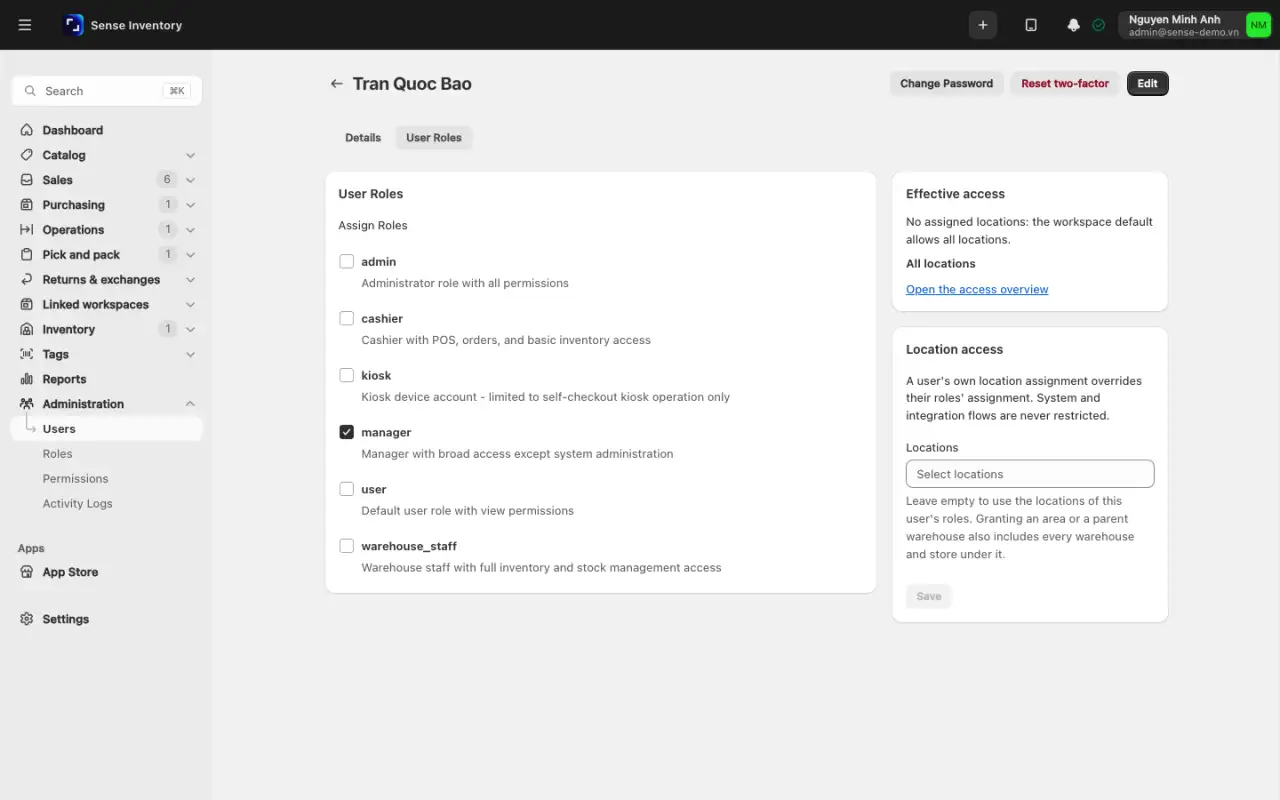
Open the User Roles tab and tick or untick roles. Each change saves on its own. You cannot change your own roles.
Read the Effective access card for the result, for example "Via roles: ..." or "All (default)".
Choose which warehouses each person can use
Go to Settings → Location access. You need the permission to assign warehouses to users or roles.
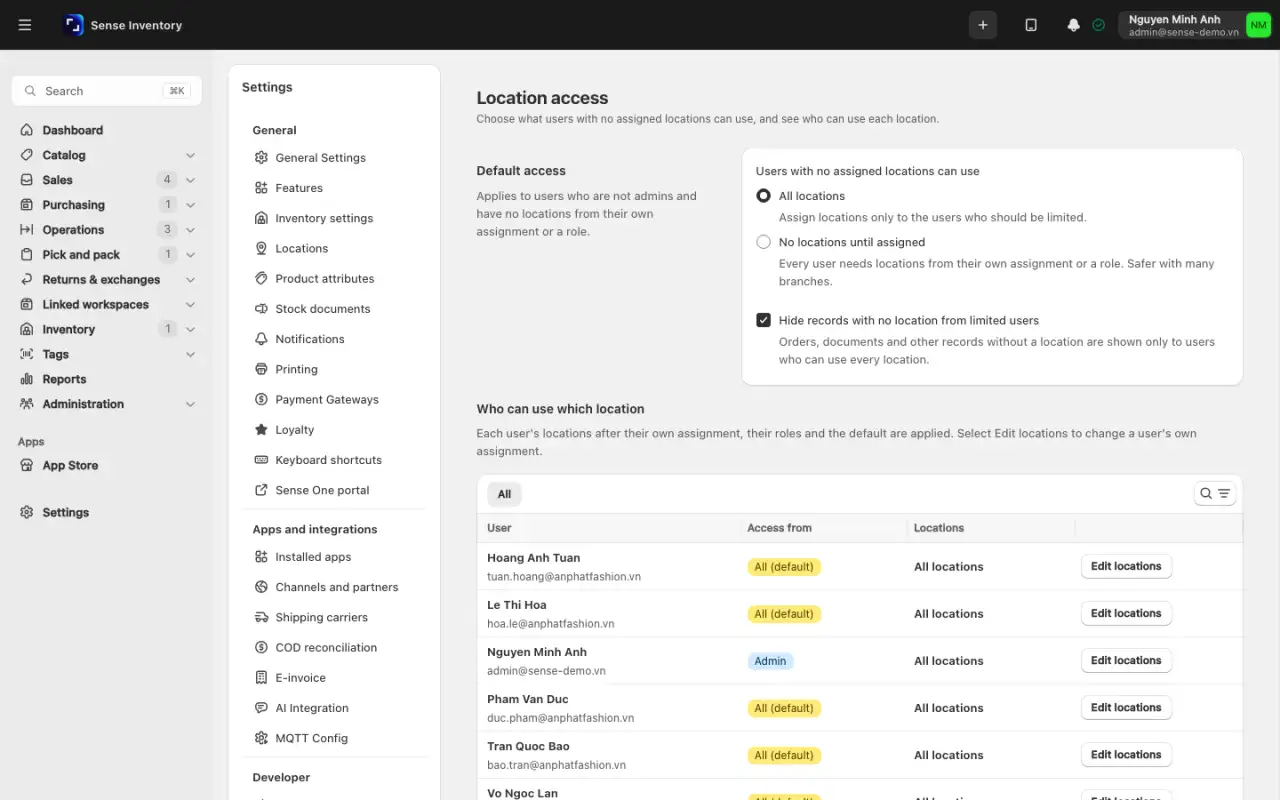
Find the user or role, click edit, pick the locations, and save.
An empty list on a user means "follow my roles". An empty list on a role means all or none, depending on Default access. When you switch the default to No locations until assigned, a warning shows how many users will lose access.
If you are limited to some warehouses yourself, you can only assign warehouses within your own scope.
Deactivate, suspend and delete accounts
Edit a user's Status to switch between Active, Inactive, and Suspended. Inactive and Suspended block sign-in in the same way. The label is only for your records. The person's sessions end at once, and a sign-in attempt shows "Invalid email or password".
Operational guidance
When someone leaves, deactivate the account instead of deleting it. Their history in the log still needs a name. Deleting cannot be undone, so delete only when your retention policy allows it.
The system always blocks two things: you cannot delete, deactivate, or suspend yourself, and the last active administrator cannot be deleted, deactivated, or lose the admin role.
Sign-in and two-factor authentication
Two-factor authentication (2FA) asks for a code from a phone at sign-in, which stops most leaked passwords from being used. You can also use security keys or passkeys, including for passwordless sign-in. Each person can store up to 10 keys, and the plan must include security keys.
Turn on 2FA for yourself
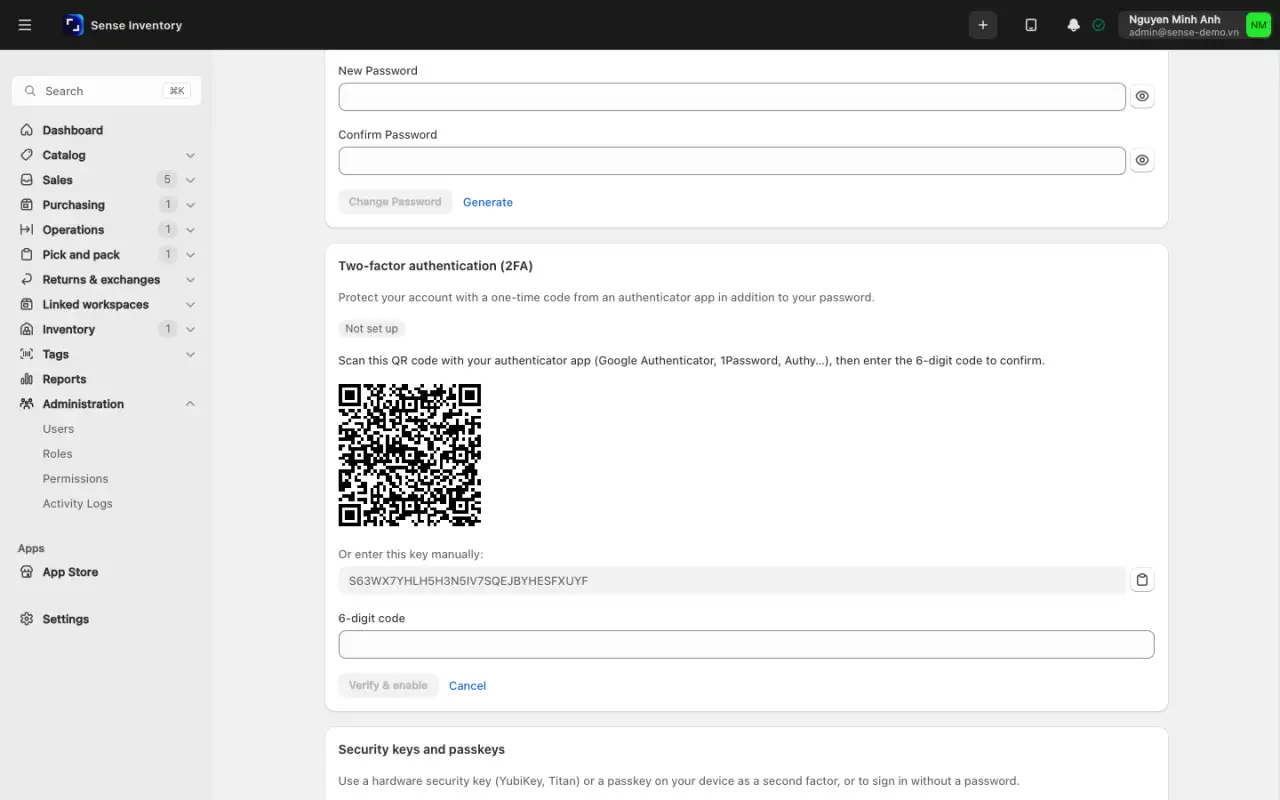
Open Profile → Two-factor authentication (2FA) → Set up two-factor authentication.
Scan the QR code with an authenticator app, or enter the key shown under it by hand.
Type the 6-digit code and click Verify & enable.
Save your Backup codes somewhere safe. They are shown only once, and each code works once.
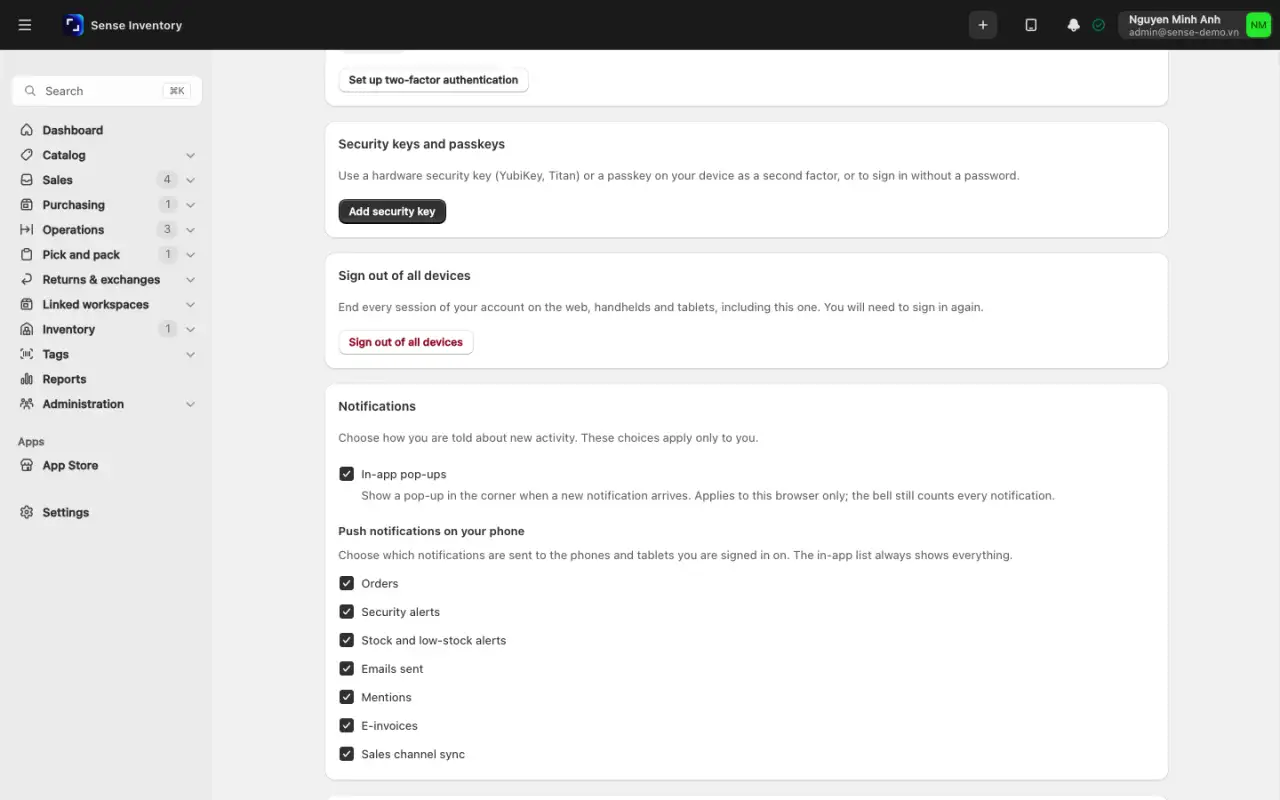
Optional: under Security keys and passkeys, click Add security key, enter a Key name, confirm your Current password, and touch the key.
For a new set of backup codes, click New backup codes. The old set stops working.
The mobile app cannot set up 2FA or security keys. Set them up on the web first, then sign in on the phone. When a code is needed, the mobile sign-in screen shows Authentication code, which accepts a 6-digit code or a backup code.
Require 2FA for the whole company
- Go to Settings → General Settings and find the Tenant-wide policy section.
- Turn on Require two-factor authentication.
- Set Applies to to All users or Administrators.
- Optionally turn on Require security keys. A 6-digit code is then refused; backup codes still work.
- Save. People in scope must enroll on their profile before they can continue. Until they do, every action except sign-in, enrollment, and reading settings is blocked with "Your workspace requires two-factor authentication. Set it up on your profile to continue." Trusted handheld devices and QR-paired sessions are not affected.
Before you turn the policy on, at least one administrator must have enrolled and signed in successfully.
Lost phone or forgotten password
Lost phone, stuck on 2FA: another administrator opens that user, clicks Reset two-factor, and confirms. The authenticator app, security keys, and backup codes are removed, and the user is signed out everywhere. You cannot reset your own 2FA here; use your profile. If needed, also click Change Password to set a new password.
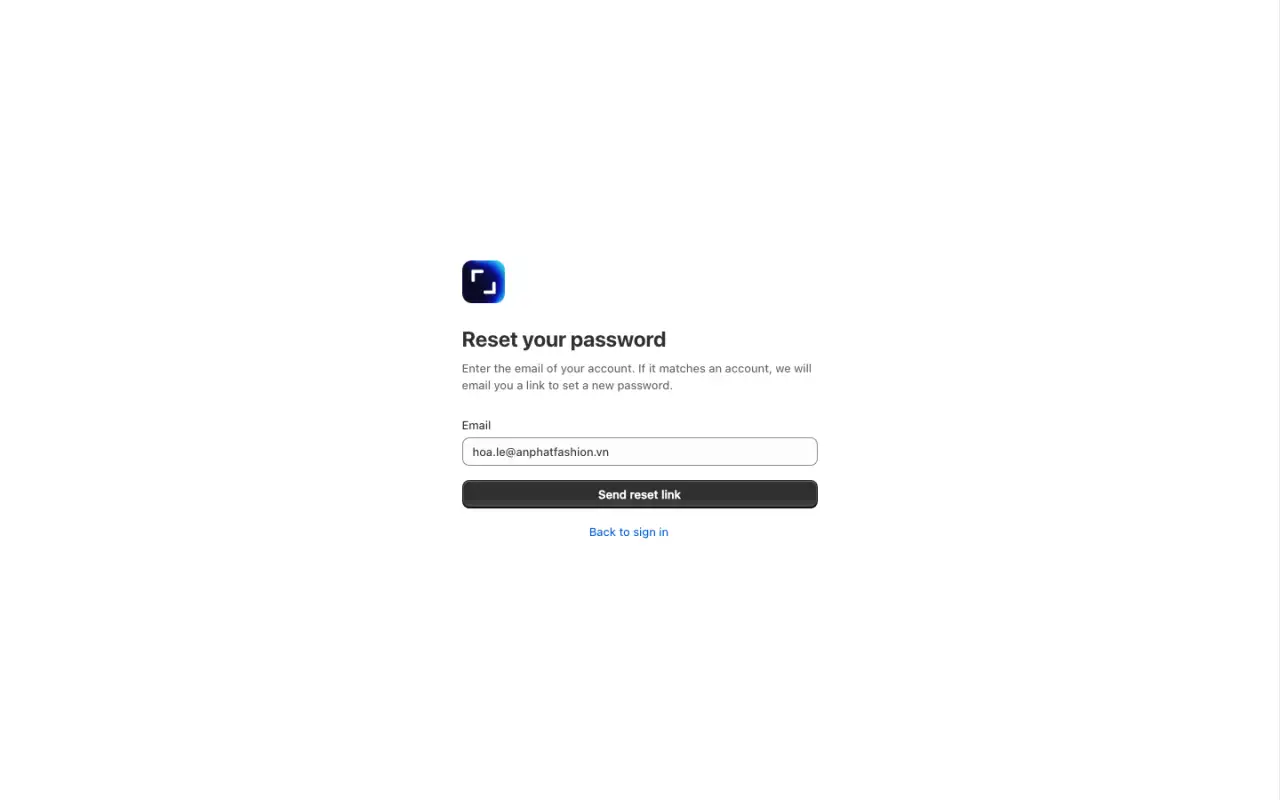
Forgotten password: on the sign-in page, click Forgot Password? and enter your email. The link in the email works once and expires after 45 minutes. Using it signs you out everywhere. This works only when the workspace has email (SMTP) set up. Otherwise, an administrator opens the user, clicks Change Password, and shares the new password securely.
Lost device or shared computer: open Profile and click Sign out of all devices.
These actions also sign a user out everywhere: changing their own password (the current session stays), resetting it through the link, an administrator changing it, turning 2FA on or off, adding the first security key, an administrator resetting 2FA, and deactivating or suspending the account. Changing roles does not.
Two automatic guards slow down password guessing. Ten wrong passwords or 2FA codes in a row lock the account for 30 minutes, and each network address can try to sign in at most 20 times in 15 minutes. Neither limit can be changed.
Review the Activity Log
Administration → Activity Logs records who did what and when.
- Pick a tab: All, Inventory, Security, Sales, Assets or Exports.
- Narrow the list with Domain, From date, To date, or the search box. Turn on Auto-refresh to watch new entries arrive.
- Expand a row to see its Changes and Context.
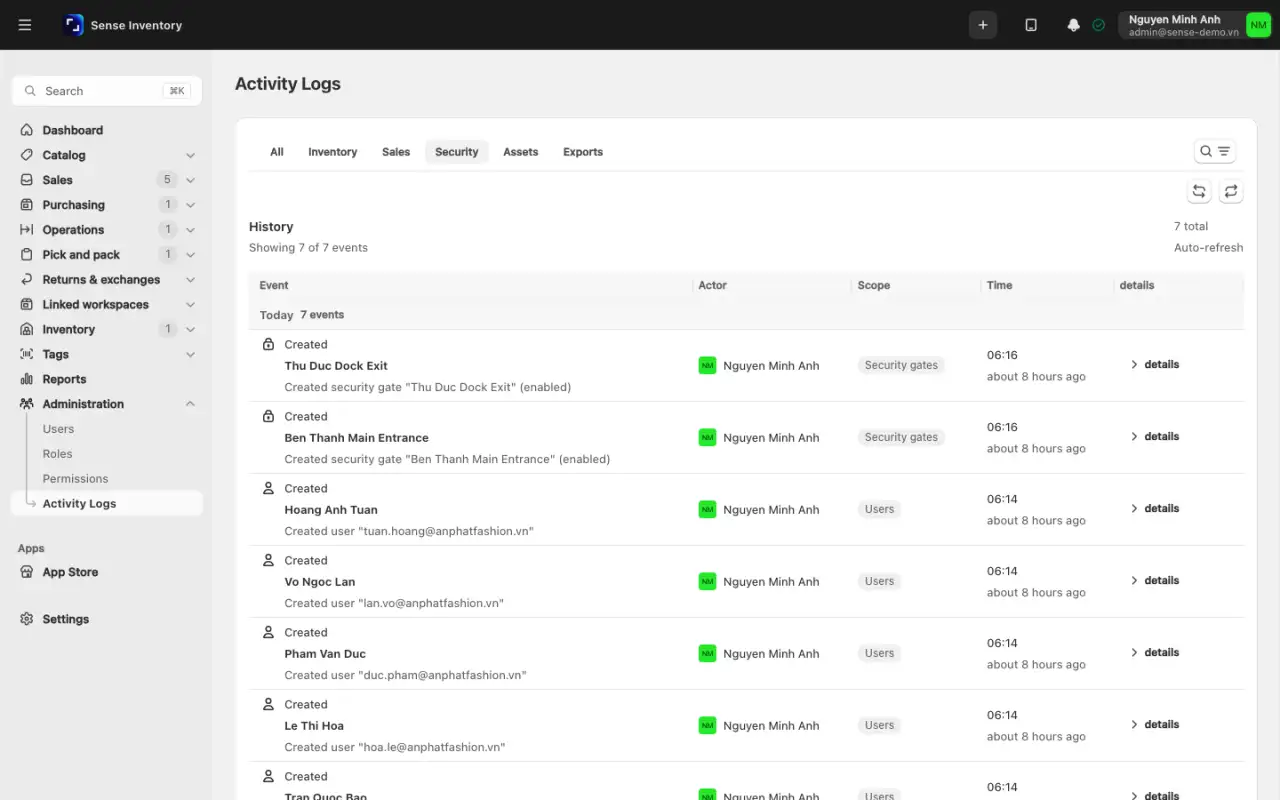
Use it to answer questions such as: who changed this product's price, who approved that receipt, who exported which report, and whether an account signed in outside working hours. The log hides entries tied to warehouses you cannot access.
When something looks wrong
| Symptom | Likely cause | What to do |
|---|---|---|
| A menu item is missing | Role lacks the permission, module off, or the plan lacks the feature | Check in that order, see Settings and integrations |
| A button is hidden, or "You do not have permission to do this. Ask an admin." | Missing permission for that action | Grant it through a role |
| "This feature is not included in your plan" | The plan lacks the feature | Ask your provider to upgrade |
| "This is not available in this workspace" | The module is off | Turn it on under Settings → Features or ask your provider |
| You see less data than a colleague | Restricted by warehouse scope | Check the user's warehouses and the Effective access card |
| "You do not have access to this warehouse" | Warehouse outside your assignment | Ask someone who can assign warehouses |
| Cannot press an approve button | Missing the approval permission for that document | Grant it through a role, keeping creator and approver separate |
| "Invalid email or password" although correct | Account is inactive or suspended | Set Status back to Active |
| "Too many failed login attempts. The account is temporarily locked: try again in 30 minutes" | 10 wrong attempts in a row | Wait 30 minutes |
| "Too many requests. Wait a moment and try again" | More than 20 sign-in attempts from one address in 15 minutes | Wait and retry |
| "Two-factor authentication code required" or "Invalid two-factor authentication code" | Code missing or wrong | Use a fresh code from the app, or a backup code |
| "This workspace requires a security key" | Policy requires keys and you entered a 6-digit code | Use your key or a backup code |
| "Your workspace requires two-factor authentication" | The policy covers you and you have not enrolled | Set up 2FA on your profile |
| "Current password is incorrect" | Wrong password when changing it, turning off 2FA or adding a key | Retype your current password |
| "You have reached the limit of 10 security keys" | Ten keys already stored | Remove one first |
| Security key says "The request expired" | The key was touched too slowly | Try again |
| "This is the last active administrator" | The only remaining administrator | Make another user an administrator first |
| "A user with this email already exists" or the same for a phone number | Matches an existing account, deleted ones included | Use another email or number |
| The reset link no longer works | Used twice, or older than 45 minutes | Request a new link |
Read next
- Settings and integrations: the Security group, security gates and sign-in policies.
- Catalog and warehouses: the warehouse tree, the unit of access scope.
- Purchase and receive: the two-person rule in daily operations.