
Sell, return, and use kiosk
This page is for cashiers, shift managers, and whoever sets up payments and discounts. A sale at the register does four things in one go: it creates the order, records the payment, books the invoice, and takes the stock out. Nobody adds up paper slips at closing time.
A day at the counter follows a fixed rhythm: open a cash shift with the float in the drawer, sell all day, handle returns, then close the shift and count the cash. The sections below follow that rhythm, then cover the pieces around it: payment methods, back-office orders, vouchers and loyalty, returns and exchanges, e-invoices, and self-checkout kiosks.
How a shift works
A POS session is a cash shift. It belongs to a person, not to a till or a warehouse, and each person can have only one open session at a time. Open it on one device and sell on another, and the sales still land in the same shift. Two cashiers sharing one drawer need two shifts and two counts.
Selling does not strictly require an open shift. A user who cannot open sessions still sees the register, but their sales are not linked to any shift and do not appear in a cash count.
Open a shift and sell
Click the tablet icon (Sell) in the top bar, or use the Go to POS shortcut. In the Warehouse picker, choose your store. Only warehouses with the POS capability appear, so an empty list means no warehouse has it on, see Set up catalog and warehouses.
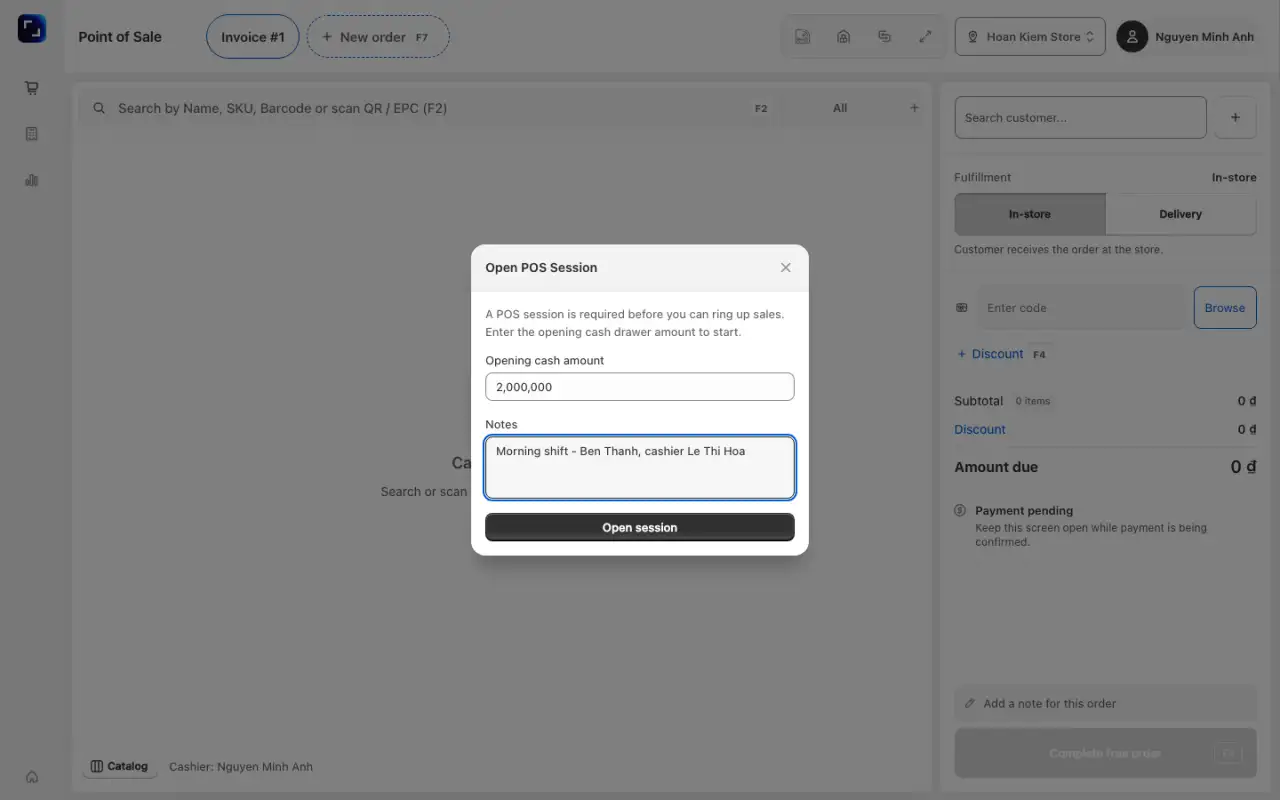
In the Open POS Session dialog, enter the Opening cash amount and an optional note, then click Open session. Count the drawer first: this figure is the starting point for the closing count. You see "Session opened", and the header shows Session Open.
Add products: scan a barcode or an RFID tag, type in the search box (it accepts product name, SKU, barcode, and EPC; the
F2key jumps there), or pick from the catalog grid.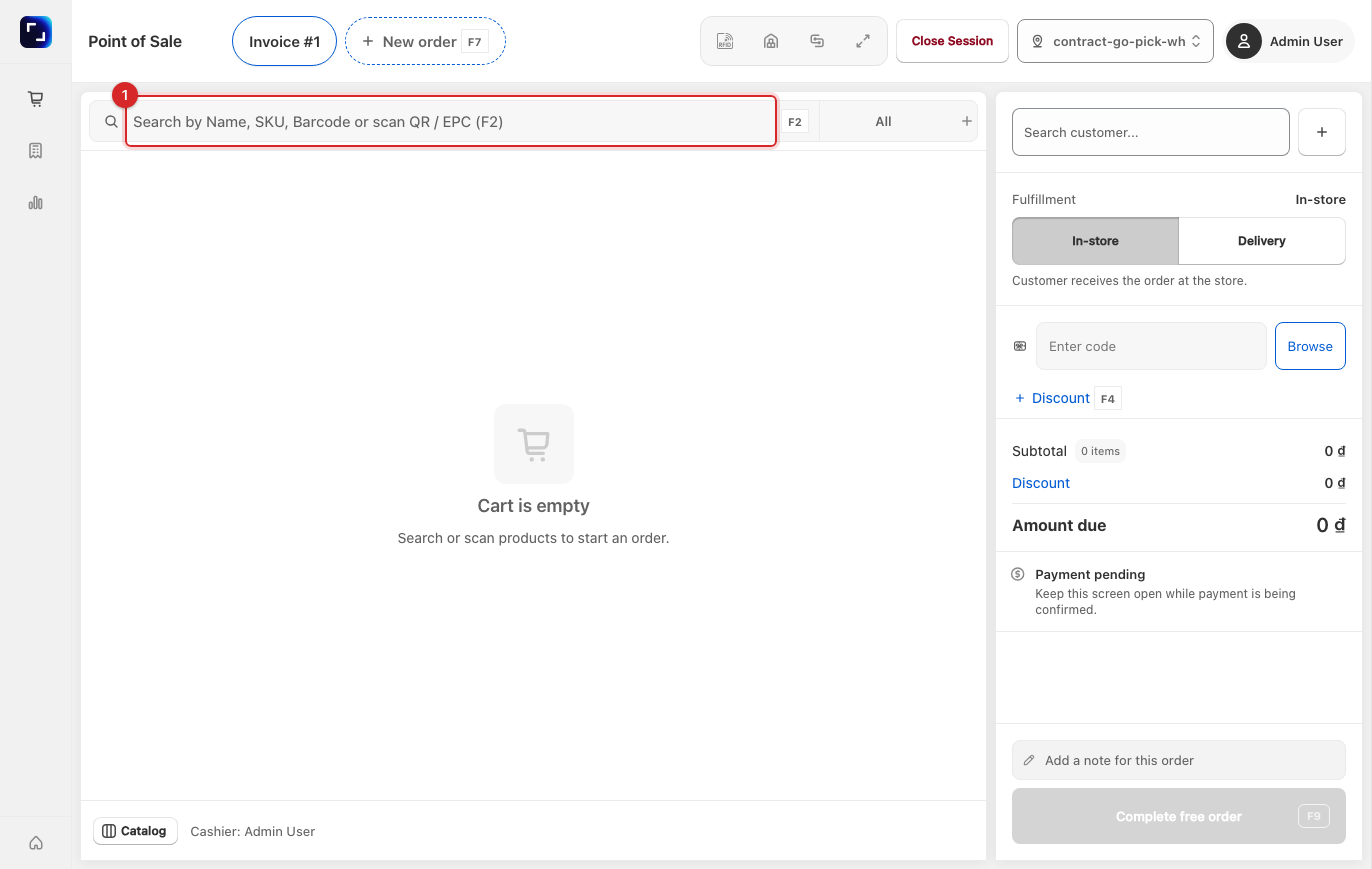
Check the cart for the right variant, quantity, and price. Add the customer now if they pay later or earn points. A manual discount and a voucher cannot be combined on one order.
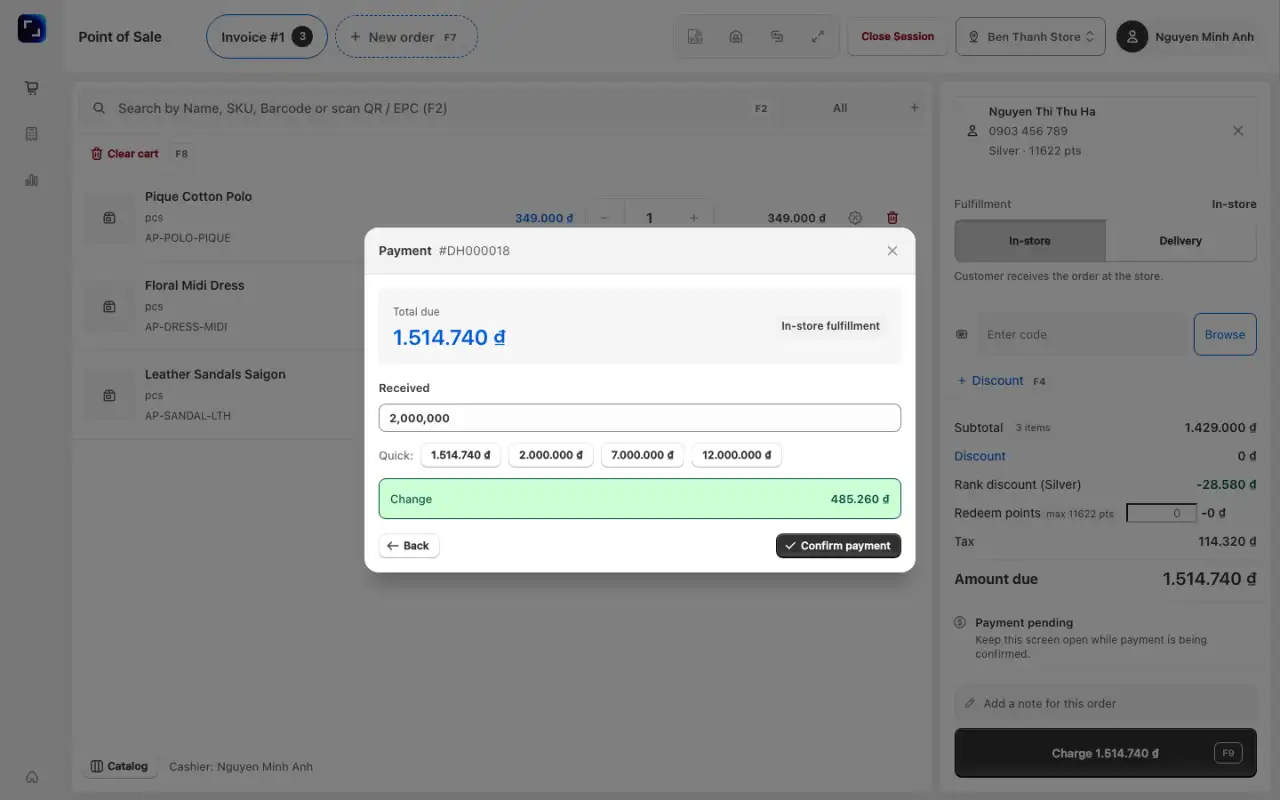
Click Checkout, choose the payment method, enter the amount received, and confirm. You see "Order placed successfully!". Print or send the receipt; the template is under Settings → Printing, see Settings and integrations.
Checkout also checks the cart. A line without a price blocks checkout. A total of 0 asks you to confirm Complete free order. If the workspace sets a minimum order amount, a smaller cart is refused.
Take a split payment
The payment buttons come from the methods you enabled: one Cash button, one per custom method, plus QR, Card, and E-wallet.
Open payment ("Choose payment method"). Tap Cash, enter a Received amount smaller than the total, and click Confirm payment. You return to the method choice with the remaining amount. Cash over the total shows as Change.
Tap a QR or Card method and set Charge this method for (the full amount by default, or less to split). Click Continue.
- QR: the customer scans; "Waiting for payment…" stays until the countdown ends.
- Card: pick the terminal, ask the customer to tap or insert the card. If it is declined, use Retry card payment or Change method.
- Custom: collect the money outside the app, then click Paid.
When you see "Payment complete", choose Print receipt or New sale.
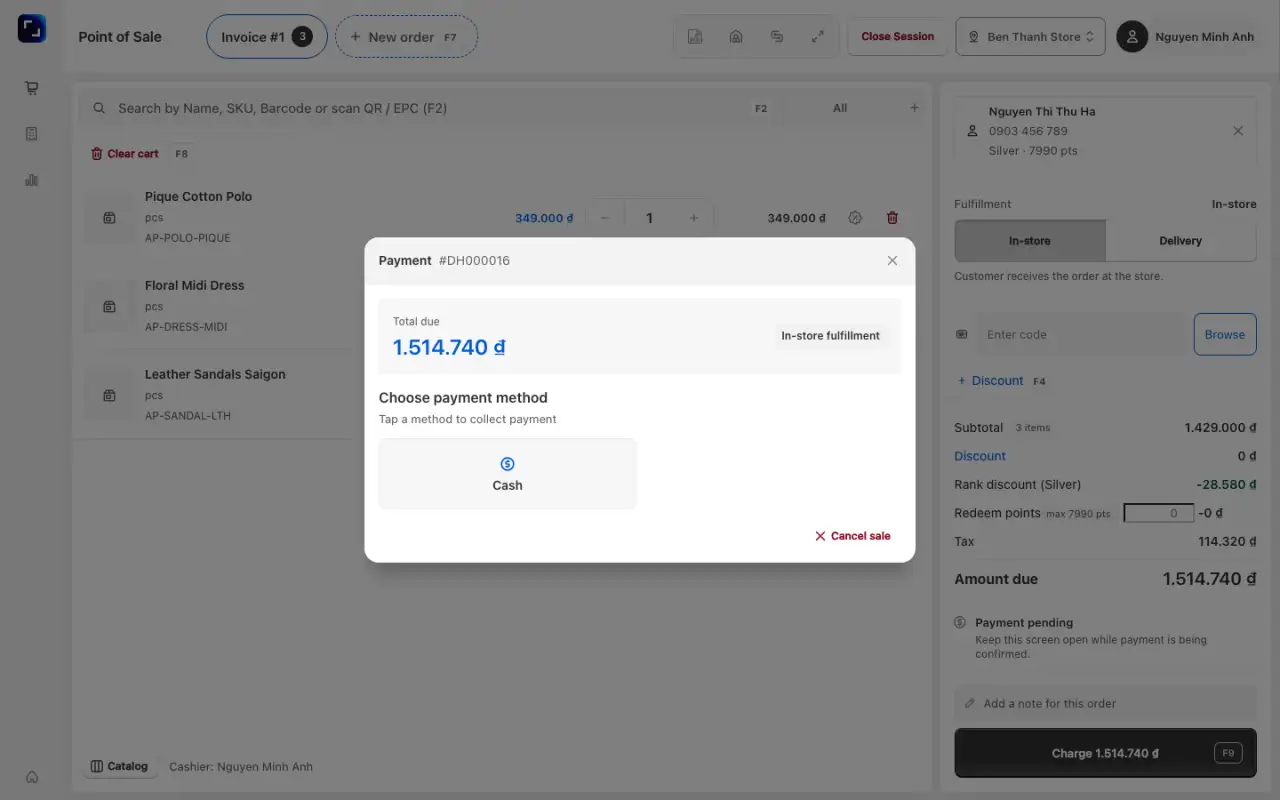
If no method is available, the register says "No payment methods available". Enable at least one gateway under Settings → General → Payment Gateways.
Sell offline
When the connection drops, a banner says the register is offline. Only cash walk-in sales can be saved, and only when an administrator turned on Allow offline selling under Settings → General Settings and you hold the Sell offline at the POS permission.
- Build a walk-in cart. It cannot have a customer, voucher, discount, loyalty points, delivery, lot-tracked product, pack product, or RFID-tagged item. Every line needs a price, and the total cannot be 0.
- Click Checkout. In Cash payment (offline), enter Cash received (or tap Exact amount) and click Save sale.
- When the connection returns, sales are sent automatically. Open View offline sales → Send now to push them yourself. Use Try again on items marked Needs review (for example the total changed while offline).
Sales marked Refused or Too old to send never go through. A manager can Discard them, and must then take their cash out of the drawer count by hand. The register will not let you close the shift while you still have unsent sales of your own. Sales sent after closing are saved without a shift.
Use the tablet POS
In the app, open Point of Sale in the Sales section. It has the same Sell, Orders, and End of day rail, the same open and close dialogs, the Z-report, and the offline queue. The POS only runs on screens at least 600 dp on the shortest side, about a small tablet. On a phone it shows "The POS needs a tablet" and a Back office button.
Close the shift and count cash
Finish or cancel every open cart.
Click Close Session in the header. Review the Z-Report: Gross sales, Refunds, Net sales, takings By payment method, Expected cash, and Top products. Click Next: count cash.
Count the drawer and enter Actual cash counted. The system shows Expected cash total and the Discrepancy (counted minus expected; negative means short). Add a closing note and click Close session.
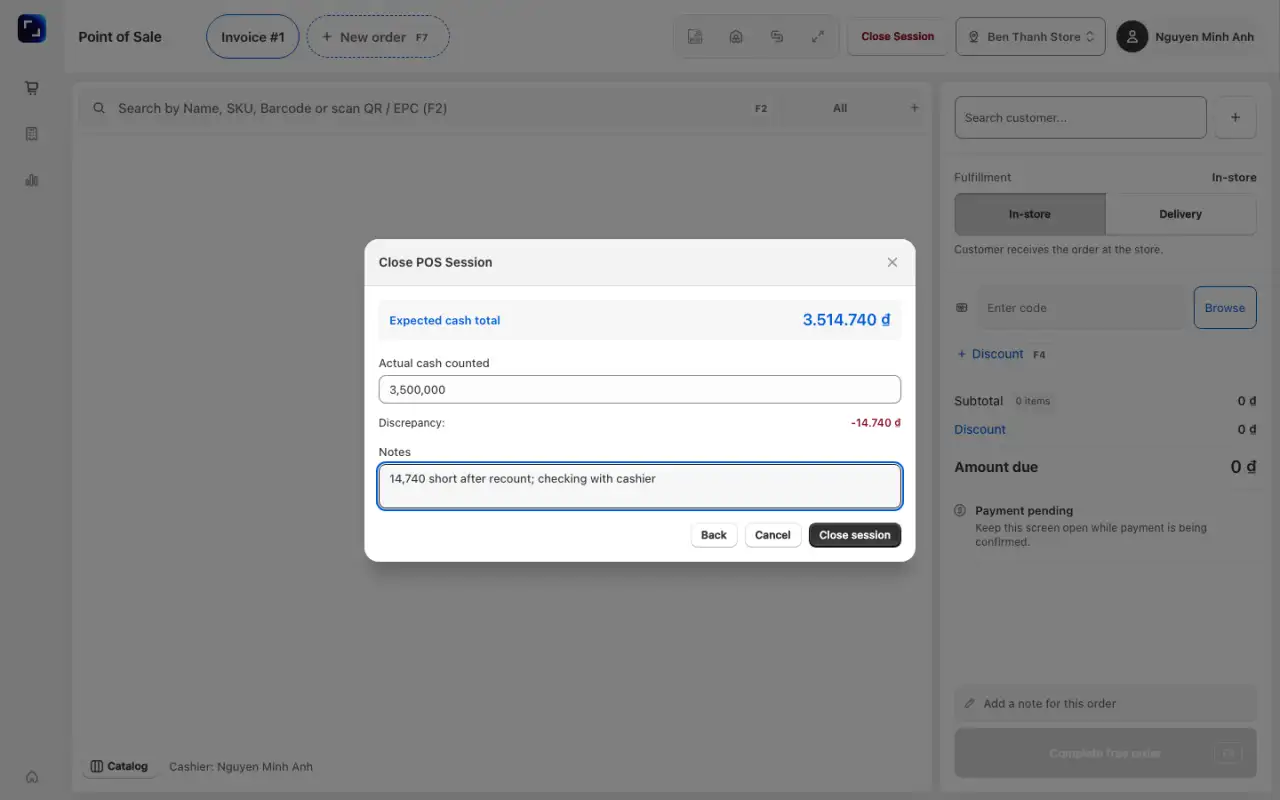
Expected cash is the opening float plus cash sales minus cash refunds. Card, e-wallet, and bank-transfer takings appear in the report but do not change what the drawer should hold. A refund counts in the shift where the original sale was made, not the shift where the cash went out.
Operational guidance
Do not leave carts open overnight. For a small cash difference, note the cause and close. For a large one, review the refunds and cancellations of the shift before closing.
Review shifts and the end of day
Sales → POS Sessions lists your own shifts with Opening Cash, Expected Cash, Actual Counted, Discrepancy, and Note. Click a row for the orders.
Managers see every cashier under Reports → Cash & POS Sessions, which can be exported, see Review reports.
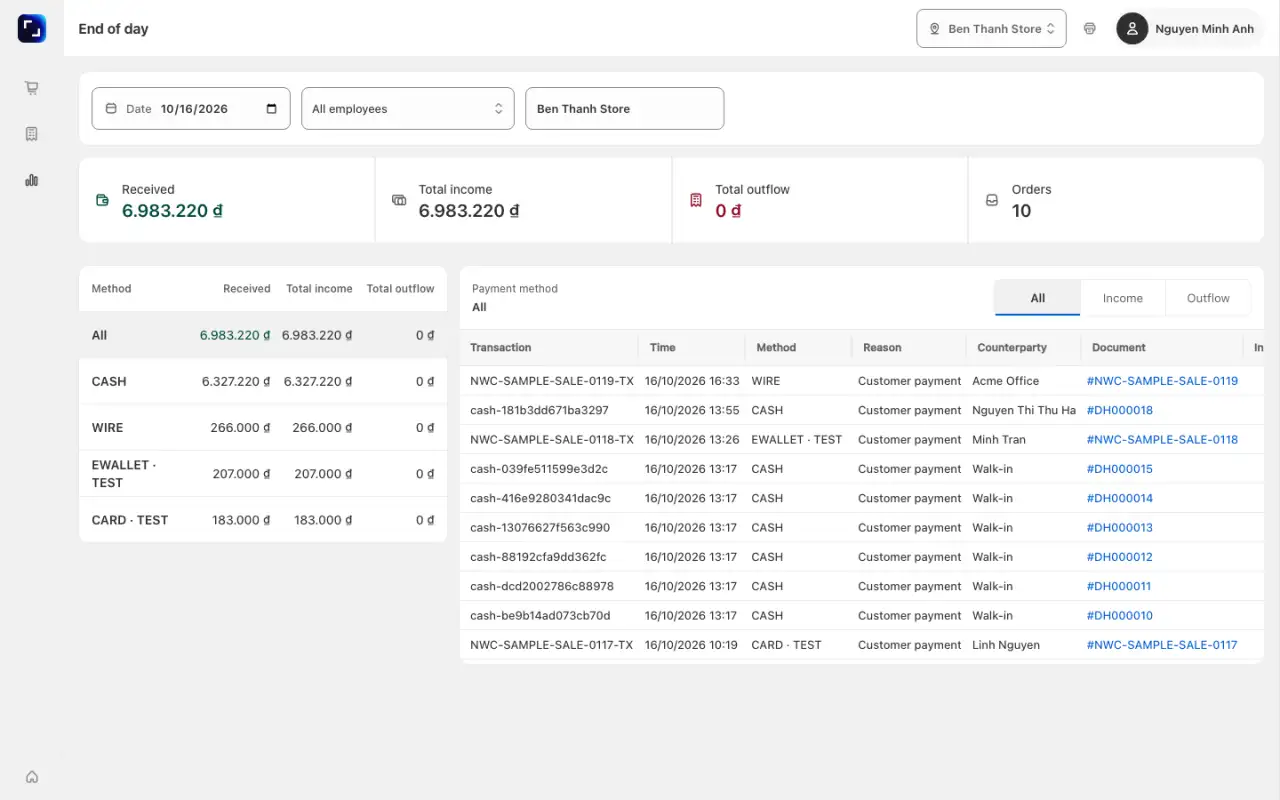
End of day in the POS rail lists every completed payment and refund per warehouse in a date range. Pick the warehouse, date, employee, Income and outflow, and payment method, then read Total income and Total outflow.
Set up payment methods
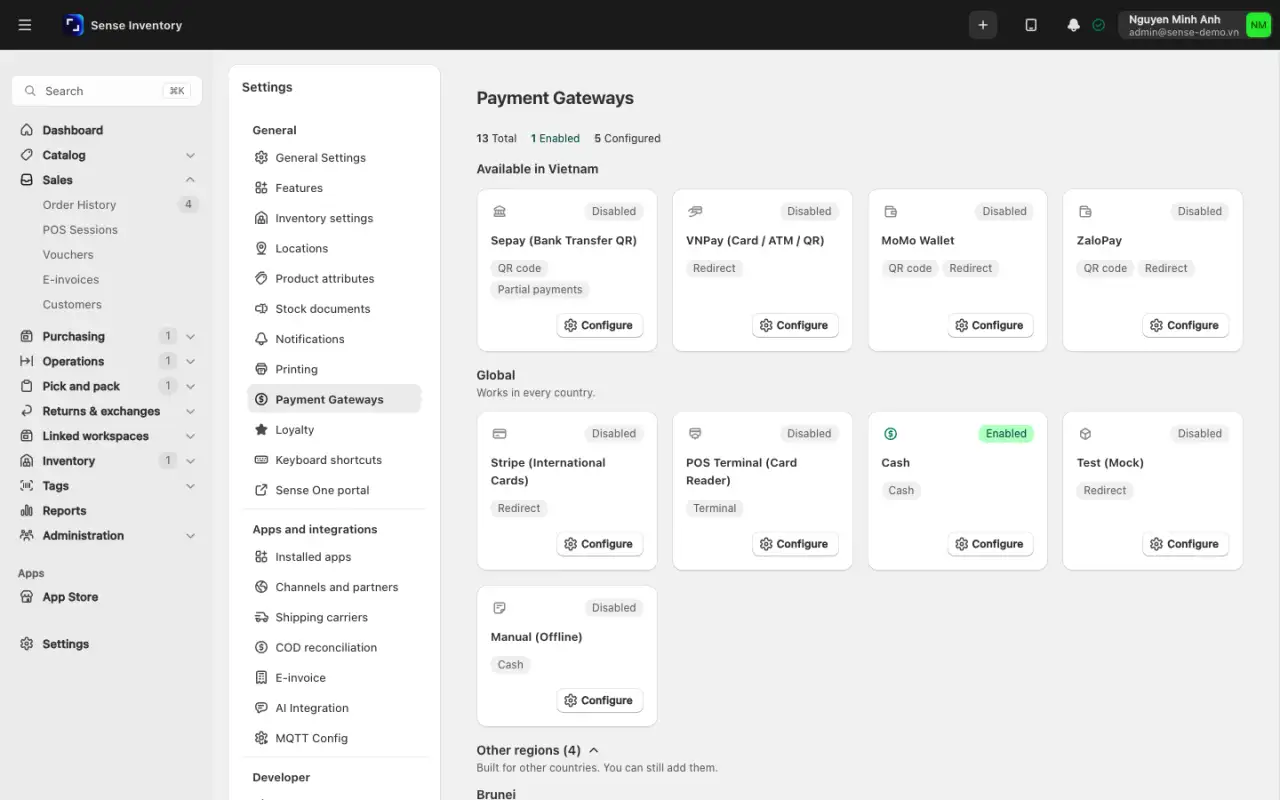
Open Settings → General → Payment Gateways. The page shows how many gateways are total, enabled, and configured, with cards grouped by country. Only gateways that are both enabled and configured appear at the POS, kiosk, and web checkout. Cash is on until you turn it off.
Turn on SePay bank-transfer QR
On Sepay (Bank Transfer QR), click Configure and tick Enable gateway. Tick Set as default if you want it auto-selected.
Enter Bank account number and Bank, plus either a Webhook shared secret or Allowed webhook IPs. Without one of the two, every bank report is rejected. Optionally set the Order code prefix.
Copy the Webhook URL into the SePay dashboard.
Click Save ("Gateway configuration saved"), then Test connection.
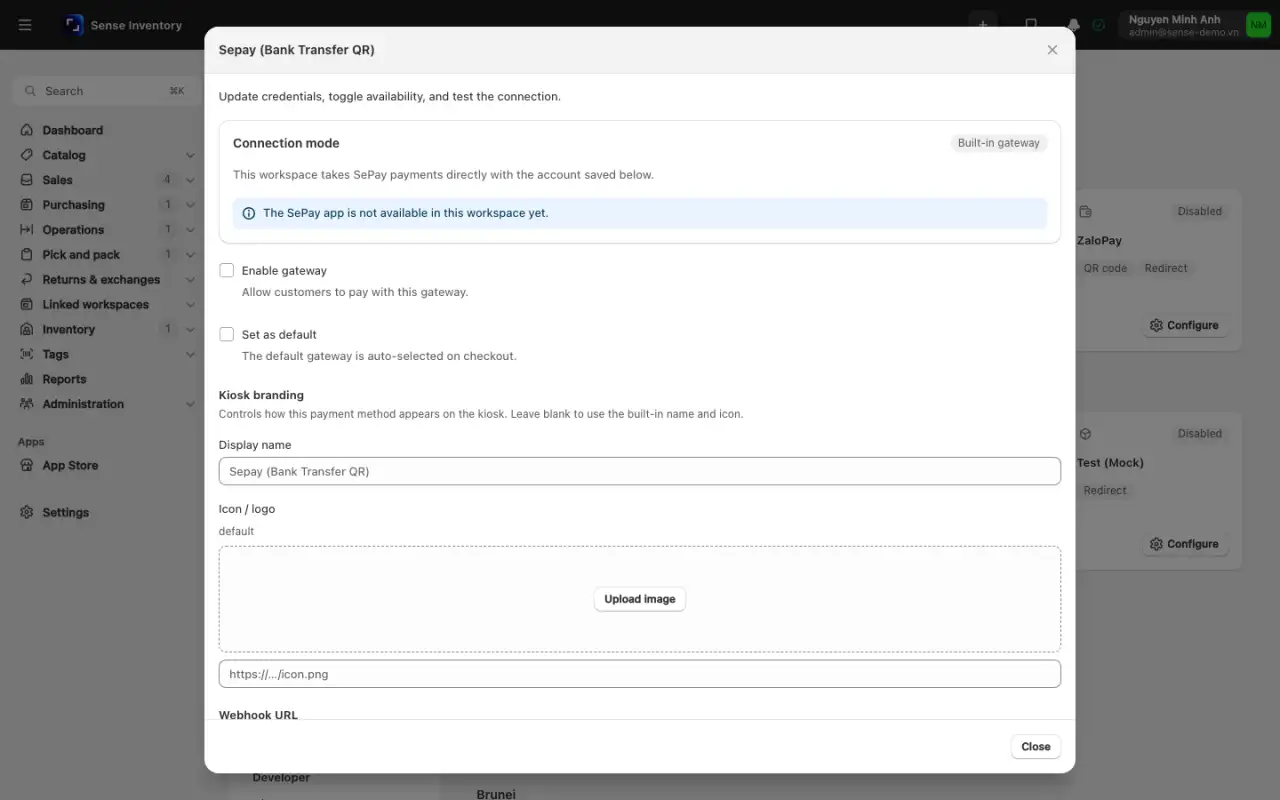
The QR memo is your prefix plus 6 characters. Several partial transfers with the same memo add up until the payment is covered. A QR payment expires after 15 minutes. If nothing was paid on the order, it is then cancelled; a partly paid order stays open.
Add a custom payment method
Under Custom methods, click Add method. Enter a Name and choose the Type: Plain (staff take the payment outside the app, then press Paid) or VietQR (shows a QR for your bank account; staff check the transfer arrived, then press Paid). For VietQR, pick the Bank and enter the Account number and Account holder.
Leave Enable gateway on and click Save ("Payment method added").
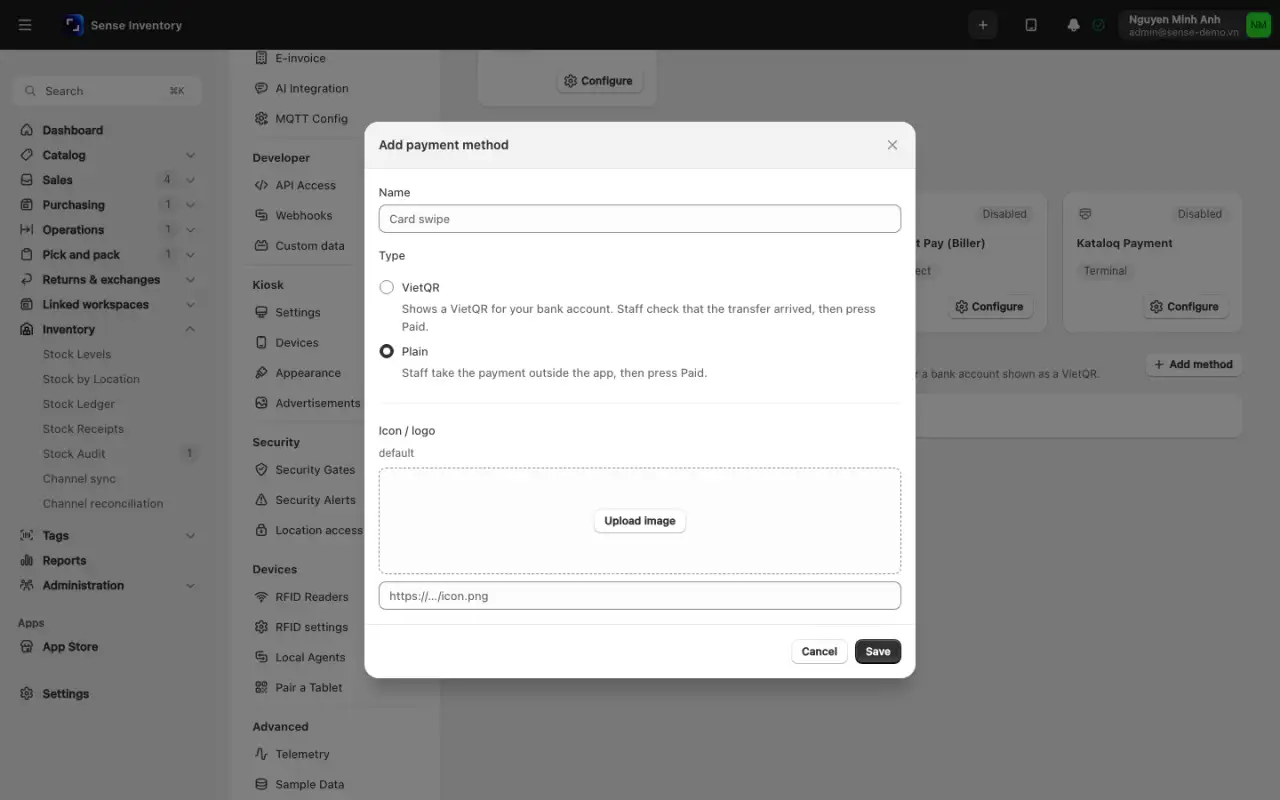
Deleting a custom method keeps past payments, which then show the method's code instead of its name.
Connect a bank card terminal
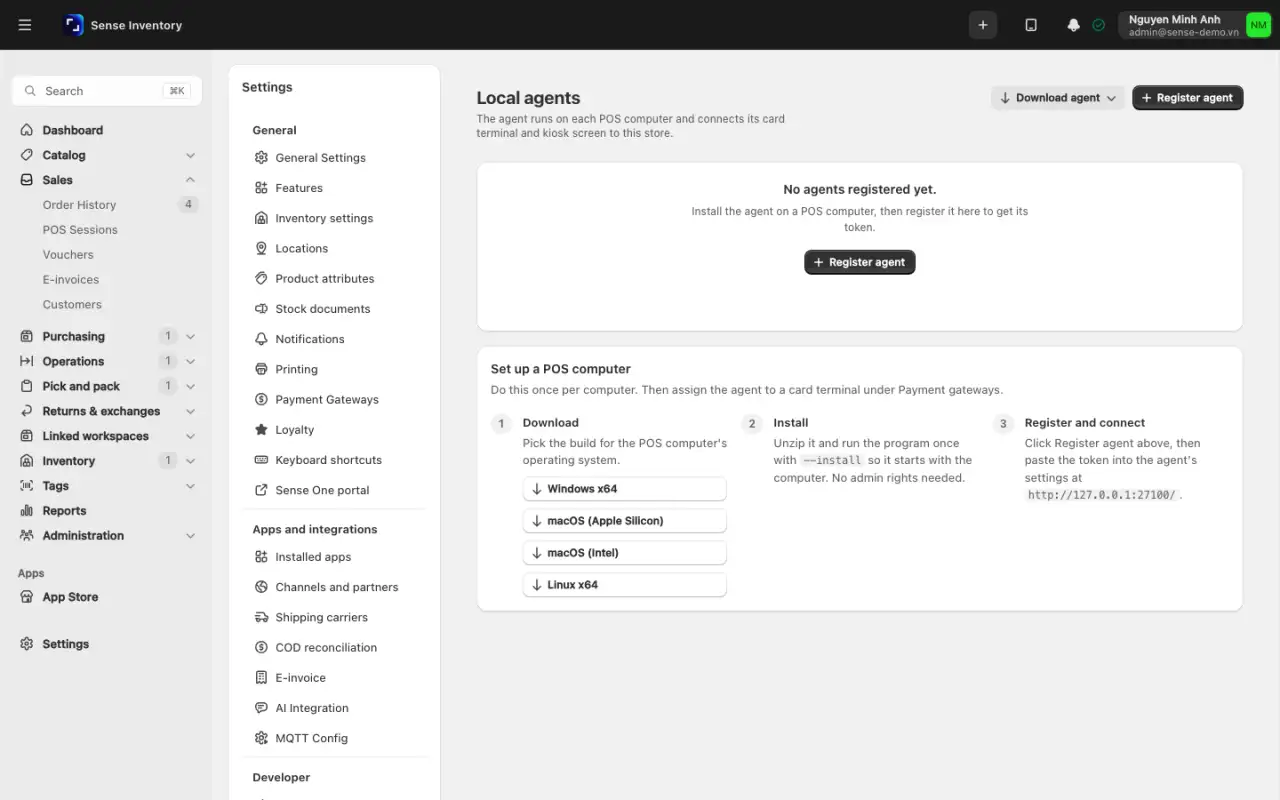
If the terminal is attached to a POS PC (USB or serial), open Settings → Devices → Local Agents, click Download agent, install it, then Register agent with an Agent code and an optional Label. Copy the token now, it is shown once.
On POS Terminal (Card Reader), click Configure. Set Deployment mode, ECR protocol variant, and Payment timeout (seconds), and enable the gateway.
Under Terminals, click Add terminal. Enter the Terminal ID and Label, and choose the Connection: TCP / IP (IP address, Port) or USB / RS232 (Local agent, Serial port). Click Save ("Terminal added").
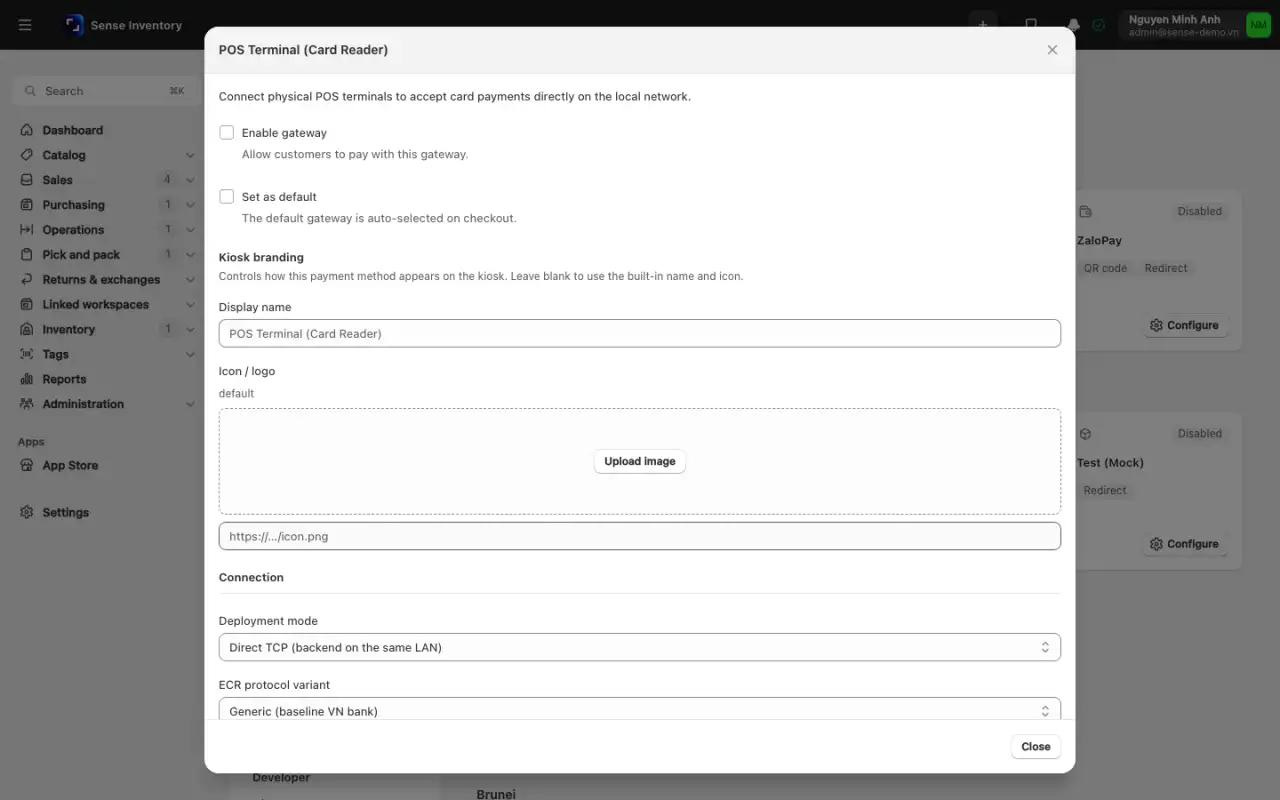
Click Ping, then run a Test sale with a small amount. If it is approved, click Void this test sale the same day.
Optionally click Settle → Schedule and turn on Auto-settle enabled with an hour, minute, and time zone, so the day's card batch is sent to the bank automatically.
Pay a pending order by QR, and void a payment
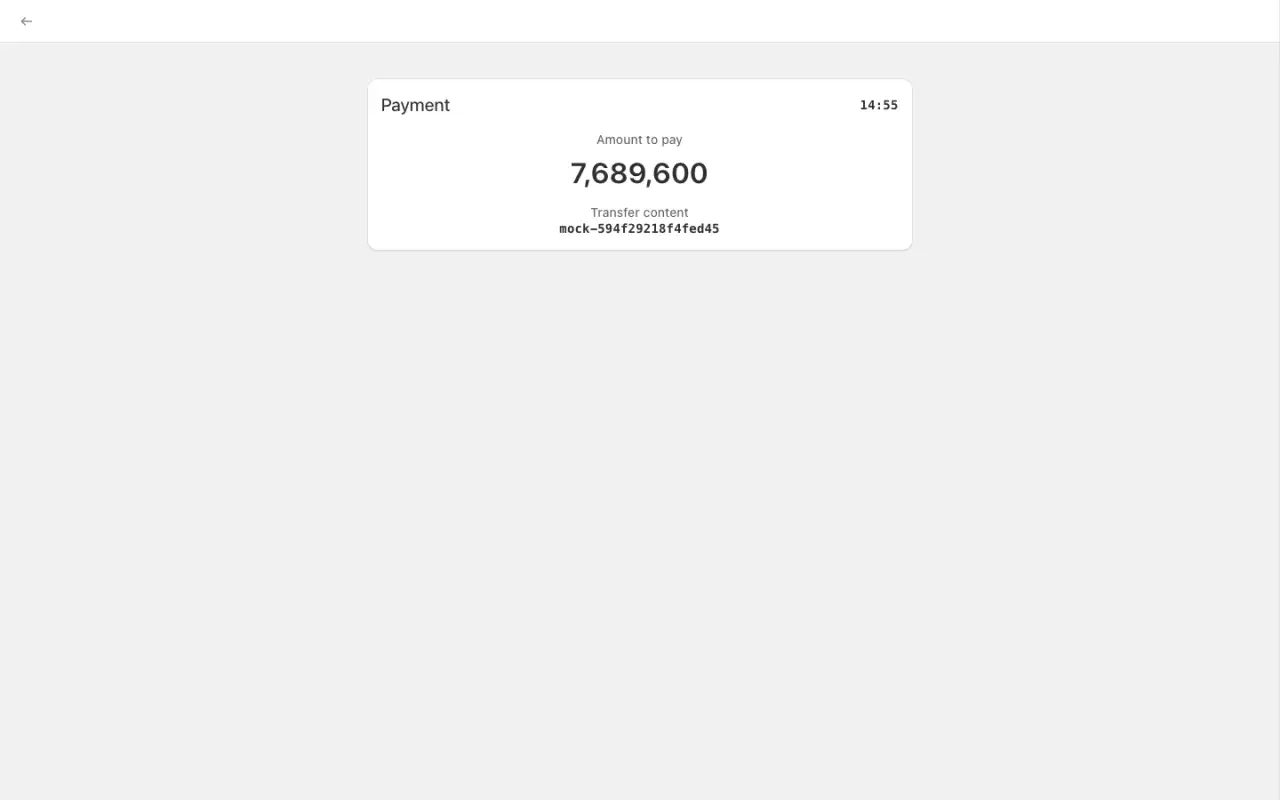
On Sales → Order History, click Pay now on a Pending order. The page shows the QR, amount, transfer content, and a 15-minute countdown, then "Payment received".
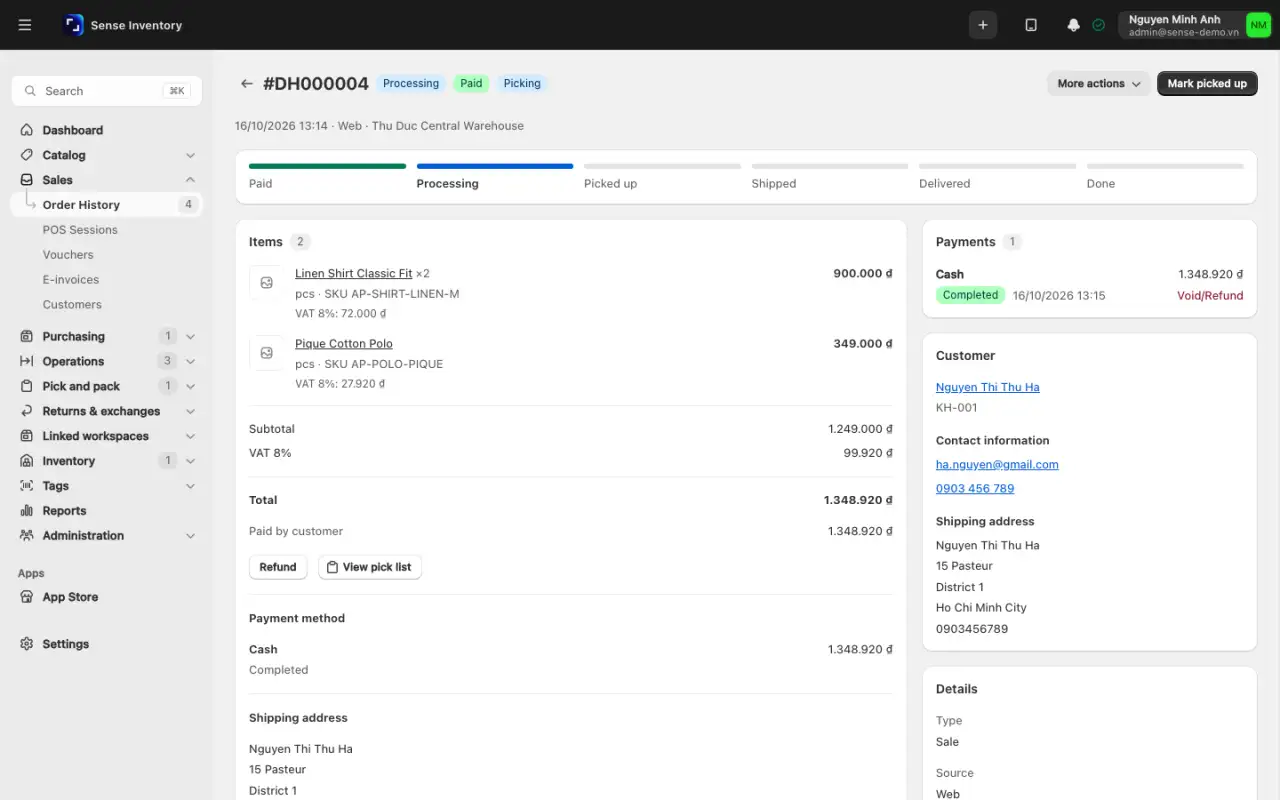
To void a payment, open an order that is still open (not a channel order, not Done or Cancelled) and use the action on the Payments card. It works only on the same local day, only for gateways that support refunds (Stripe, Pocket Pay, the card terminal, and app gateways that offer them), and the refund goes through the gateway. After that the payment shows Refunded and the order returns to unpaid. For anything older, use a return or a refund on the order.
Orders imported from a sales channel cannot be paid or voided here, see Channel orders.
Create an order in the back office
Use this for phone orders, shipping orders, and anything not rung up at the counter.
Open Sales → Order History and click Create Order. Choose the fulfilment warehouse.
Add lines with Add product: search, Browse, or Scan RFID to add products. For lot-tracked products, use Choose lot(s).
Optionally pick a customer, set Delivery to Store pickup or Shipping (Shipping needs a name, phone, and address), click Add discount, and add notes.
Click Create Order. In Payment type, choose Pay now. Set each payment line, use Add method to split, check Total paid, Remaining, and Change, then confirm.
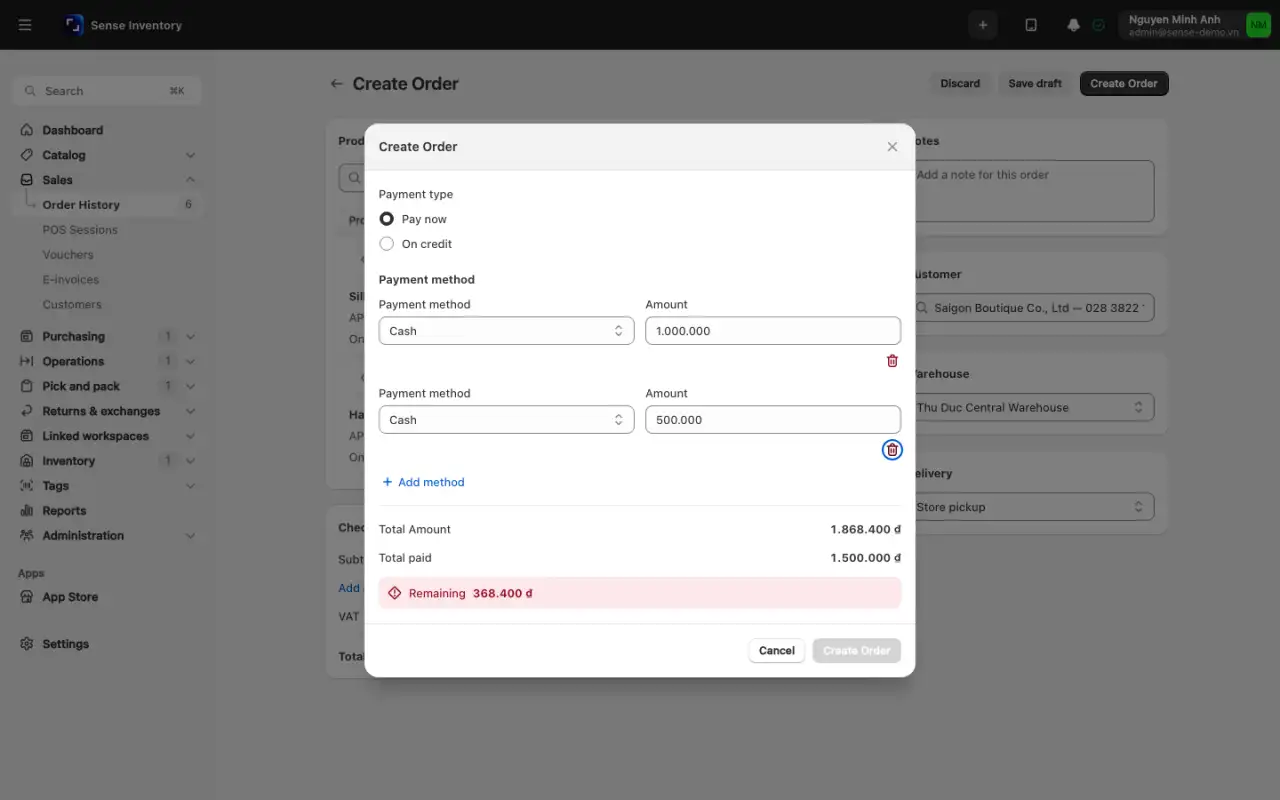
QR, card terminal, and e-wallet payments are collected on a payment screen after the order is created.
Sell on credit
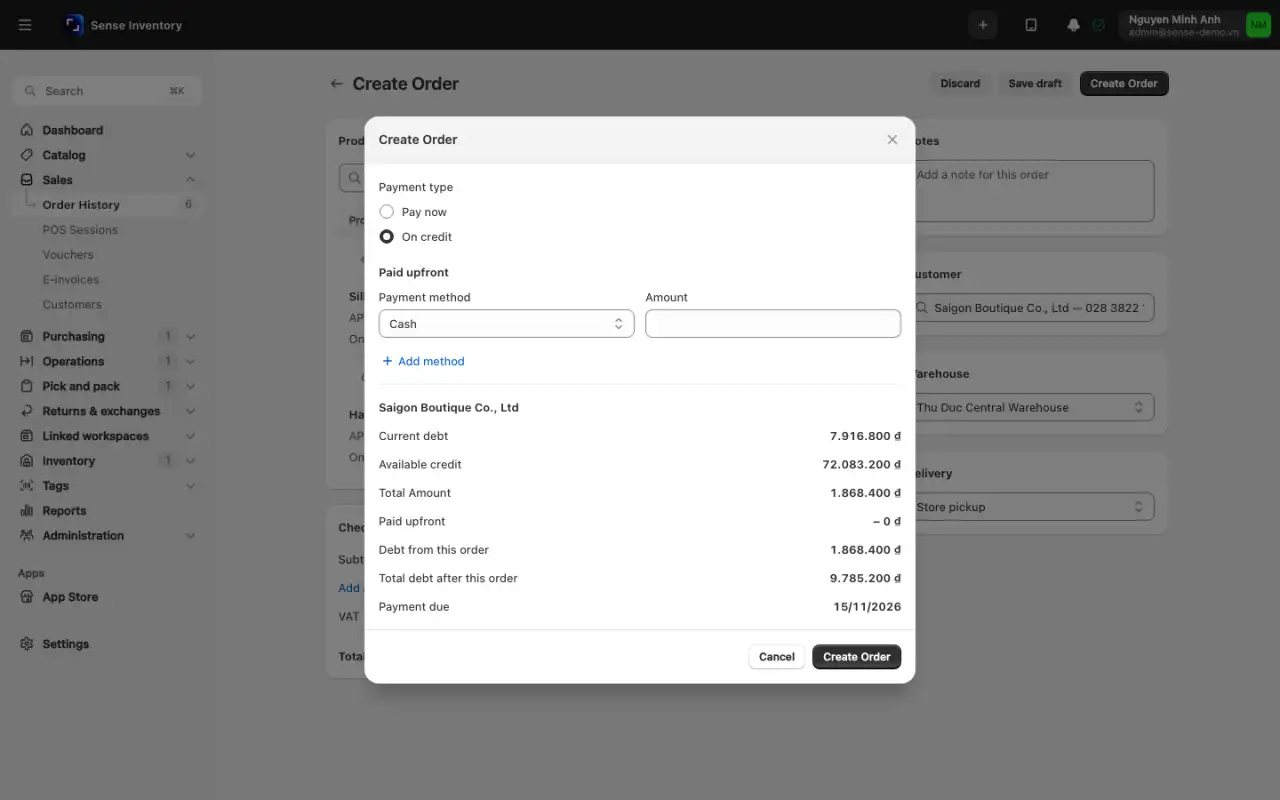
With a customer who is allowed credit, choose On credit in Payment type. The panel shows Current debt, Available credit, Paid upfront, Debt from this order, Total debt after this order, and Payment due. Over the limit, a Credit limit warning or Credit is not available appears. Under the Block policy the order is cancelled automatically. See Manage debt and consignment.
Save a draft
Click Save draft to keep an order without placing it ("Draft order saved"). A draft has no payments, no credit, and no stock effect. Later, use the Drafts filter in Order History, open it, and click Continue editing, then Create Order, or Delete draft.
Move an order through fulfilment
Open the order and use the main button in the header: Mark as paid, Start processing, Mark ready, Mark picked up, Mark shipped, Mark delivered, or Mark as done. For warehouse picking, use Create pick list or View goods issue note on the fulfilment card, see Pick, check, and ship.
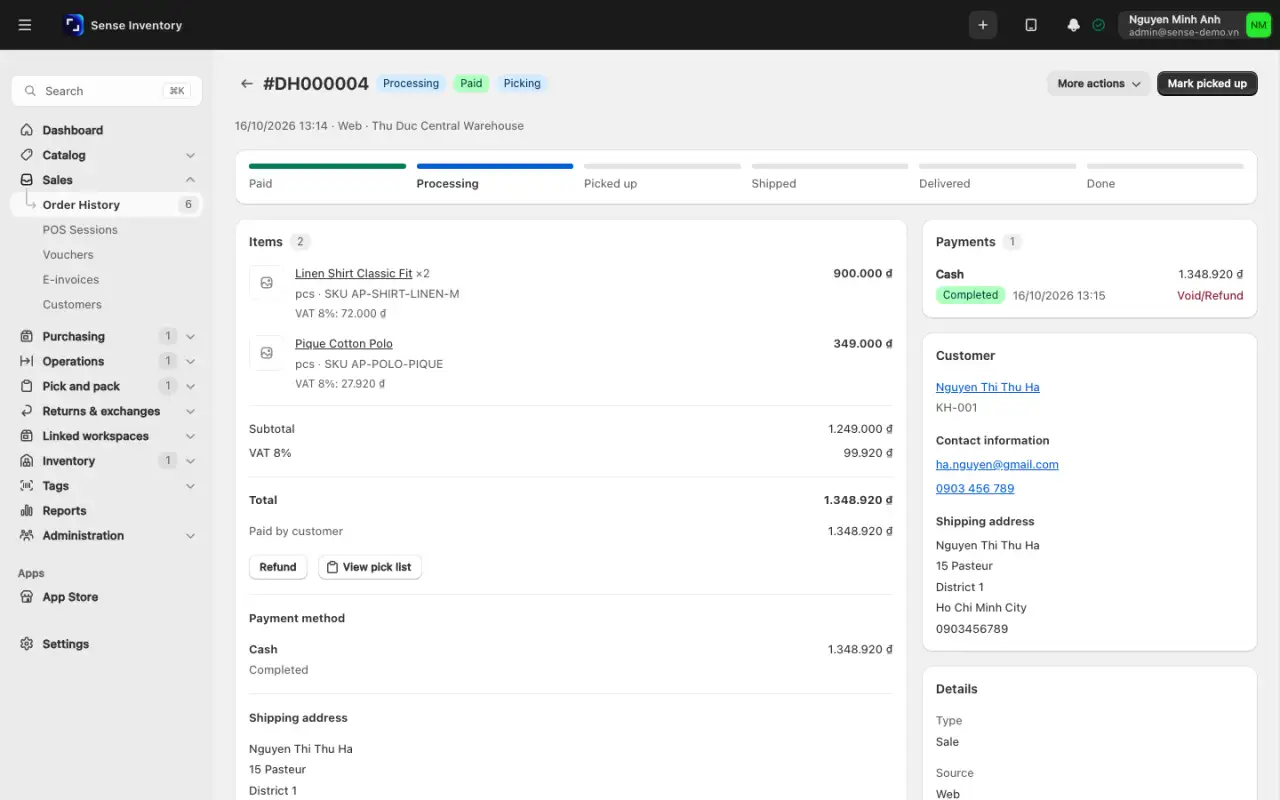
To cancel, use More actions → Cancel order and confirm. Cancelling releases reserved stock, gives back voucher use, and reverses loyalty points. It is refused once a goods issue note has been submitted: cancel the note first, or use a customer return.
Three behaviours surprise people:
- An unpaid Pending order that is not on credit is cancelled automatically after 10 minutes, with the reason "Timeout, no paid". Orders waiting for an online payment confirmation are skipped. Record a payment, use Mark as paid, or sell on credit.
- Stock is reserved at checkout by default, so it drops before the order is paid. Cancelling releases it.
- A total of 0 (for example a 100% voucher) goes straight to Paid.
Vouchers and loyalty
Create a voucher
Open Sales → Vouchers and click Create Voucher.
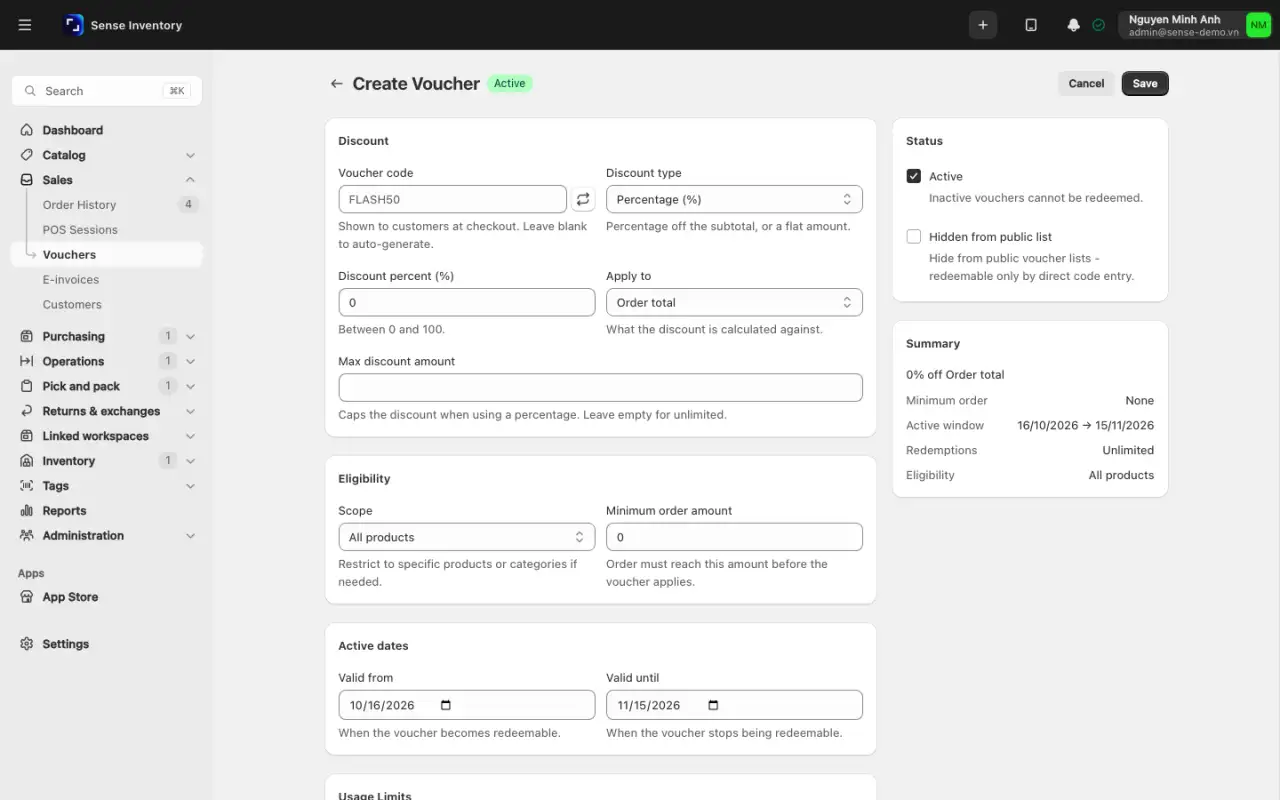
Under Discount, enter the Voucher code or leave it blank (or click Auto generate) for an 8-character code. Codes are saved in capitals and match in any case. Choose the Discount type (Percentage (%) or Fixed amount), the value, Apply to, and optionally Max discount amount.
Under Eligibility, set Scope and Minimum order amount. Set Valid from and Valid until, and the Usage Limits.
Under Targeting, set Customer tiers, Payment methods, and New customers only. Under Budget & Protection, set Budget limit and Allow stacking. Under Status, keep Active on, and tick Hidden from public list to keep it off pick lists.
Check the Summary and click Save ("Voucher created").
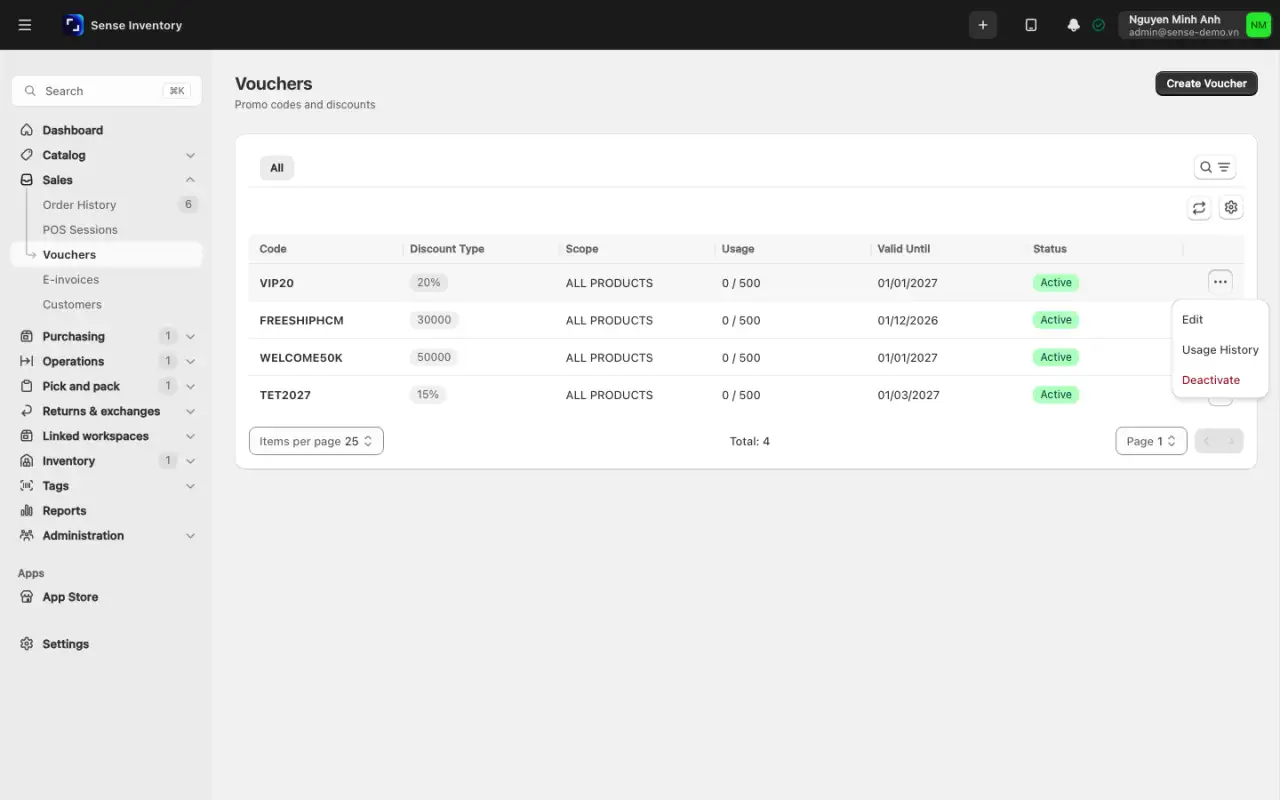
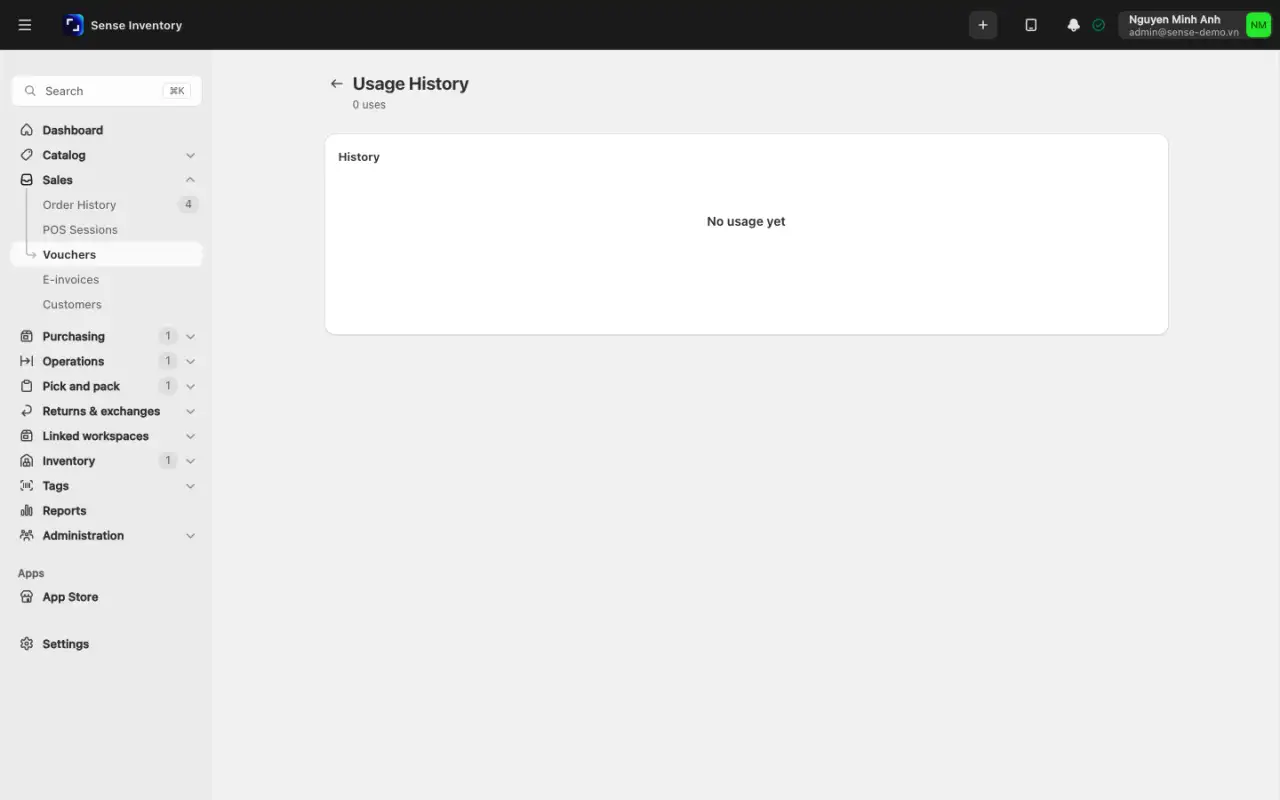
A voucher is never deleted. In the row menu, Deactivate switches it off, and Edit → Status → Active switches it back on. Usage History shows each use with the user, time, and discount. The code of a voucher that has been used cannot be changed.
Apply a voucher and redeem points at the register
Add items and select the customer. The customer is needed for per-user limits, tiers, rank, and points.
Under Voucher, enter the code and click Apply, or click Browse and apply one from "Available vouchers".
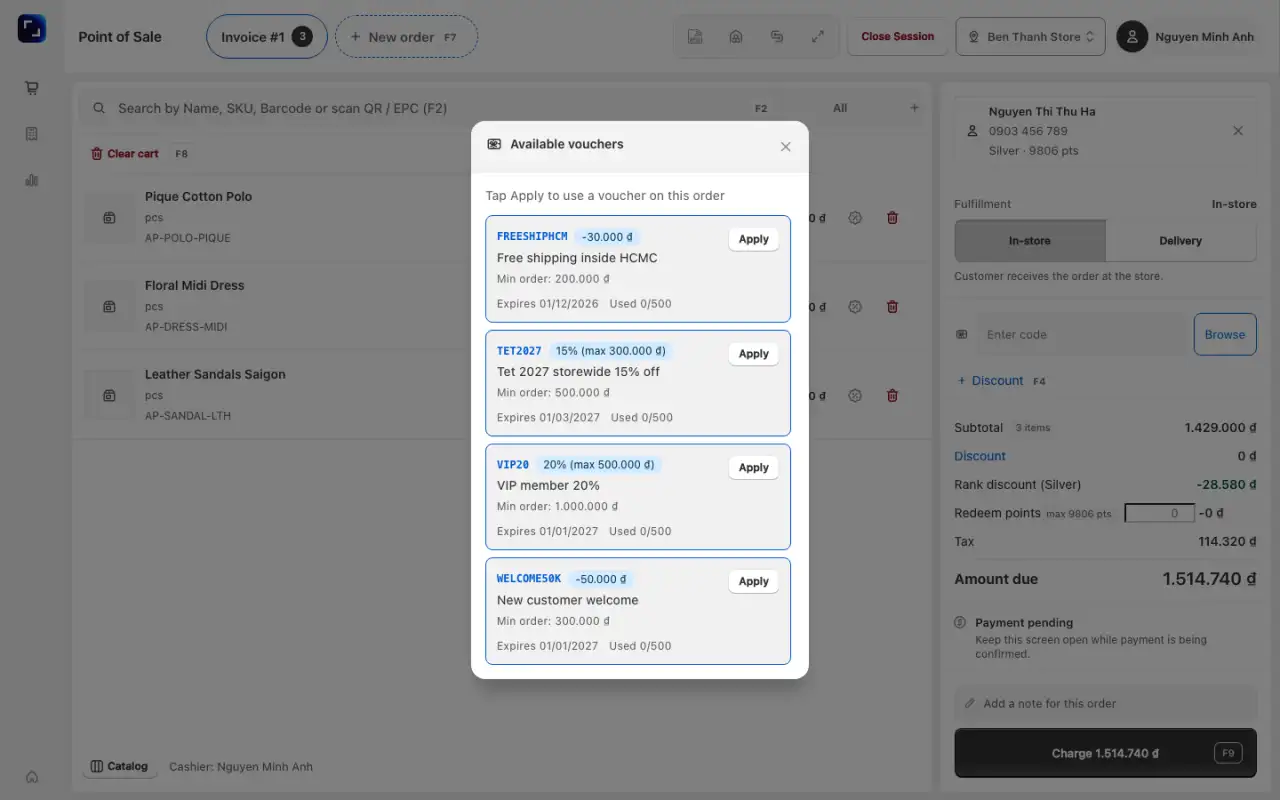
Under Redeem points, type the points to use. The register lowers the number to the maximum allowed. If the customer has a rank, totals show the rank discount, or "Rank discount not applied" when it does not stack.
Take payment. A refused voucher shows the reason, such as "Voucher has expired" or "This voucher's budget has been exhausted".
Vouchers, discounts, and points cannot be used while the register is offline. A voucher limited to certain payment methods is refused when the customer pays another way. Cancelling an order gives the voucher use back; a partial refund does not.
Set up loyalty
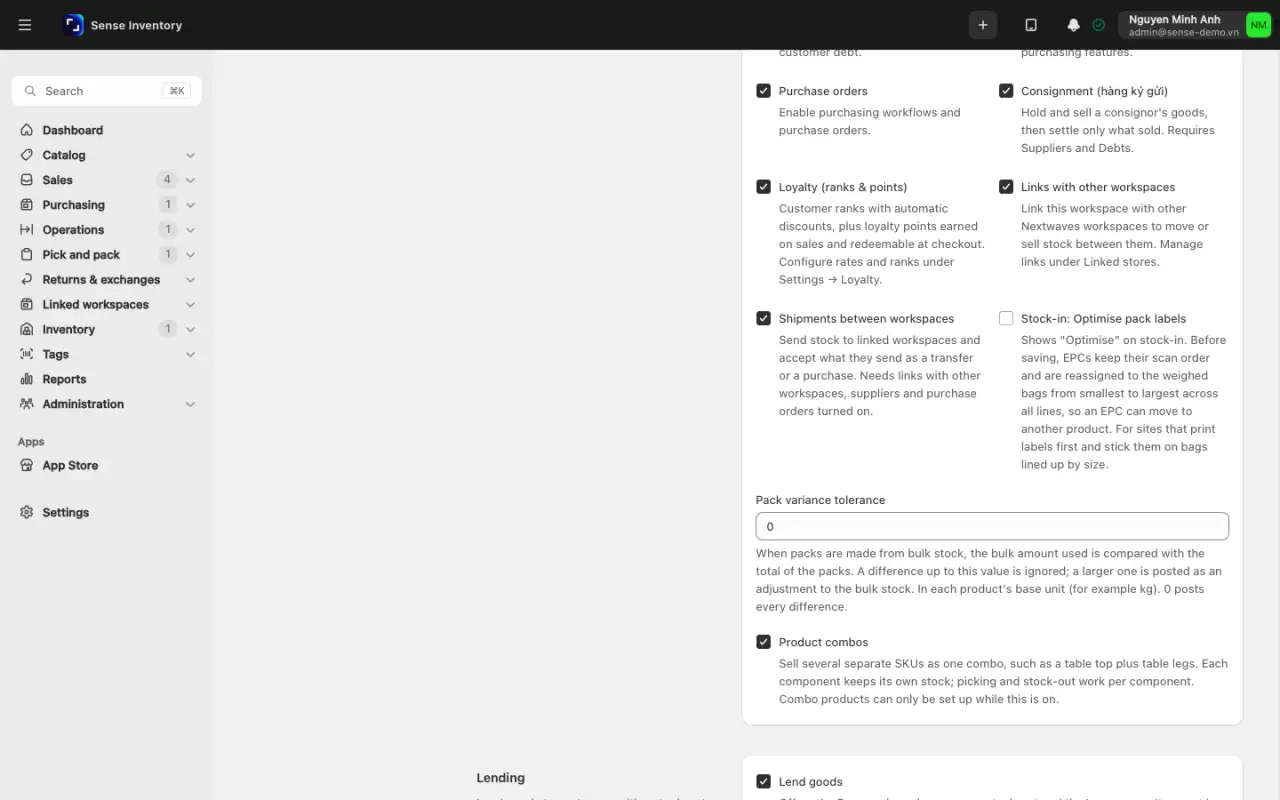
Open Settings → Features, tick Loyalty (ranks & points), and save.
Open Settings → Loyalty.
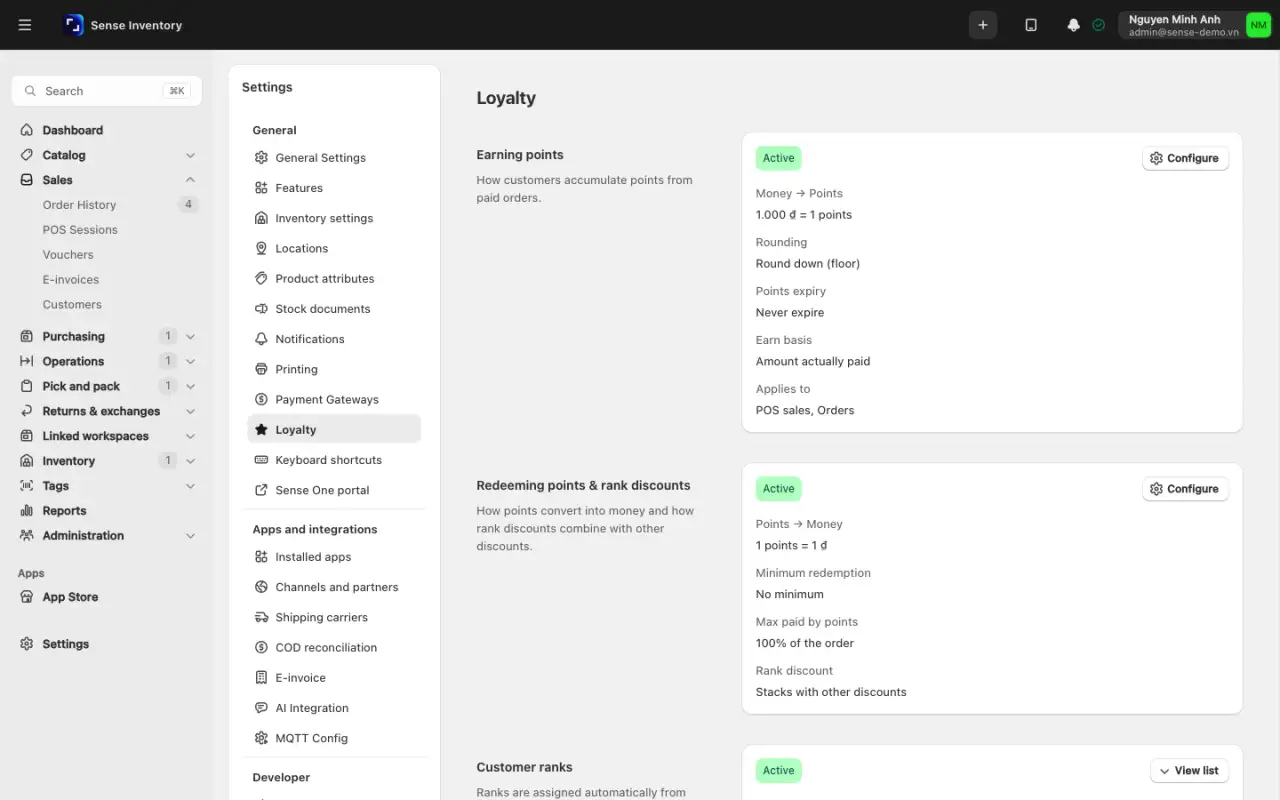
Under Earning points, click Configure and set Spend amount (Money → Points), = Points earned, rounding, expiry months, Earn on the amount actually paid, and where points apply (POS sales, Orders). Click Save.
Under Redeeming points & rank discounts, set the money value of a point, Minimum points per redemption, Max % of order payable by points, and Rank discount stacks with other discounts.
Under Customer ranks, click Add rank, enter the name, Lifetime spend threshold, Discount %, and Points multiplier, and save. A customer gets the active rank with the highest threshold at or below their lifetime spend.
Points expire oldest first, once a day, when Points expire after (months) is above 0. Cancelling an order reverses points fully, and a refund reverses them in proportion.
Adjust a customer's points
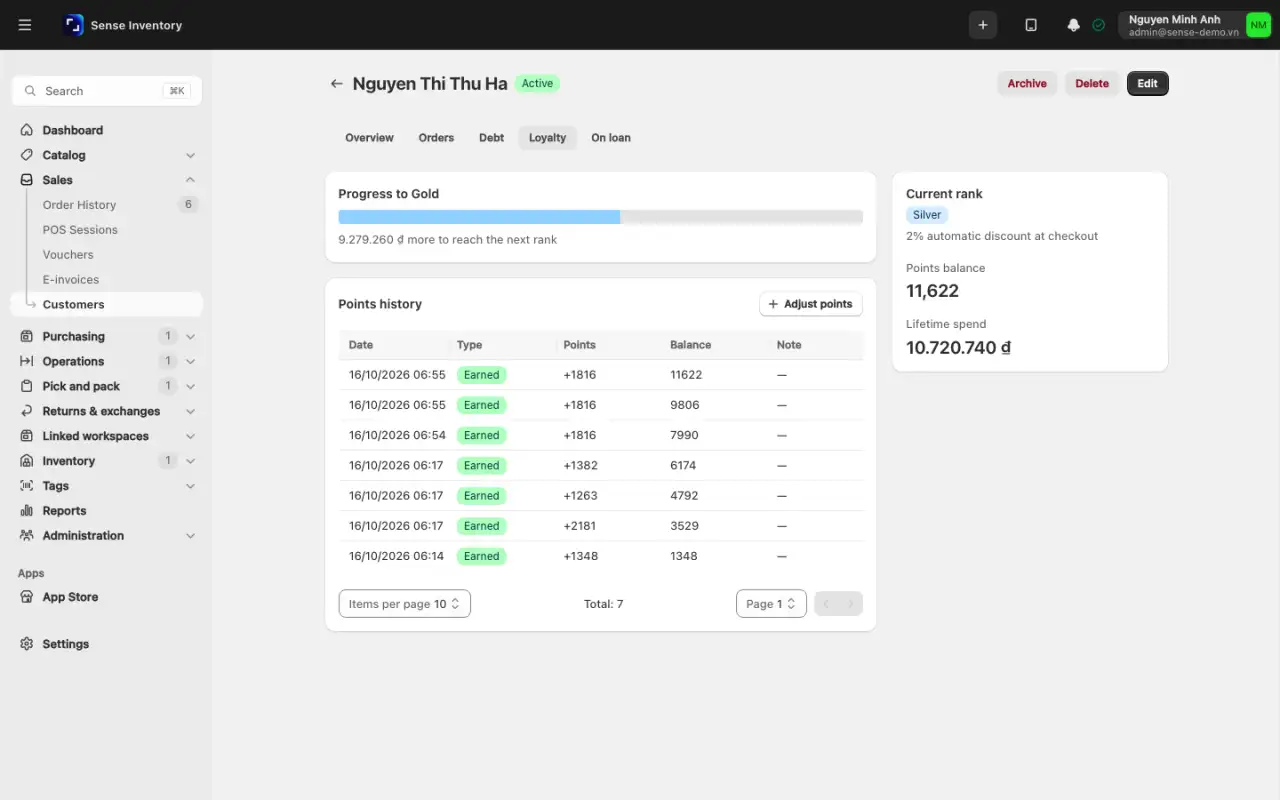
Open Sales → Customers, open the customer, and go to the Loyalty tab (current rank, points balance, lifetime spend, history). Click Adjust points, enter Points (+/-) and an optional note, and save ("Points adjusted"). Zero and fractions are refused.
Returns, exchanges, and refunds
Goods and money are handled as two separate, linked steps. Receiving and inspecting never change stock; only Complete posts stock. A refund is its own action, except in an exchange, where it is part of Complete. There are three kinds of return document, each with its own sidebar entry and number:
| Type | Number | Starts from |
|---|---|---|
| Customer return | TH000001 | A sale that is Done, Delivered, or Picked up |
| Carrier return | HH000001 | A shipment that is Returning, Returned, or Delivery failed |
| Exchange | DOI000001 | The same sales as a customer return, plus replacement products |
A return moves through Draft, Received, Inspected, and Completed. It can be cancelled at any step before Completed. Orders from a sales channel cannot be returned or exchanged here, and the buttons are hidden: the channel handles them.
Take back goods from a customer
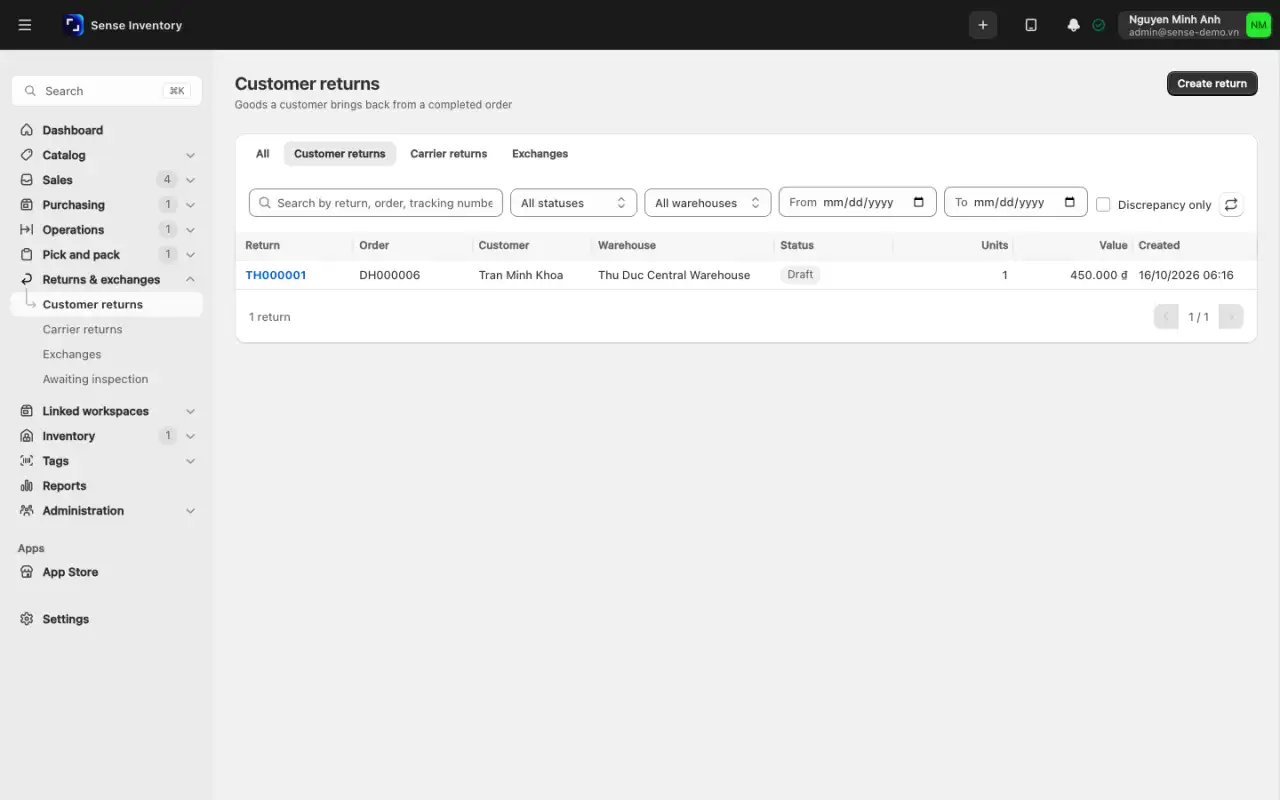
Open the order, choose Create return from its actions, or open Returns & exchanges → Customer returns and click Create return.
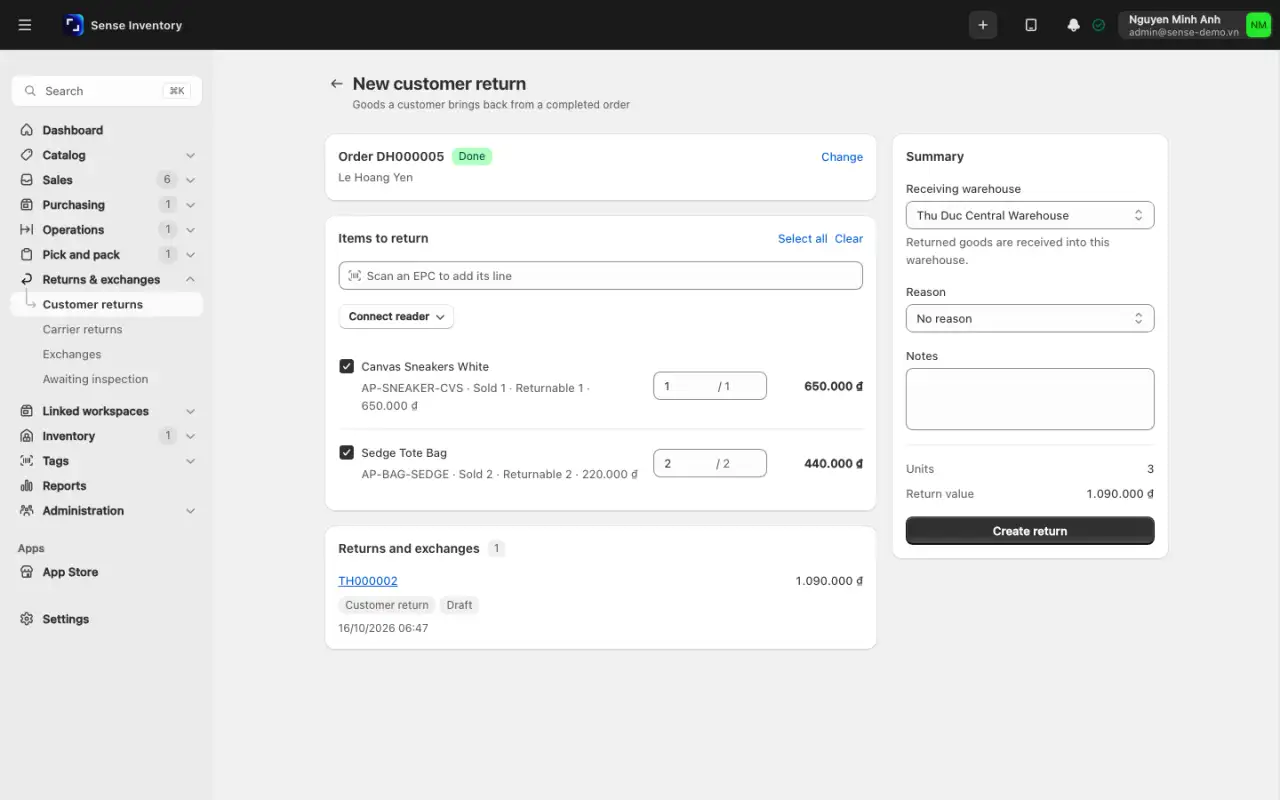
Under Find the order, scan a tag (Scan EPC → Find) or search the Order number and click Select.
Under Items to return, tick the lines and set Quantity, or scan tags into Scan EPC to add. Choose the Receiving warehouse and a Reason (Changed mind, Wrong size, Wrong item, Defective, Damaged, Other), then click Create return.
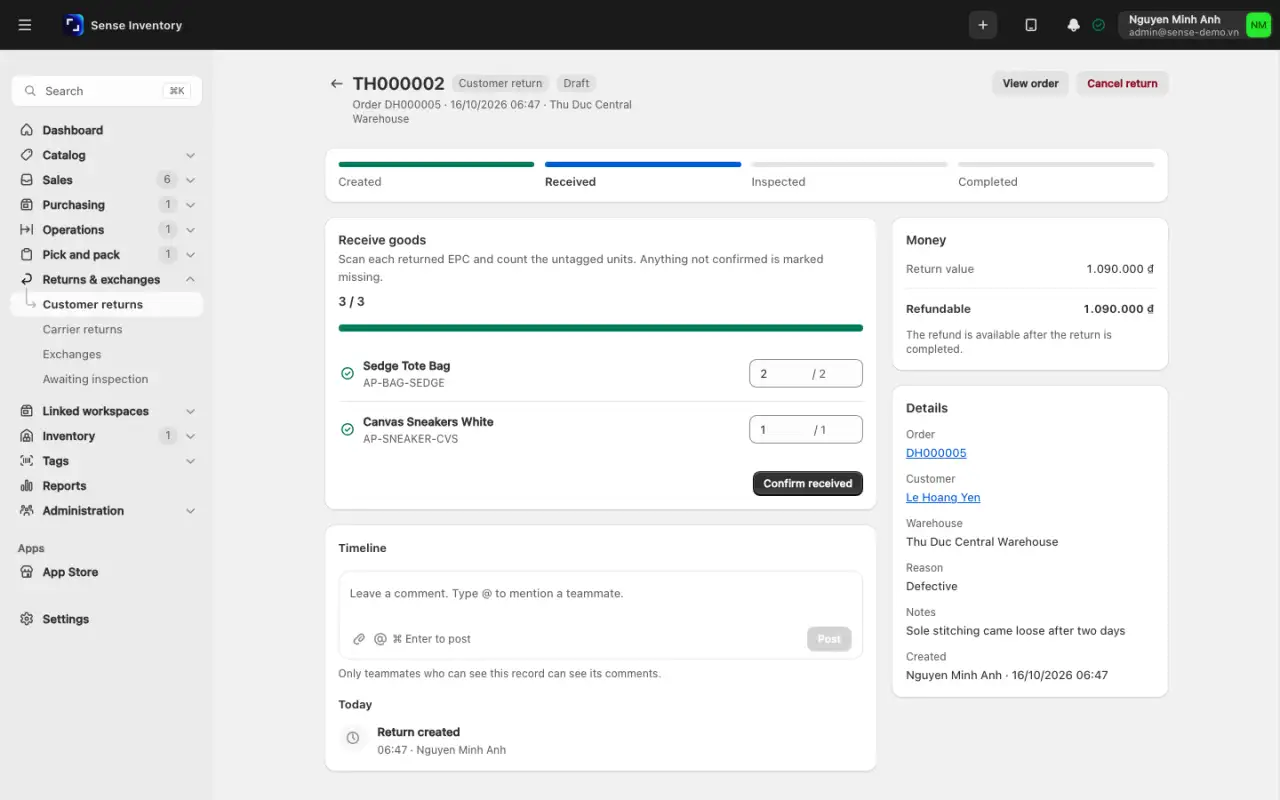
On the return, in Receive goods, scan each tag or count untagged units, then click Confirm received. A tagged line that was not scanned becomes Missing.
In Inspection, choose a Condition (Good, Opened, Damaged, Defective) and an Action for each line, or click Mark the rest as good, then Save inspection. The actions are Restock (back into sellable stock), Quarantine (stays in the returns area, not sellable), Scrap (the tag is retired), and Return to supplier (held, not sellable).
Click Complete and confirm. Only Restock lines add stock back, to the receiving warehouse unless a line picks Restock into another.
In the Money card, click Refund. Tick Also refund missing items only when neither the customer nor the carrier is responsible, enter a Refund reason, click Refund {amount}, and choose the payment method. A return can be refunded only once, and the refund never restocks again.
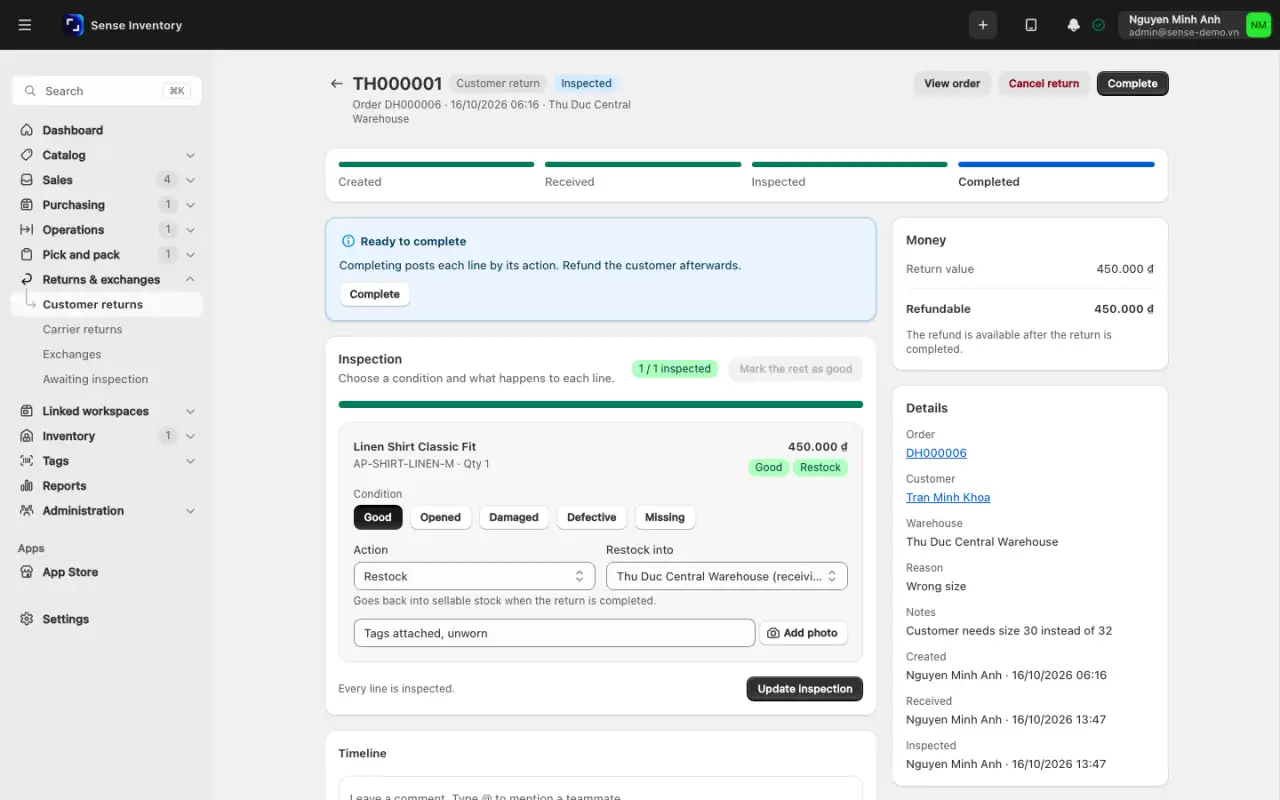
Stock not going up after Receive is expected: nothing posts until Complete.
Receive a parcel the carrier sent back
- On the order, the shipment panel shows "Parcel coming back". Click Receive returned parcel, or open Returns & exchanges → Carrier returns and click Create carrier return.
- Scan the Tracking or shipment number and click Find. Leave the lines empty to take the whole parcel. Choose a reason (Delivery failed, Customer refused, Wrong address, Damaged in transit, Other) and click Create carrier return.
- In Receive goods, scan everything in the parcel. Anything not scanned is marked Missing, ready for a carrier claim. Confirm, inspect, then Complete.
- Completing a carrier return cancels the order, and you are warned first. If the order only had reserved stock (it never shipped), the reservation is released and Restock lines post nothing. If the customer had paid in advance, click Refund in the Money card. An unpaid COD order cannot be refunded.
Exchange a product
On the order, click Exchange, or open Returns & exchanges → Exchanges and click Create exchange.
Pick the returned lines, then under Replacement products click Add products and set Quantity and Unit price. The summary shows the returned value (credit), the replacement total, and the difference ("Customer pays", "Refund to customer", or "No difference").
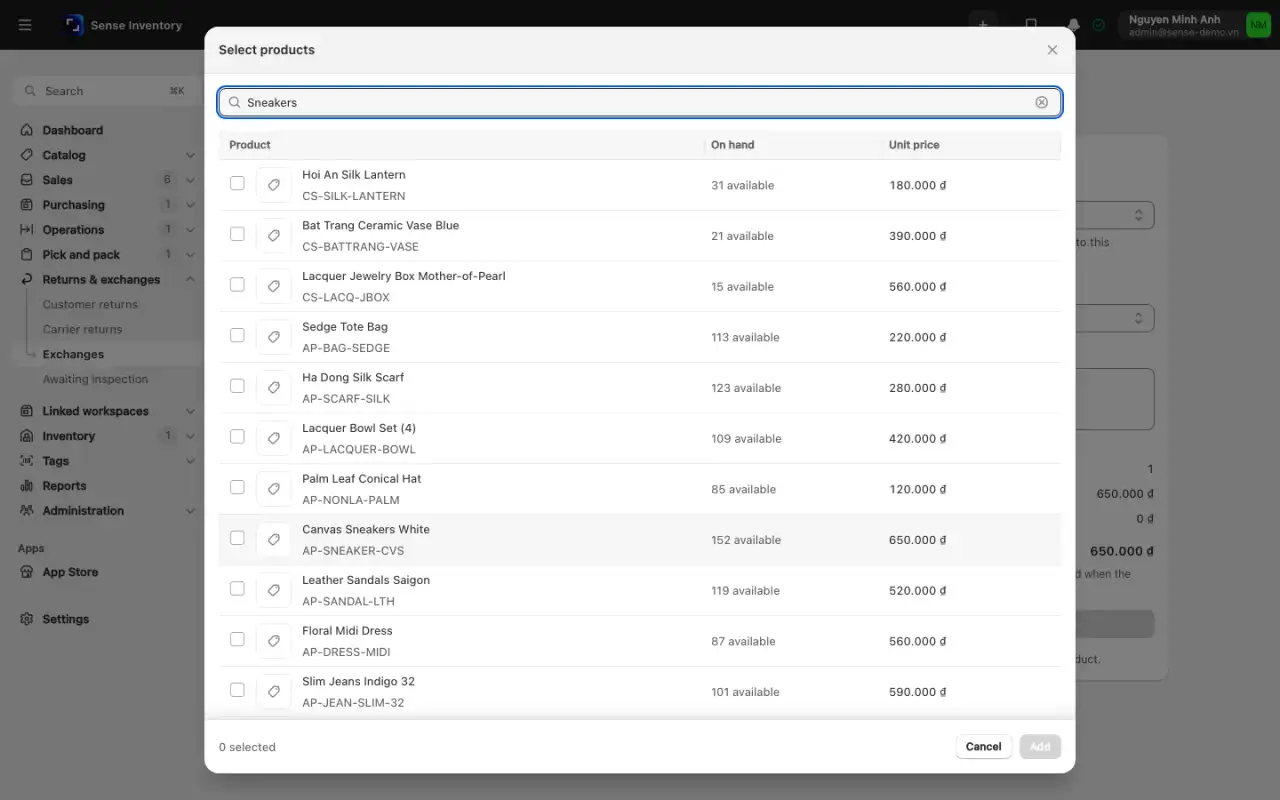
Click Create exchange, then receive and inspect it as above.
Click Complete. Keep Collect {amount} from the customer or Refund {amount} to the customer ticked to settle the difference, or untick it to waive it (the store keeps the excess, or gives the shortfall as a discount). Settling opens the payment dialog with Cash, Card, QR/Transfer, and E-Wallet.
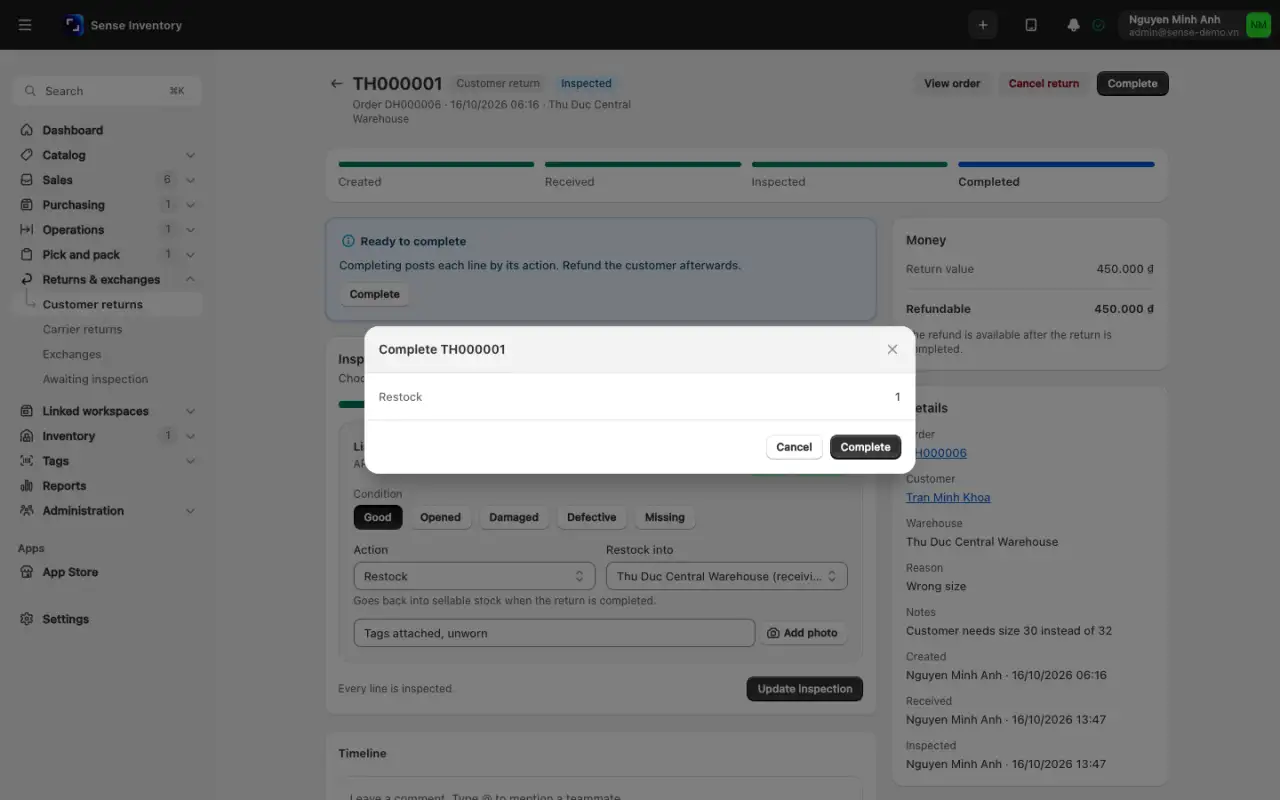
The Money card links to the Replacement order, which is a normal sale created and completed for you. The returned goods become exchange credit that pays for it.
Refund an order without a return document
Open a Paid, Processing, or Done sale and click Refund. On a Processing order the button appears only while there is a draft or open pick list to cancel. For Delivered or Picked up orders, create a customer return instead.
Select items and quantities (Select all). Choose the Return lot when asked, keep Restock items on to return the stock, enter a Reason, and click Refund. A refund slip prints, and loyalty points are reversed.
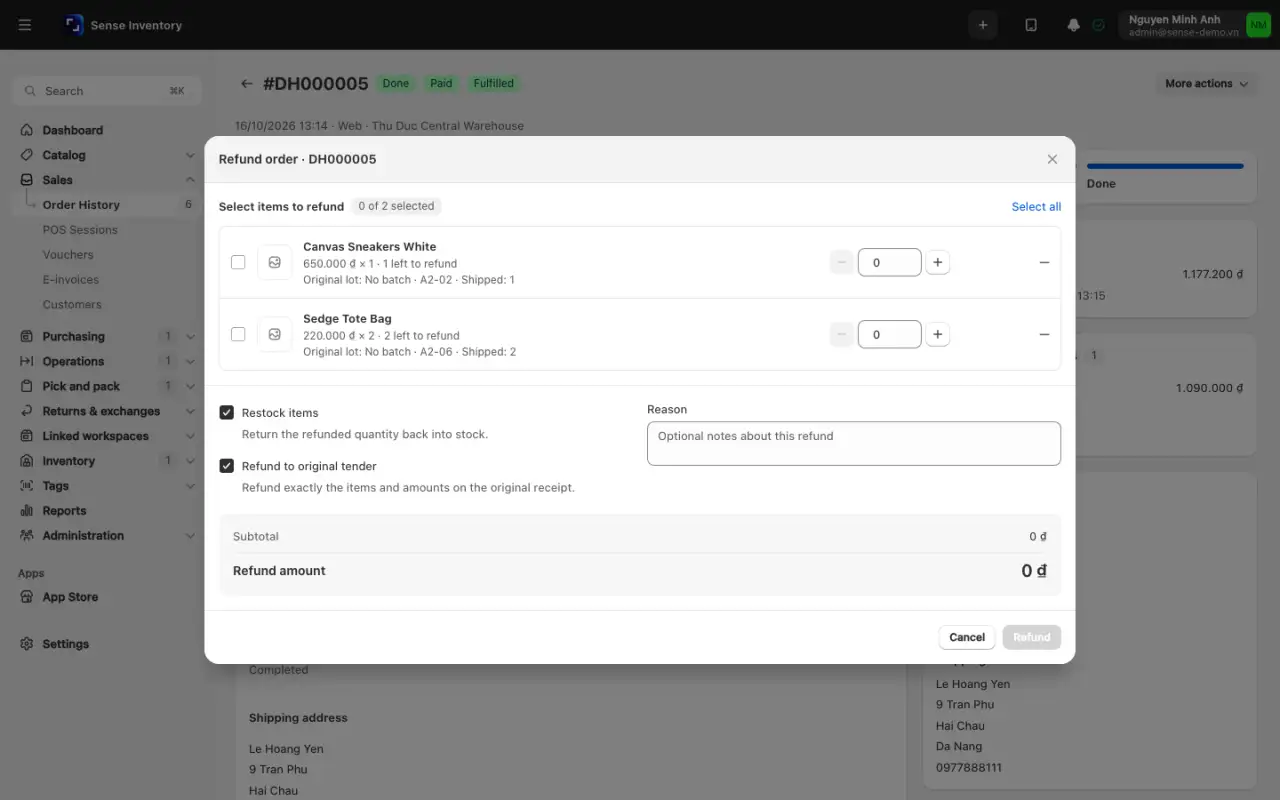
Refund to original tender is on by default. It records the items, totals, reason, restock, payment status, and loyalty reversal, but no money-back payment line and no gateway refund. Untick it and choose a method when you need the refund recorded against a payment method.
By default, a cashier can create returns and exchanges and receive goods, but cannot inspect, complete, cancel, or refund. Managers and warehouse staff finish the return, and only managers and admins refund, see Users and security.
Cancel a return
On the return, click Cancel return, enter a Reason, and click Cancel return again (Keep return backs out). Received tags go back to their previous status, and nothing was posted to stock. A completed return cannot be cancelled.
E-invoices
Vietnamese rules require sales to be invoiced electronically through a licensed partner, dated on the day of sale. Sense creates the invoice for you and flags any that need a person. An invoice problem never stops the sale, refund, or receipt. Sales from channels such as Haravan or Sapo are not invoiced here, because those channels issue their own.
Connect MISA meInvoice and start issuing
Open Settings → Apps and integrations → Channels and partners, tab E-invoice. On MISA meInvoice, click Enable. Only one partner issues invoices at a time.
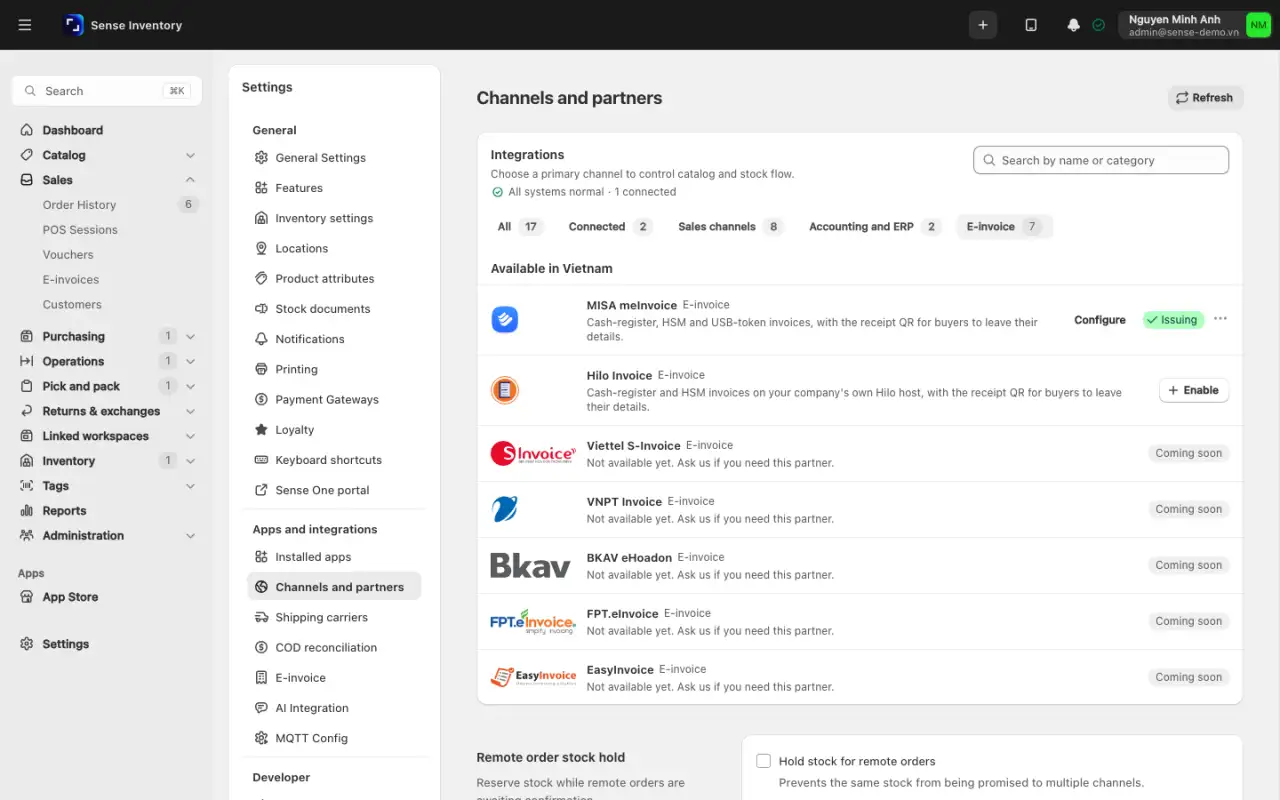
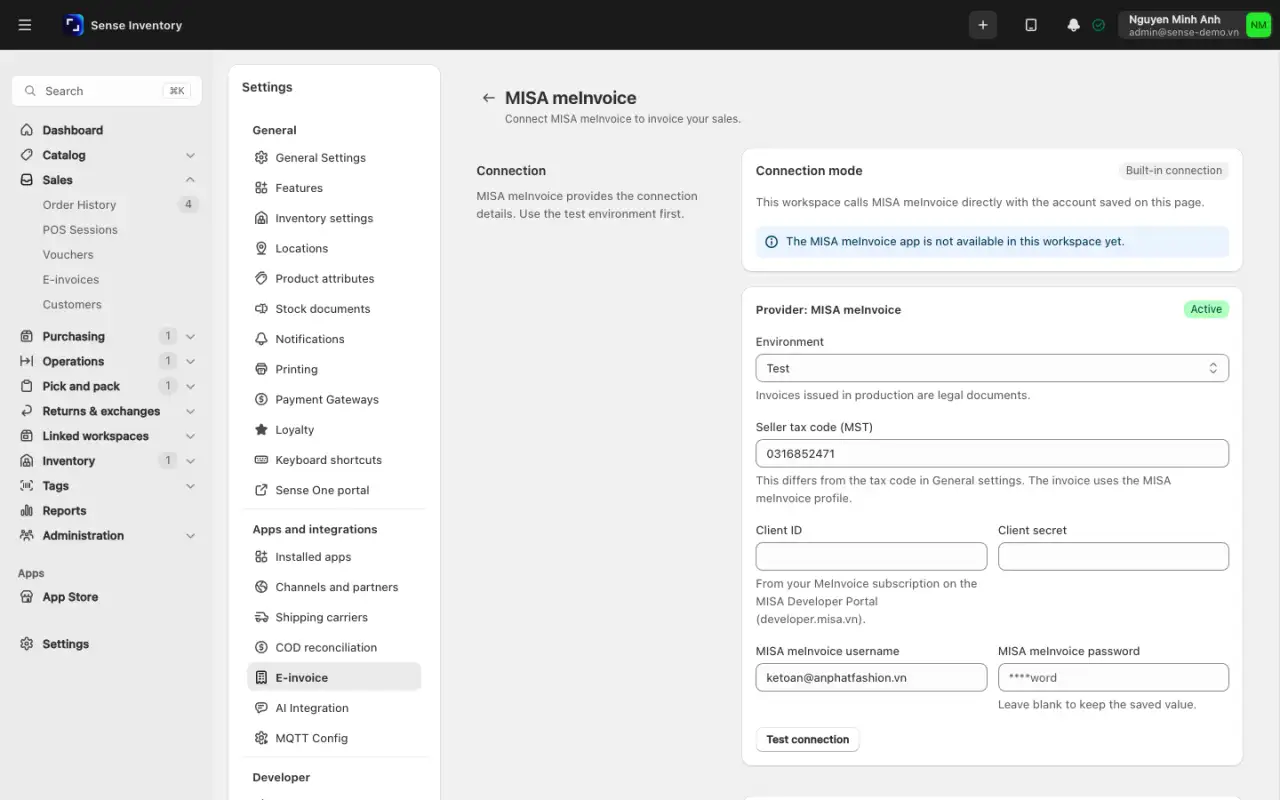
On the connection page, set Environment to Test, enter the Seller tax code (MST) and credentials, and click Test connection.
Choose How invoices are signed (cash-register invoice, digital signature, USB token at the store, or draft only) and a Series. A cash-register series needs
Mas its fourth character.Turn on Issue e-invoices for new sales and click Save. A Still needed list shows anything missing.
Open Settings → E-invoice, choose Automatic issuing (right after payment, after a delay of 3 hours by default, at a time of day such as 23:00, or manually), and save.
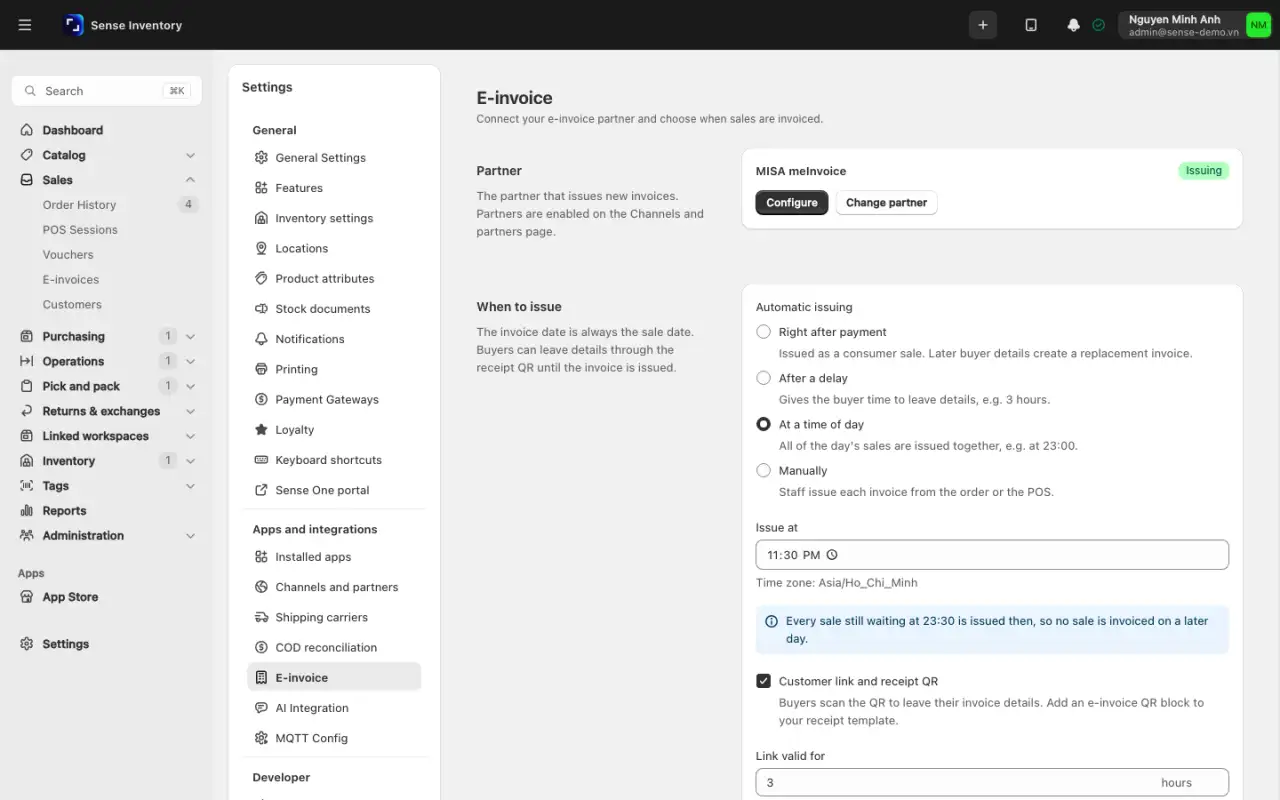
The invoice date is always the sale day. Everything waiting is published by 23:30. An original never goes out on a later day unless a manager approves a late issue, and then it carries today's date.
Issue an invoice in a company's name
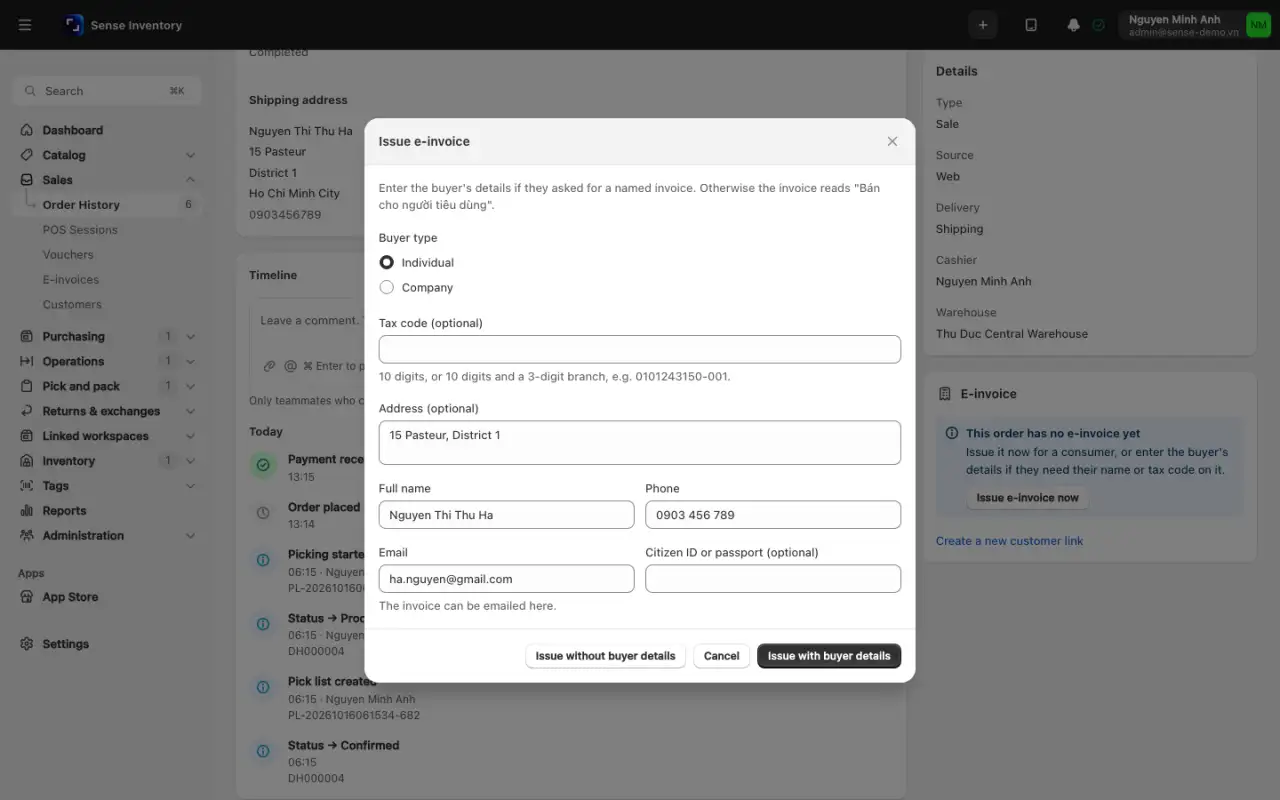
Open the order. In the E-invoice card, click Issue e-invoice now.
Choose Company, type the Tax code (MST) (use the look-up result with Use this information), the Company name as registered, and the Address, then click Issue with buyer details. For a consumer sale, click Issue without buyer details.
Let the customer leave details by QR
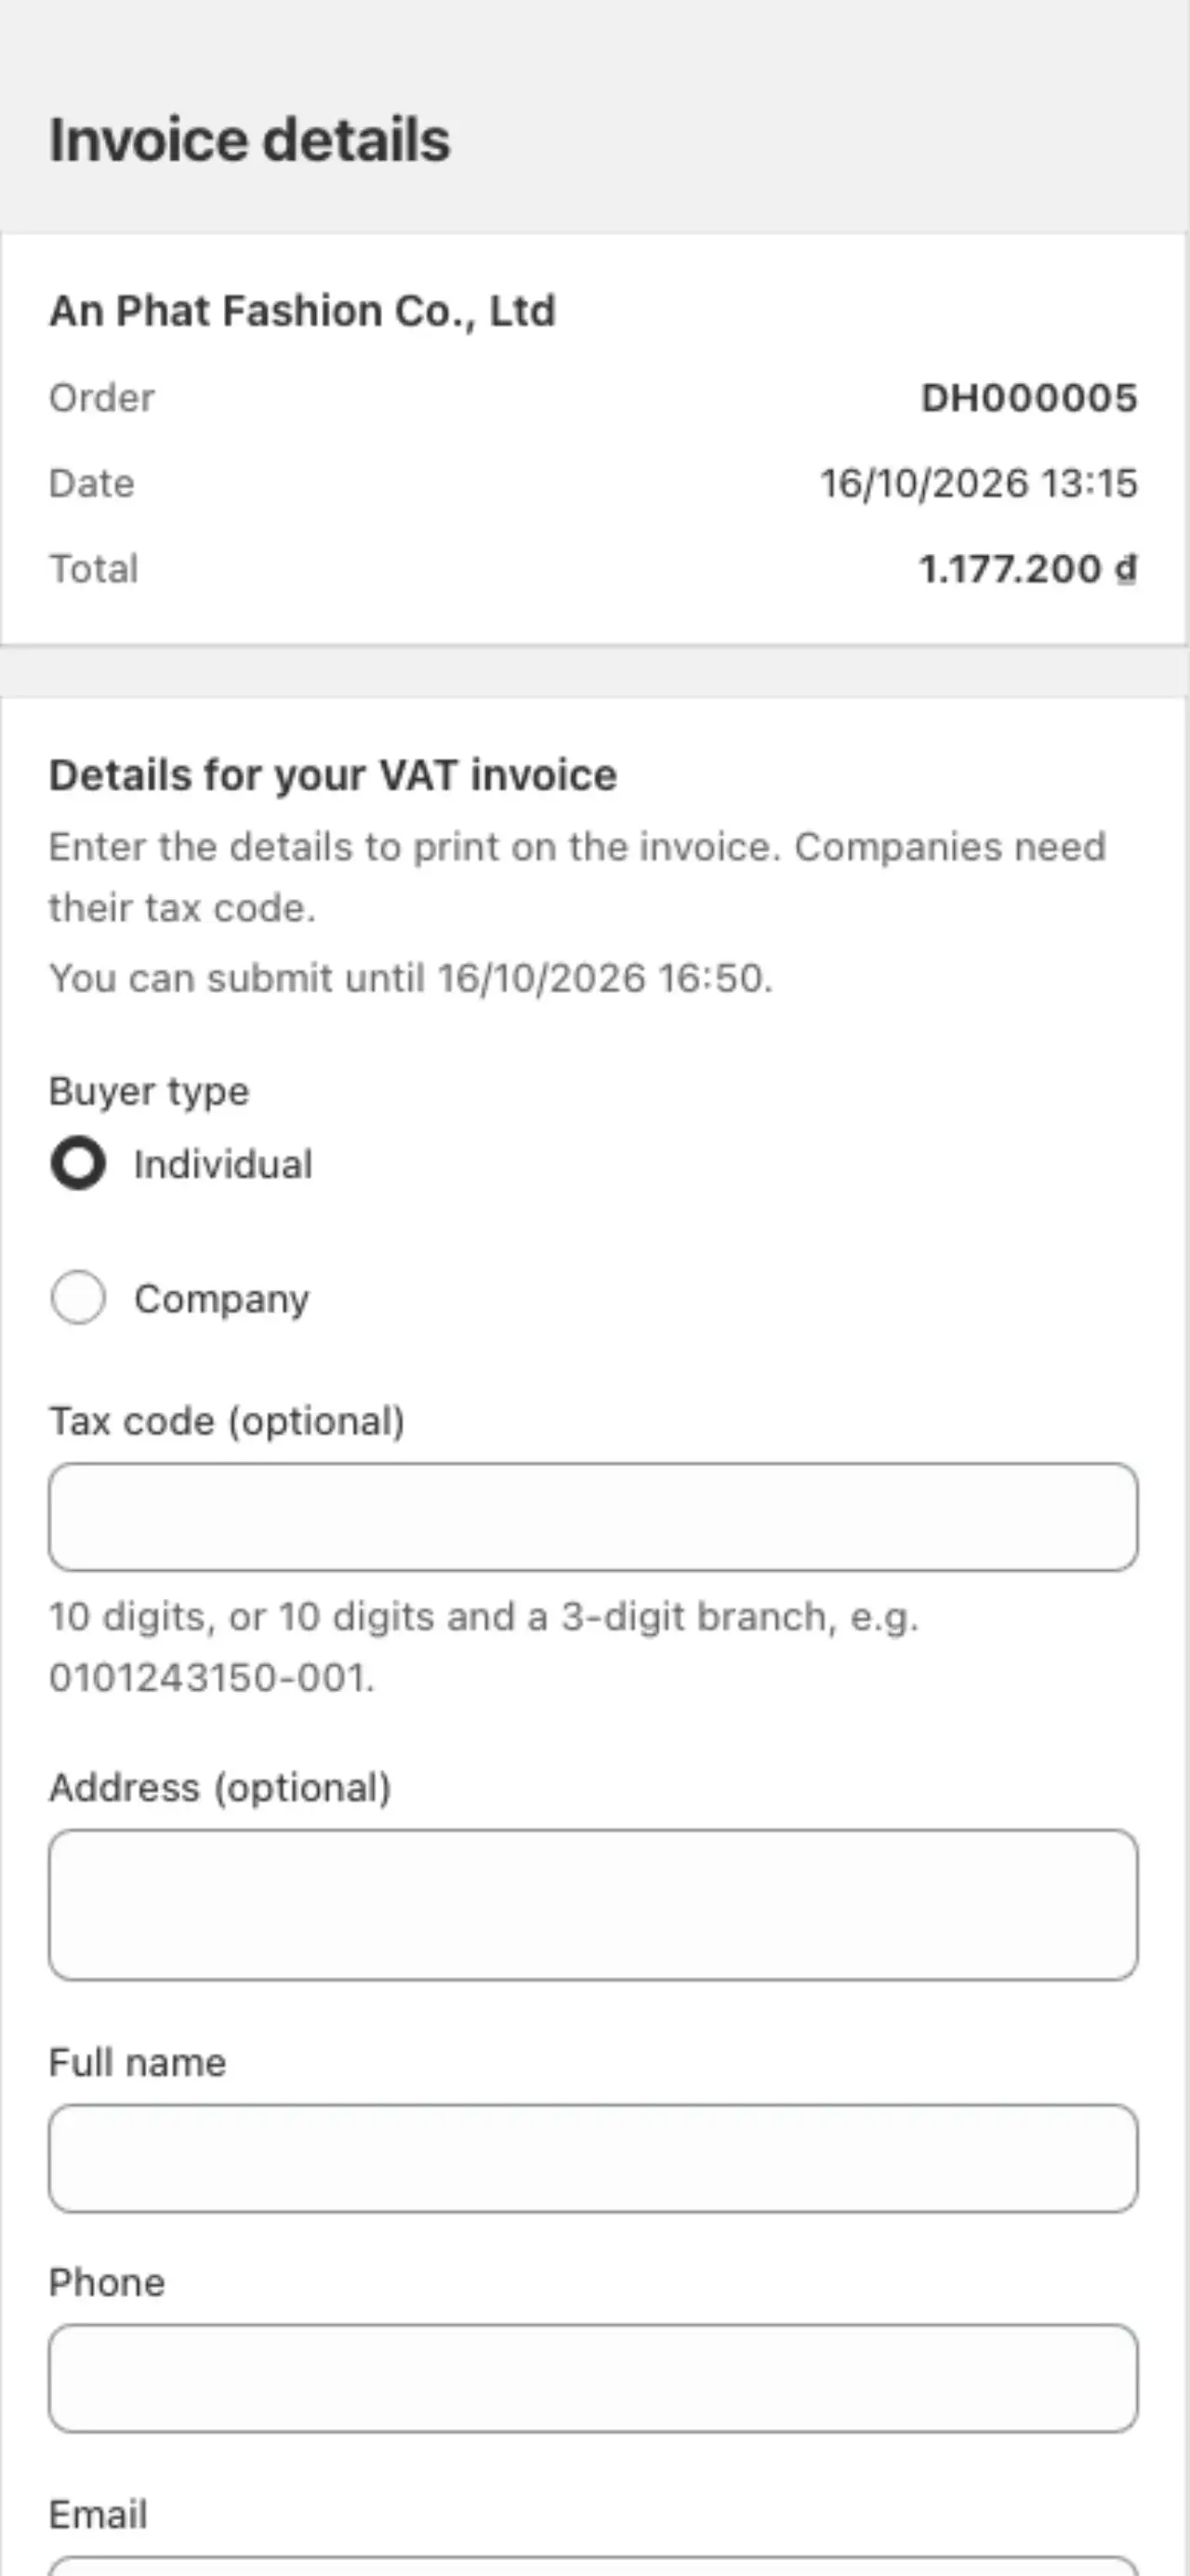
The payment-success screen at the register shows an E-invoice block with a QR code, and a button for the cashier to type the details instead. To print the QR, add the block "E-invoice: customer details link" to the receipt template under Settings → Printing.
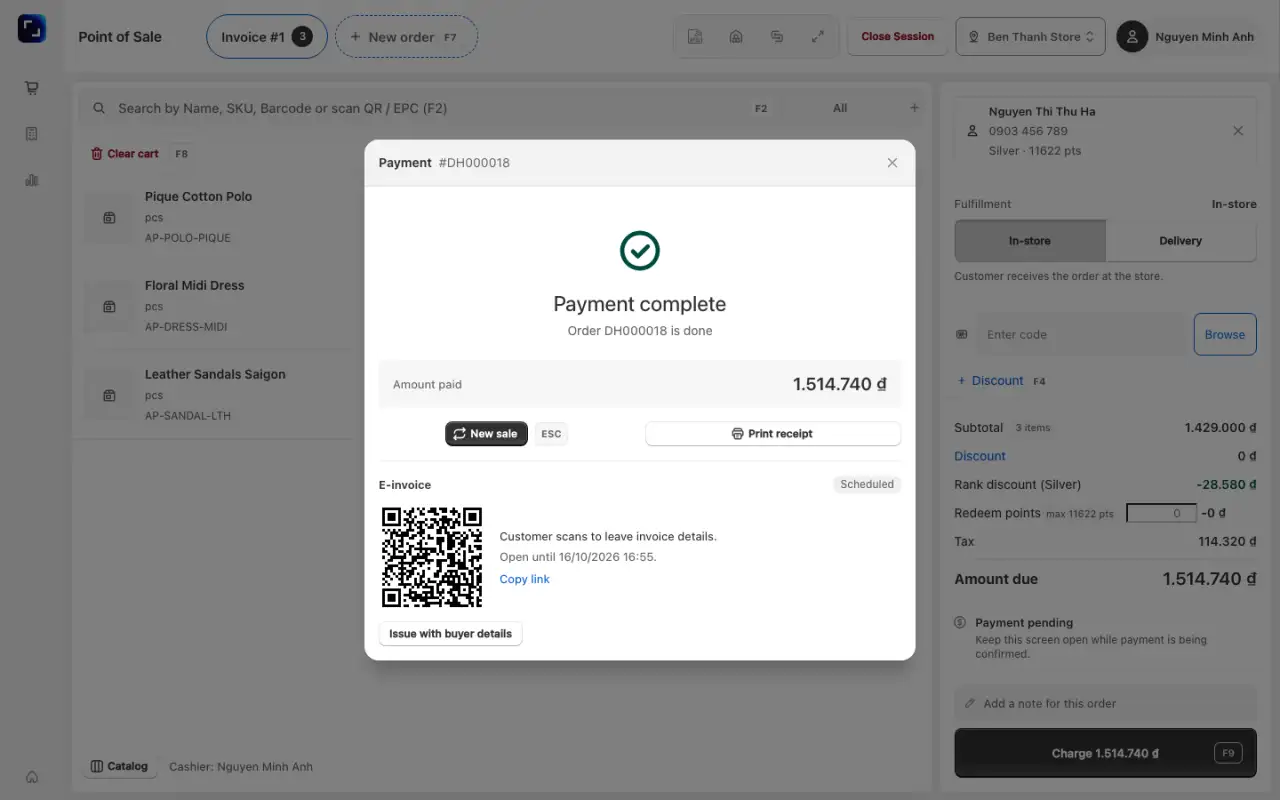
The customer scans it and sends their details on a page that needs no sign-in. The link stays open for the configured time, but never past 23:30 on the sale day. If the invoice was already issued as a consumer sale in the same month, the buyer can ask for a replacement.
Handle the Needs attention queue
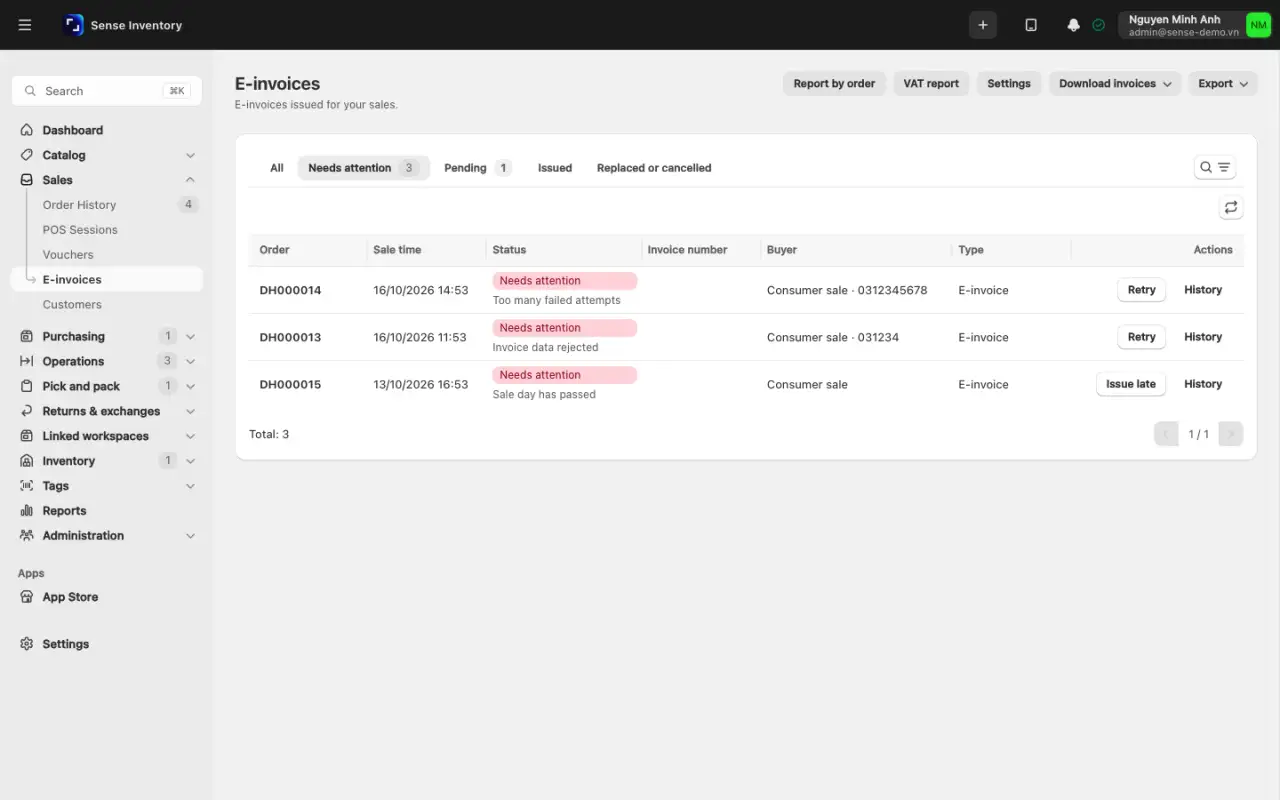
Open Sales → E-invoices and the Needs attention tab, or open the "E-invoice needs attention" notification.
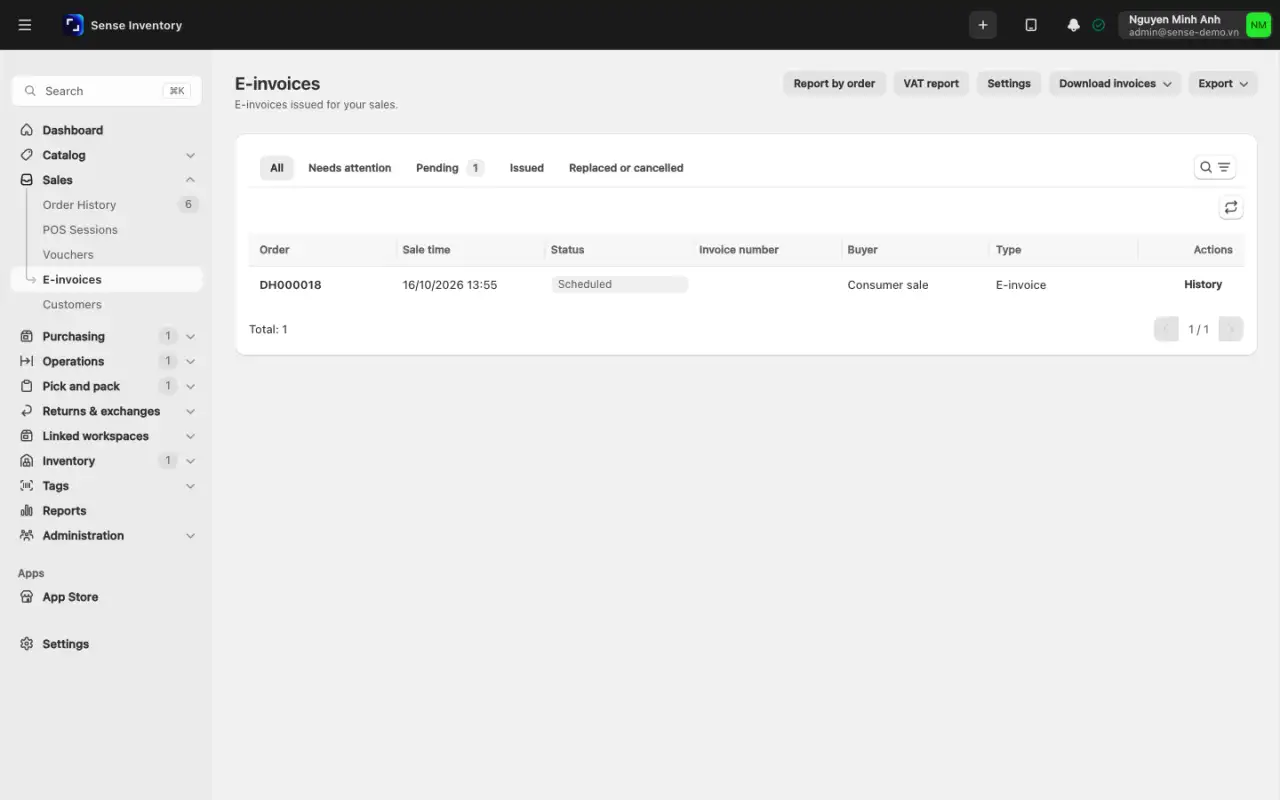
Act on each row:
- Invoice data rejected, too many failed attempts, or partner refused: fix the data, then Retry.
- Refunded after issue: open the order and click Issue adjustment for each refund.
- Sale day has passed: a manager clicks Issue late. Other users click Request approval, which notifies managers.
- Order cancelled after issue, or tax authority refused: Issue replacement or Cancel invoice, after agreeing it with the accountant.
- Awaiting signature (USB token): Sign and publish. The store PC, the token, and the payment agent (0.5.0 or later) must all be on.
A refund before the invoice is issued needs nothing: a partial refund is built from the remaining quantities, and a full refund cancels the pending invoice. Fix mistakes on a cash-register invoice with a replacement. Adjustments are only for returns.
Export for the accountant
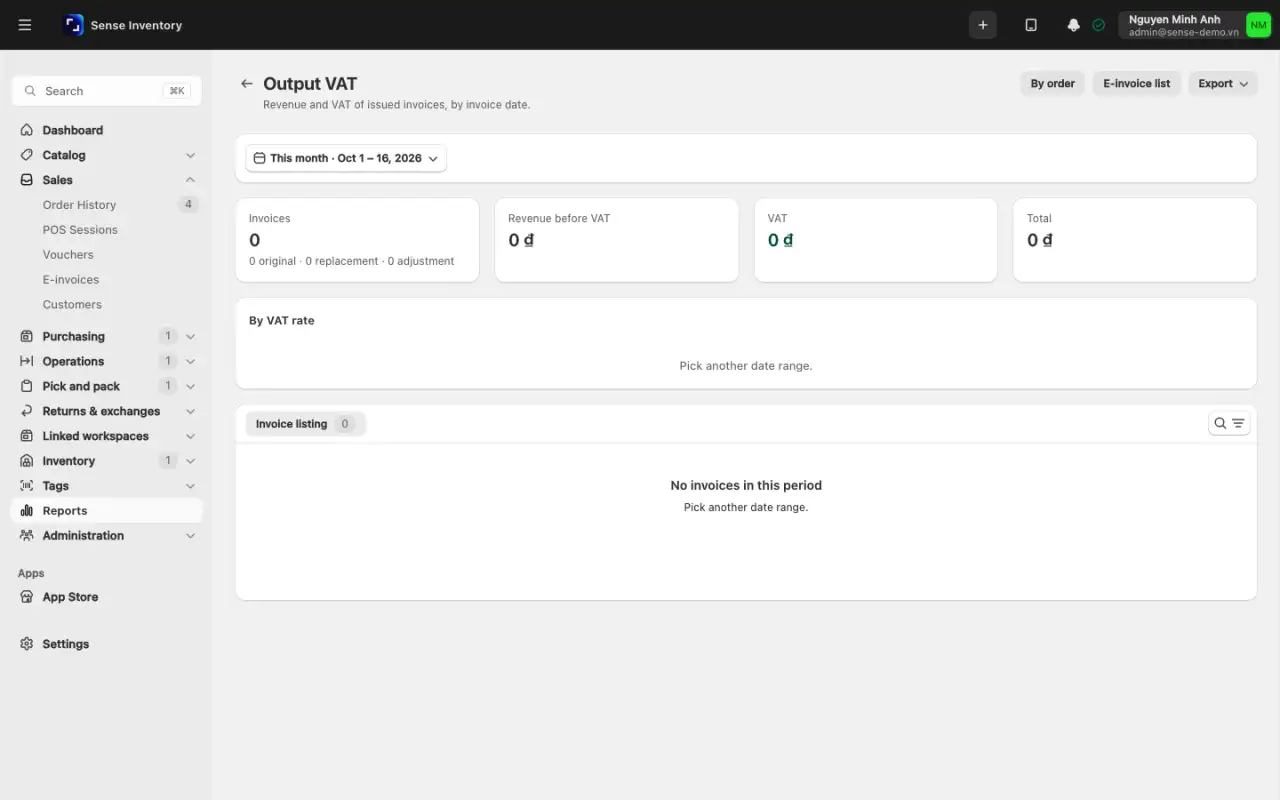
On Sales → E-invoices, click Export for Excel, CSV, or the MISA SME sales vouchers file, or Download invoices for a ZIP of PDFs or XML (up to 1,000 invoices). The VAT report is in Reports, see Review reports.
Kiosk: self-service checkout
A kiosk lets a customer put a basket on an RFID reader, see every item appear, and pay without a cashier. It shares the catalog, prices, tax, and stock with the POS. Between customers it shows advertisements.
Register a kiosk
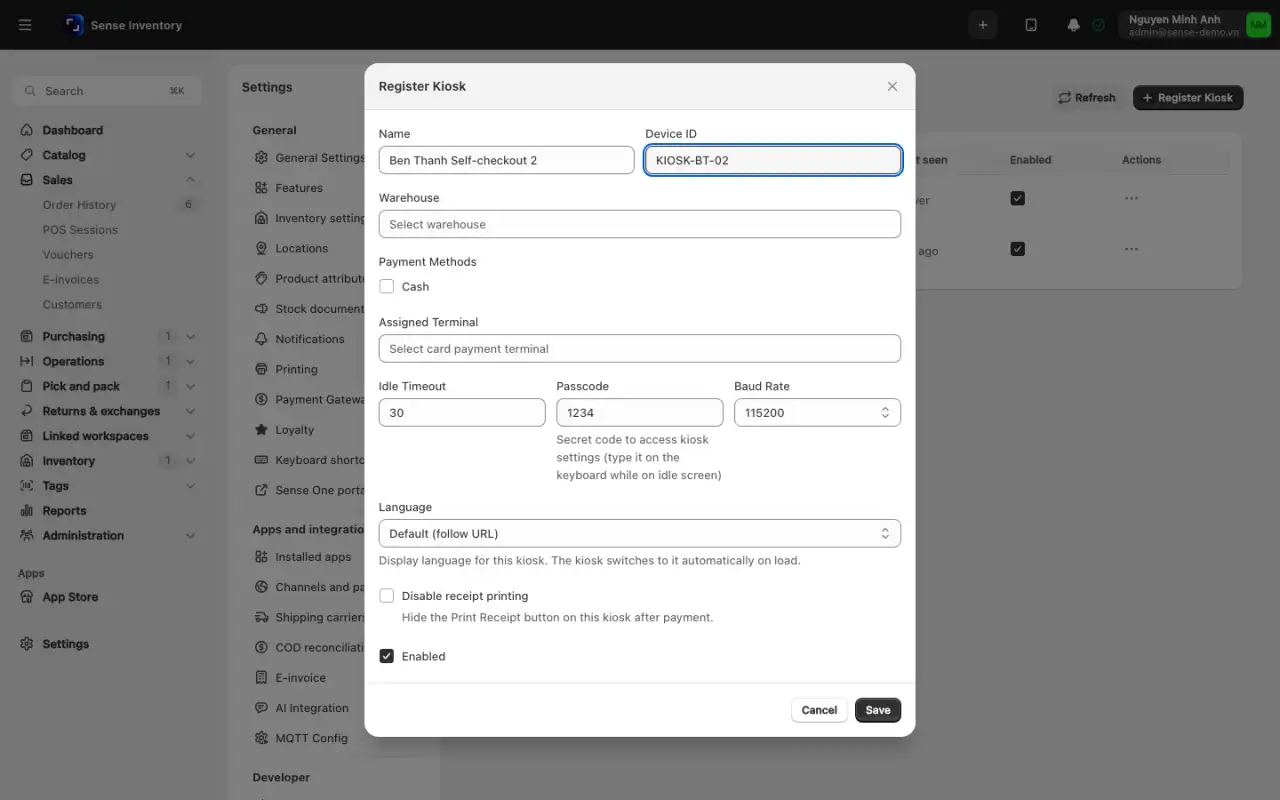
Open Settings → Kiosk → Devices and click Register Kiosk.
Fill in Name, Device ID (unique, for example STORE1-K1), and Warehouse. Only warehouses that allow kiosks are listed. Optionally set Payment Methods, Idle Timeout, Assigned Terminal, Passcode, Baud Rate, Language, and Disable receipt printing. Click Save ("Kiosk registered").
Set up the kiosk PC
On the kiosk PC, open the kiosk address from Settings → Kiosk → Settings (Open Kiosk), adding the Device ID. Sign in with the kiosk account. The built-in kiosk role has everything it needs.
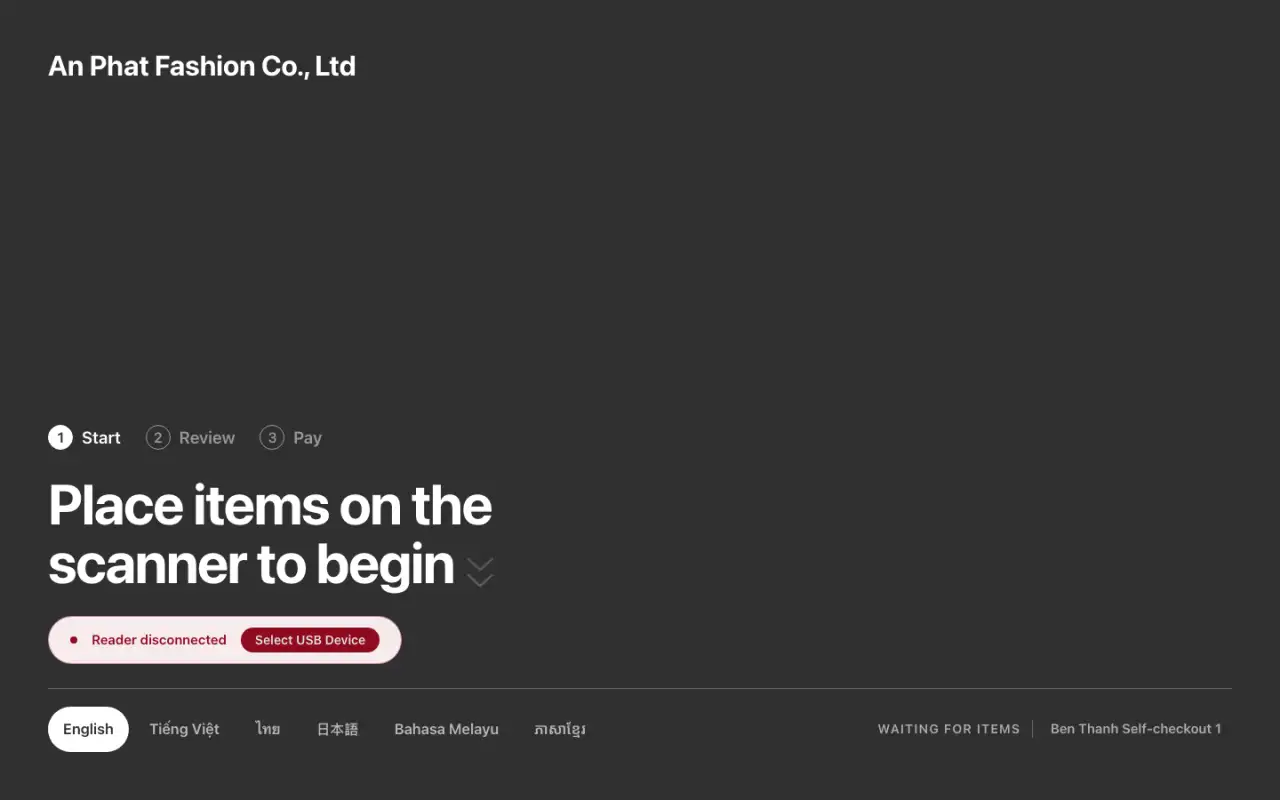
Plug in the RFID reader. If it does not connect, open the hidden operator settings (type the passcode, 1234 by default, or tap the top-left corner 10 times) and click Reconnect reader. Turn on Fullscreen and Lockdown mode there.
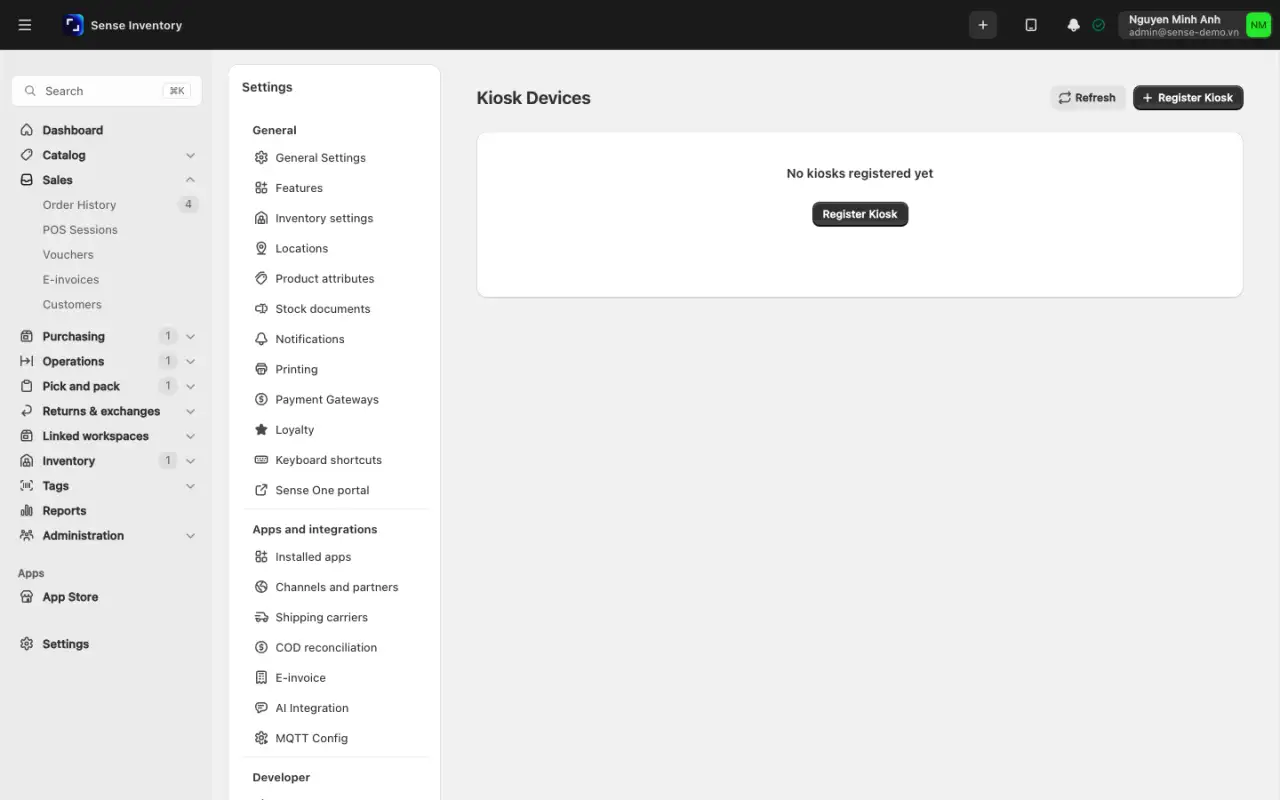
In Settings → Kiosk → Devices, check that the status shows Reading or Connected. Online · no reader means the page runs but the reader is unplugged, and Offline means no check-in for about 15 seconds.
Add advertisements and brand the screens
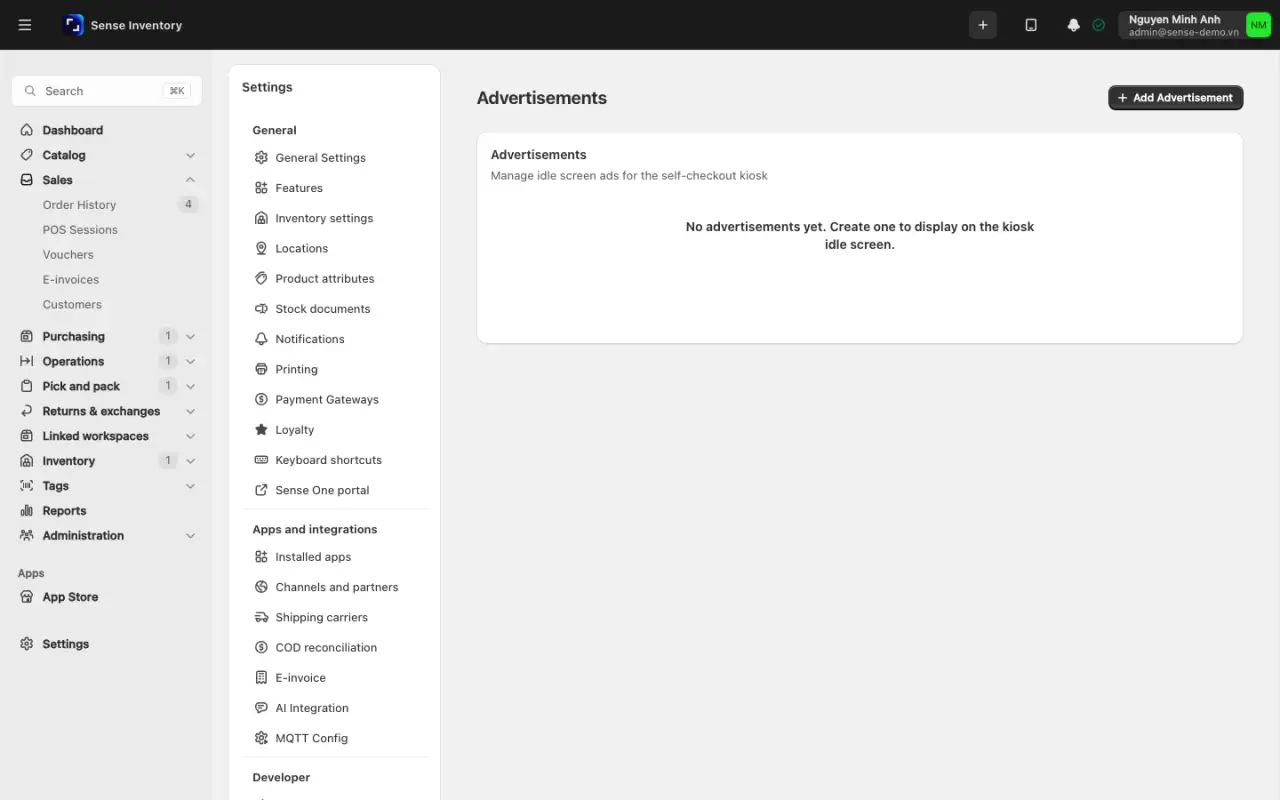
Open Settings → Kiosk → Advertisements and click Add Advertisement. Enter the Title, upload a JPG, PNG, GIF, MP4, or WebM file (or paste a Media URL), set Type, Duration (seconds), Sort Order, and Active, then click Create. Use the Active switch in the table to pause an ad.
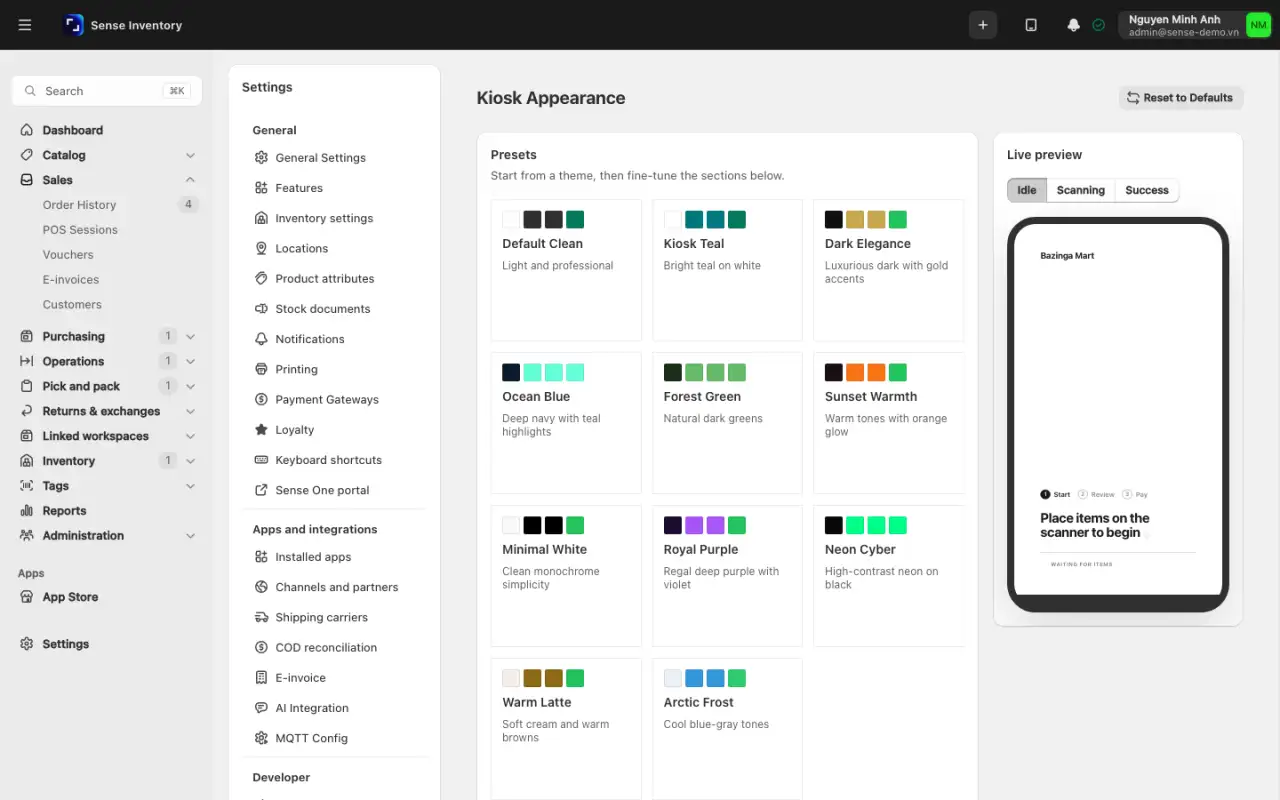
Open Settings → Kiosk → Appearance, pick one of the Presets, adjust the welcome, ad bar, scanning, success, and button settings while watching the live preview, and click Save Appearance. The theme applies to all kiosks.
What the customer does
- Place items on the reader. They appear under "Review your order". Tags with no product, already sold or retired, or for products not allowed for sale are quietly ignored.
- Optionally tap Have a voucher?, enter the code, and tap Apply.
- Tap Pay Now, then Confirm on "Does this match your items?". Choose a payment method and pay. A tile whose terminal is not online stays visible but disabled.
- On "Thank You!", optionally tap Print Receipt. The kiosk returns to the start after the countdown.
A declined or timed-out card payment offers Retry card payment, Choose another method, and Cancel sale. With no choice for 60 seconds, the sale is cancelled. A customer who walks away from the payment screen has the order cancelled after 240 seconds.
Operational guidance
Before going live, test the bad cases yourself: an empty basket, a voucher that is not valid, a declined card, and a timeout.
When something goes wrong
| Symptom | Likely cause | What to do |
|---|---|---|
| Cannot open a shift | You already have an open session | Close it first. Each person has one open session |
| The warehouse picker is empty | No warehouse has the POS capability | Turn it on, see Set up catalog and warehouses |
| Cannot close the shift | You have unsent offline sales | Open View offline sales and send or resolve them |
| The drawer count is off | Cash refunds or cancellations recorded in the wrong shift | Review the shift report and its refunds |
| An order was cancelled after 10 minutes | It was Pending, unpaid, and not on credit | Record payment, use Mark as paid, or sell on credit |
| Paid by QR but still Pending | The provider has not confirmed yet | Wait. If the money arrived outside the system, use Mark as paid |
| Cannot void a payment | Not the same day, or the gateway has no refunds | Use a return or an order refund |
| No Refund button | The order is not Paid, Processing, or Done, or you lack the permission | Create a customer return for Delivered orders, or ask a manager |
| Cannot cancel an order | A goods issue note was submitted | Cancel the note first, or create a customer return |
| Return created, stock unchanged | Stock only posts at Complete | Inspect and complete the return |
| Carrier return completed, no stock added | The order only had reserved stock | Expected: the reservation was released |
| A voucher is refused | Expired, used up, wrong tier, or minimum not met | Read the reason on screen and check the voucher's limits |
| An e-invoice is in Needs attention | Rejected data, or the sale day passed | Follow the table in the Needs attention section |
| Kiosk shows "disabled by the administrator" | Enabled is off for that kiosk | Turn it on in Devices |
| Two kiosks keep going offline | They share a copied browser profile | Clear the browser storage on one of them |
Read next
- Manage debt and consignment: where pay-later sales land and how to collect.
- Pick, check, and ship: fulfilment of shipping and pickup orders.
- Channel orders: orders from online channels behave differently from counter orders.
- Review reports: shifts, sales, VAT, and e-invoice reports.