

Handheld Bluetooth RFID scanner user guide (NHR-10 REV-B)
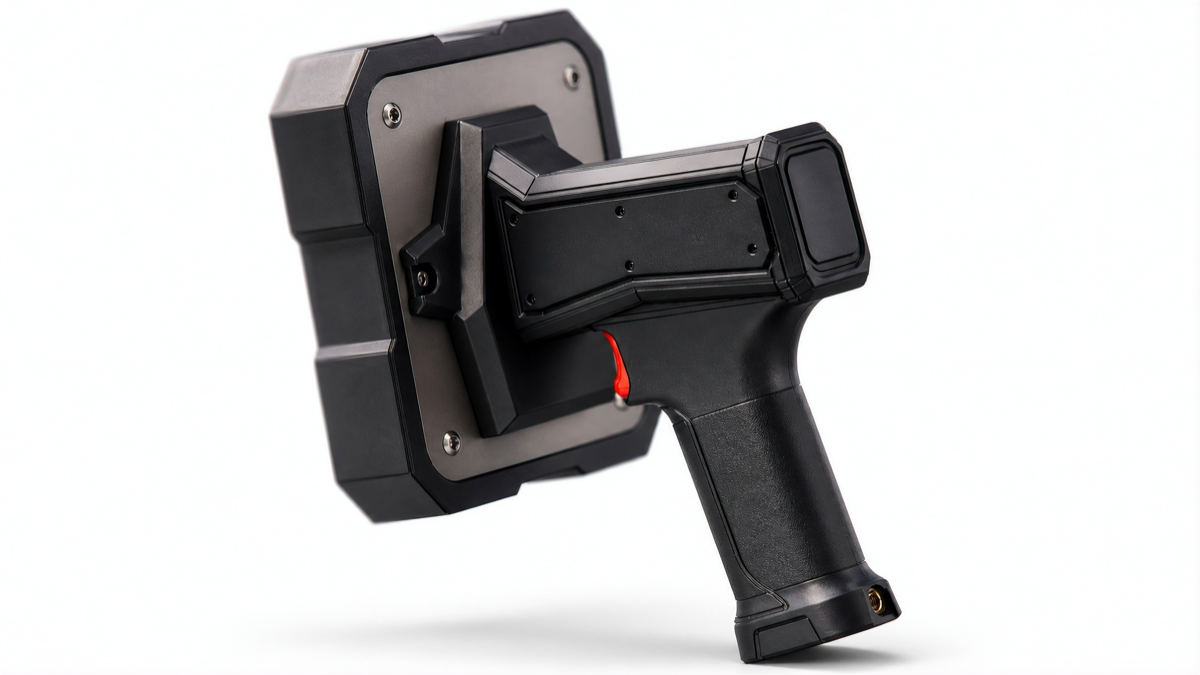
NHR-10 REV-B is a handheld RFID data collection device. It provides UHF RFID data to a host application over Bluetooth Low Energy (BLE); it does not replace the business system that receives that data. The reader is used for stocktaking, asset checks, tag finding, EPC access, and field data collection, then sends RFID data to a mobile app, web app, desktop app, ERP, WMS, or cloud system.
RF operation warning: only operate the reader with an RF configuration approved for the target deployment. Do not change region, frequency, or power settings to unsupported values.
Before you start
| Done | Check |
|---|---|
| ☐ | The reader is charged or connected to an approved power source |
| ☐ | The host device has a BLE GATT client application that supports service 0x00FF |
| ☐ | Bluetooth is enabled on the host device |
| ☐ | A known EPC Gen2 test tag is available |
| ☐ | The RF region configuration matches the country of deployment |
| ☐ | The operator understands that read range varies with the tag, orientation, material, environment, and RF settings |
Quick start
- Charge and inspect. Confirm the battery, enclosure, trigger, and charging accessories are ready.
- Power on and connect. Open the host app, find
NHR-10, connect over BLE GATT, request MTU 185, and subscribe to notifications. - Confirm configuration. Read device info, battery, RF power, region, query settings, and temperature before scanning in production.
- Scan a known tag. Open Inventory mode, aim the reader at a reference tag, and press the trigger.
- Save or discard. Confirm the EPC appears, then save, export, or discard the test session.
First-use warning: do not deploy the reader into production until the RF region, data format, duplicate-handling policy, timestamp source, and upload process have been verified with the target host application.
Charging, power, and buttons
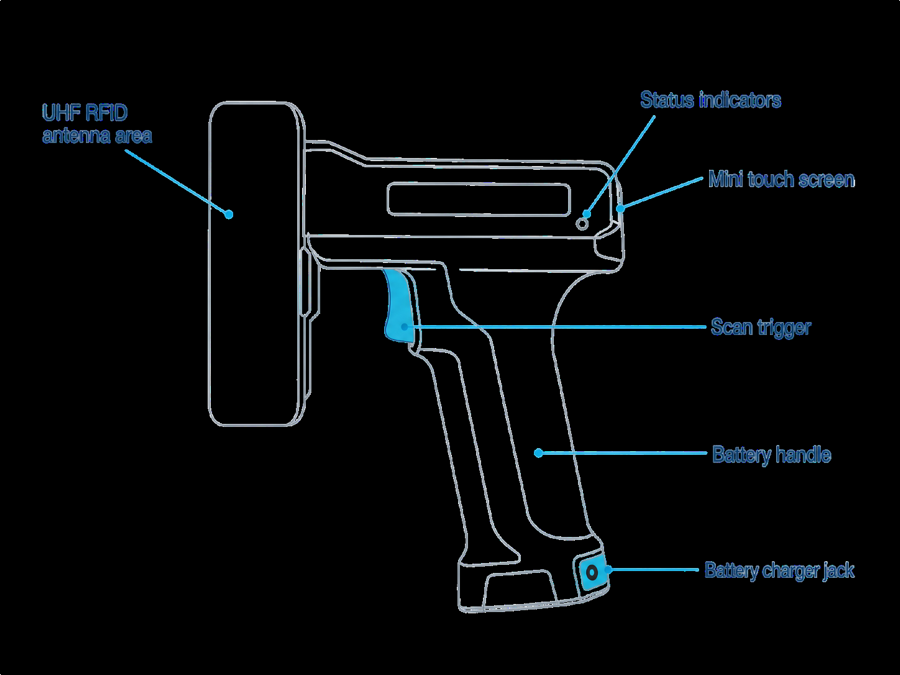
Charging procedure:
- Inspect the reader, battery, cable, charger, and charging cradle for visible damage.
- Connect the reader with an approved USB cable, charger, or cradle.
- Confirm a charging indicator on the reader or in the host app, if supported.
- Wait for the full-charge indicator.
- Disconnect the reader and confirm the battery level before field use.
| Action | Default function |
|---|---|
| Press and hold the trigger | RFID inventory or tag finding, depending on the screen and current app profile |
| Release the trigger | Stop the active scan |
| Quick press of the power button | Wake the reader or show status |
| Press and hold the power button | Power off |
Battery safety: use only approved batteries, chargers, cradles, and cables. Do not use a battery that is swollen, leaking, damaged, overheated, or has been modified.
Reading RFID tags: read-zone orientation
RFID reads are directional and environment-dependent. The optimal read angle is approximately 106°: aim the antenna face at the target items and keep them inside the fan-shaped zone, within ±60° of the center direction.
- Start with moderate RF power and only increase it when needed.
- Use lower RF power for items at close range, or when unwanted tags appear outside the target zone.
- Move steadily; sweeping too fast can miss tags or produce inconsistent counts.
- Scan from multiple angles near metal, liquids, dense packaging, or stacked items.
- Verify unexpected EPCs before recording an inventory transaction into an ERP or WMS.
Status indicators
The current hardware has a single battery-charge LED: solid green means the charger is connected and charging, solid red means the charge cycle is complete. Bluetooth, scan, and error status appear on the screen/app and are echoed with the buzzer:
| Buzzer | Meaning |
|---|---|
| Startup tone | The device is booting |
| One short beep | BLE connected, or the trigger started a scan |
| Two short beeps | BLE disconnected, or the trigger stopped a scan |
| Three short beeps | Battery warning. In batch mode, the firmware also stops and saves the session |
| Search tone | Find mode emits 70 ms tones when the target EPC is detected; tone frequency rises with a stronger RSSI |
Bluetooth connection
The current firmware exposes a BLE GATT API for app integration. The host application is responsible for device discovery, connection, command timing, data parsing, session context, and uploading data to the enterprise system.
BLE GATT connection steps:
- Power on the reader and place it near the host device.
- Confirm the reader is not already connected to another host.
- Enable Bluetooth on the host device and scan for the name
NHR-10. - Filter by the advertised service UUID
0x00FFwhen the platform supports service filtering. - Connect as a BLE central/client. The current firmware requires no PIN or access key.
- Request an ATT MTU of 185 when supported, then discover characteristics
0xFF01,0xFF02, and0xFF03. - Enable notifications on
0xFF01; enable0xFF03before a batch upload.
Only one host can control the reader at a time. The firmware resumes advertising after a disconnect; if the host cannot connect, close the previous app session, power-cycle the reader if needed, and reconnect from the intended host.
Application workflows
Real-time inventory. Use when you need the tag count and live EPCs immediately: connect over BLE GATT, select Inventory, start scanning with command S or the trigger, watch the live binary EPC stream, stop with X.
Batch (offline) inventory. Use when the connection is unstable or you need to scan multiple areas before uploading: start a batch session, scan each area, stop and save with XB, wait for SAVE status to reach saved, then upload the NHRB file over 0xFF03 and verify the count on the host side before starting the next batch. The internal flash target capacity is up to 25,000 unique EPC records.
Find tag. Use proximity feedback to locate a known EPC: send command F with the target EPC, start at moderate RF power, move slowly through the search area, and reduce power as you approach the final position.
Read and write EPC. Only for trained users with a confirmed isolated tag: isolate the target tag, confirm the old and new EPC, execute the read/write command, read the EPC back, and log the operator, timestamp, old EPC, and new EPC.
Write protection: an accidental EPC write can corrupt inventory and shipment records. Always require explicit confirmation, isolate one tag, and log every write operation.
Integration for developers
The current integration method is a custom BLE GATT API. The host application treats the reader as an RFID data-collection peripheral and owns process context, user permissions, data validation, and writes to the enterprise system.
GATT map:
| UUID | Property | Purpose |
|---|---|---|
0x00FF | Primary service | Custom NHR-10 RFID service |
0xFF01 | Write / Notify | Main command channel; the app writes JSON commands here, notifications are JSON responses or live binary EPC frames |
0xFF02 | Write | Batch file control; write the ASCII string send_file after SAVE reports saved |
0xFF03 | Notify | Batch file data stream, packets carry a 2-byte sequence header followed by metadata or NHRB bytes |
Commands most applications need (every command uses the JSON key "cmd", single-argument commands use "val"):
| Command | Purpose | JSON payload |
|---|---|---|
DI | Reader identification | {"cmd":"DI"} |
GB | Battery status | {"cmd":"GB"} |
S / X | Start / stop live inventory | {"cmd":"S"} / {"cmd":"X"} |
SB / XB | Start / stop and save batch scan | {"cmd":"SB"} / {"cmd":"XB"} |
F | Find one EPC | {"cmd":"F","val":"EPC"} |
send_file | Upload a saved batch | Write ASCII send_file to 0xFF02 |
For 0xFF01, always check the first two bytes before decoding: 4E 48 (ASCII "NH") marks a live binary frame, any other non-empty payload is JSON UTF-8. The firmware rejects most RF configuration and tag-access commands while inventory is active, because scan packets and command responses share the module's UART link; stop scanning before changing RF settings or writing a tag. Wait at least 300 ms between scan start/stop commands.
The full command list (RF configuration, diagnostics, tag writes) and the complete binary packet layout live in the internal integration documentation your technical team provides per project; contact contact@nextwaves.industries for the full document when integrating for production.
Troubleshooting
| Symptom | Possible cause | Recommended action |
|---|---|---|
| Reader does not power on | Empty battery, incorrect power-button press timing, hardware fault | Charge the reader, hold the power button for the confirmed duration, contact support if unresolved |
| Reader not found in the app | Bluetooth off, reader already connected elsewhere, missing app permission | Enable Bluetooth, disconnect the old host session, scan for NHR-10/0x00FF, and grant the required permissions |
| Connection drops | Distance, metal shelving, interference, low battery | Move closer, charge the reader, reduce interference, reconnect and re-subscribe to notifications |
| No tags detected | Wrong scan mode, RF power too low, faulty tag, region not configured | Confirm inventory mode, try a known-good tag, increase power within limits |
| EPC write fails | Locked tag, wrong password, weak signal, multiple tags in the read zone | Isolate one tag, check the EPC format and access password, then retry |
| Missing batch records | Upload interrupted, a new batch started before uploading finished | Retry send_file, confirm SAVE reached saved, do not start the next SB before the host persists the data |
When contacting support, provide the product model, serial number, firmware version, app version, host platform, connection mode, reproduction steps, and any error code.
Maintenance, safety, and warranty
Power off the reader before cleaning, wipe external surfaces with a soft, slightly damp cloth, do not spray liquid directly into connectors or the battery compartment, and do not use unapproved solvents or corrosive chemicals. Use only approved batteries, chargers, cradles, and accessories; do not operate a damaged reader or battery; and follow site regulations for RF equipment in hospitals, aircraft, laboratories, and explosion-risk environments.
Standard warranty policy: a one-for-one replacement within 6 months of delivery for confirmed manufacturing defects, and repair/maintenance coverage for 1 year for defects originating in the device itself. Warranty does not cover damage from misuse, impact, liquid ingress, or unauthorized repair or modification.
Support
contacts@nextwaves.com- nextwaves.com
Full technical specifications are on the handheld scanner specifications page.