

Purchase and receive goods
This page brings goods into the system: ordering from suppliers, receiving goods into a warehouse, and approving stock-in documents. Two documents are easy to confuse. A purchase order records what you plan to buy from a supplier. A stock-in document records what physically arrived. A purchase order does not change stock; only a completed stock-in raises it.
The amount you owe the supplier is booked when you confirm the purchase order, not when the goods arrive.
Before you start
- To use purchase orders, turn on the Purchase orders and suppliers module under Settings → Features. Also turn on Debts if you want the supplier payable in the debt ledger. See Settings and integrations.
- Products and the receiving warehouse must exist. See Catalog and warehouses. Products should have a Cost Price so profit reports have data.
These settings under Settings → Inventory settings change how receiving behaves:
| Setting | Effect |
|---|---|
| Require purchase order approval | Adds an Approved step; Confirm is refused until a person with approval rights has approved the order |
| Over-receipt tolerance (%) | How much more than ordered a line may receive, as a percentage of the ordered quantity. 0 means exact delivery only. A line can override it |
| Supplier stock-in needs a purchase order | A stock-in with the reason Purchase must name its order |
| RFID tags set the received quantity | The quantity on a scanned line must equal the number of different tags |
| Require RFID for Stock In / Stock Out | Every receipt line needs scanned EPCs |
| Batch / lot tracking | Batch-tracked products need a batch number on receipt |
Add a supplier
- Open Purchasing → Suppliers and click Add Supplier.
- Fill in Name (required) and, as needed, Supplier Code, Phone, Email, Tax Code, Address and Notes.
- Set Credit Term (days). When you confirm an order, the due date becomes the confirm date plus this number of days, unless you typed a due date yourself.
- Click Save. You see "Supplier created successfully".
A supplier that purchase orders or consignment records still refer to cannot be deleted. Set it inactive instead.
Create and confirm a purchase order
Open Purchasing → Purchase Orders and click New Purchase Order.
Pick the Supplier and the Destination warehouse. Optionally add the Supplier order reference, Due Date and Notes. The warehouse must allow stock-in.
Search the catalog by product name, SKU, or barcode, or use Select multiple. Set Quantity and Unit Cost and, if needed, discount and tax. Each product may appear only once, and combos and consignment products cannot be bought on an order: order a combo's components, and receive consignment goods from the consignor.
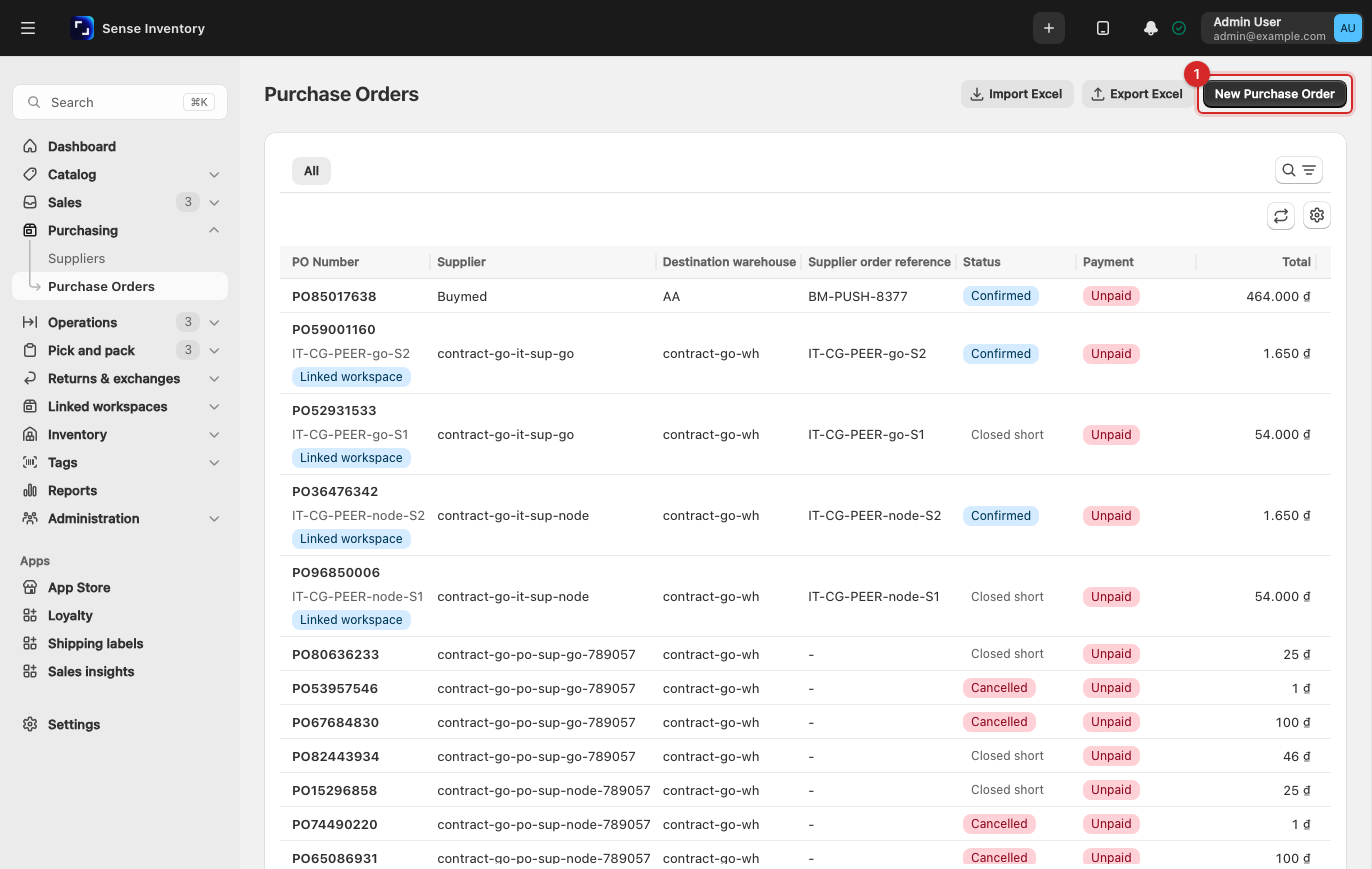
Click Save draft. You see "Purchase order created".
On the order page, click Approve (only when approval is required), then Confirm, and accept "Confirm this purchase order?". This books the supplier payable and sets the due date. If the supplier is a linked store, the order is also sent to them.
When approval is not required, a Draft can be confirmed directly. An order can be edited while it is a Draft, or while it is Confirmed with no receipts yet. The supplier cannot change on a confirmed order. If the total changes, the difference is booked as an adjustment to the payable.
Receive goods against an order
- Open the order and click Receive inventory. It appears on Confirmed or Partially received orders.
- The Create Stock In Entry form opens with the order already selected, and the warehouse is set by the order. Enter the received quantities, batch and expiry, and bin, or scan tags with Receive by RFID.
- Click Stock In. If stock documents need approval, the document waits for an approver. See Complete the document.
- Go back to the order. Goods receipts lists each delivery. Delivery verification marks every line Short, Exact, Over (allowed) or Over limit, with the units still outstanding.
One order can have many receipts. After each one the status becomes Partially received or Received. In the mobile app, Receive PO also receives goods against a purchase order.
Close, edit, or cancel an order
- To close a short delivery, or to settle a tolerated over-receipt, open the ⋯ menu on a Confirmed, Partially received, or Received order and choose Close order.
- Read the message about the undelivered units and the payable adjustment, type a Reason for closing, and confirm. The status becomes Closed short. The payable is adjusted once to the value actually received, and no more goods can be received.
- To cancel a Draft, Approved, or Confirmed order, use Cancel Order with an optional reason. The payable is reversed. A Draft can also be deleted.
An order that has received goods cannot be edited. Close it and raise a new order.
Import orders from Excel
- On the purchase order list, click Import Excel and then Download template.
- Fill in one row per product line: Supplier, Receiving warehouse, Supplier order no., Payment due date (dd/mm/yyyy), Order notes, Product code/SKU/Barcode, Quantity and Unit cost. Rows with the same supplier, warehouse, and supplier order number make one order.
- Upload the file and check the preview. Each order shows Valid, or Not created with the reason; Show only orders with errors narrows the list.
- Click Create {count} draft orders, then open and confirm each one.
Each file takes up to 200 orders, 2,000 rows and 10 MB, in .xlsx, .xls or .csv. If any valid order fails to save, none are created. Product codes are matched by SKU, then product number, then barcode. A blank quantity means 1. A blank unit cost takes the product's cost price. Import Excel on the order form is different: it only fills in the lines, and the order is stored only when you save it.
Receive goods without an order
A purchase order is optional. Goods that arrive without an advance order, such as opening stock at go-live or small walk-in purchases, go straight onto a stock-in document. The steps, approval states and ledger lines are the same as receiving against an order. If Supplier stock-in needs a purchase order is on, a stock-in with the reason Purchase must name an order.
Open Operations → Stock In (Stock Operations → Stock In on the classic layout) and create a new document.
Check the Warehouse field. The system pre-fills the warehouse you used last, so this is the field most often entered wrong.
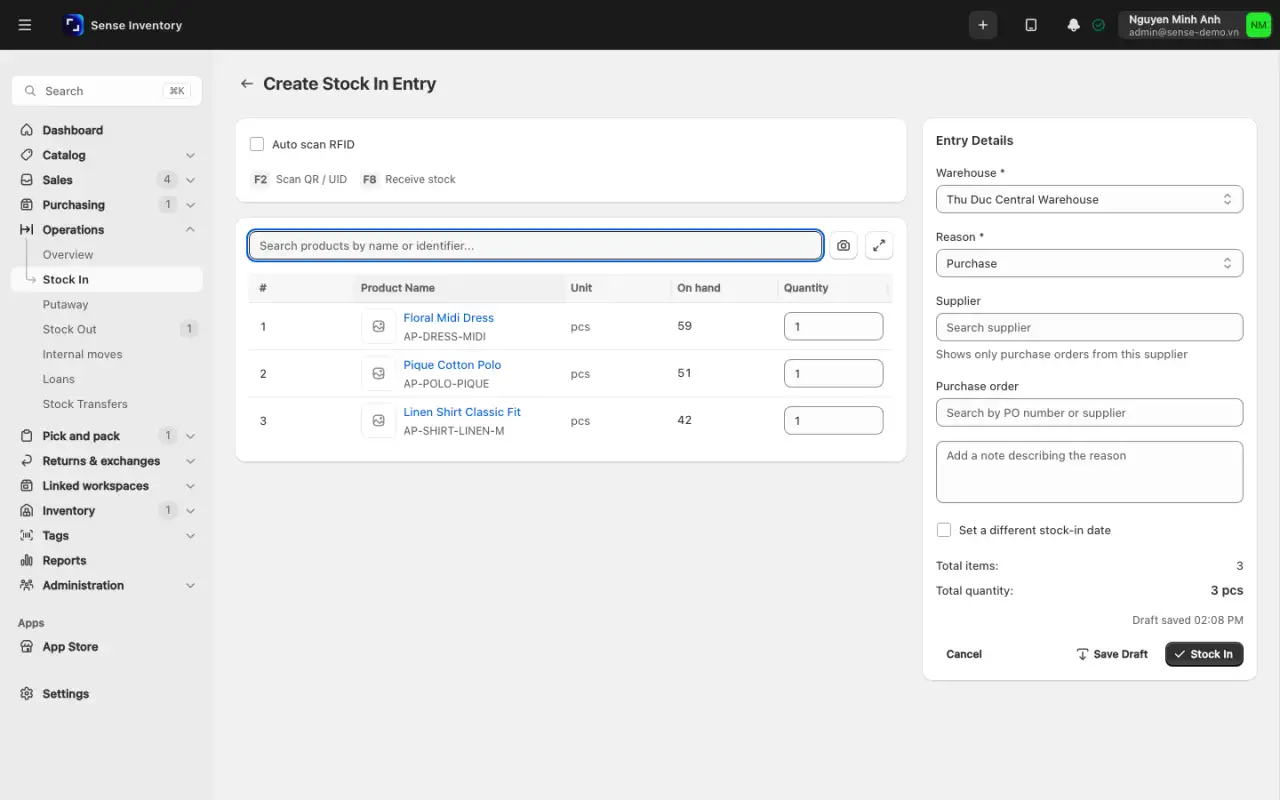
Choose the Reason. Some reasons require a note.
Type in the Search products by name or identifier... box to find a product by name, SKU or barcode, then enter the Quantity.
For RFID-tagged goods, pick the exact product or variant first, tick Auto scan RFID, and scan the whole batch. Every EPC read becomes one unit. See Manage RFID.
For batch-tracked products, enter the batch number and expiry date. Without a batch number the line does not save.
Compare the quantity on screen with the goods actually received. For RFID goods, compare the number of EPCs scanned with the hand count. A difference means a tag was missed or a stray tag was read.
Click Save Draft if you are not finished, or Stock In to submit the document.
Operational guidance
- Choose the reason that matches what really happened. Months later, the reason is the only thing in the ledger that explains the entry.
- Turn on auto scan only when the reading zone holds just the group you are receiving, because the reader also catches tags on the next pallet. When a group is done, turn auto scan off before moving to another product.
Complete the document
A stock-in follows the status cycle shared by every stock document: Draft → Submitted → Approved → Completed. Stock rises only at the last step. See the full diagram on the overview page.
If the business requires approval, the document waits under Inventory → Stock Receipts (Stock Documents → Stock Receipts on the classic layout). A person with approval rights opens it, compares each line with the goods actually received, then approves and completes it.
The person who created a document cannot complete it unless they hold the self-approval right. This keeps receiving and confirming with two different people. See how permissions are granted in Users and security.
Operational guidance
If fewer goods arrive than ordered, enter exactly what arrived, not the ordered quantity. The purchase order keeps the ordered quantity for reconciling with the supplier, while the stock ledger must record the real goods.
Check after receiving
- Open Inventory → Stock Levels and filter by the receiving warehouse.
- Open Inventory → Stock Ledger and find the line that raised stock, with the document number as reference.
- For RFID goods, check a few EPCs under Tags → Check Item to confirm the right product and warehouse.
When something goes wrong
| Symptom | What to do |
|---|---|
| Stock did not rise after creating the document | The document is still Submitted. Complete it under Inventory → Stock Receipts |
| "This purchase order must be approved first." | Require purchase order approval is on. Click Approve before Confirm |
| "Enter a reason for closing the purchase order." | Close order stays disabled until you type a reason |
| "A product appears more than once in this purchase order. Merge the lines." | Keep one line per product |
| "{product}: only {remaining} left to receive on this order" | The quantity is more than what is left plus the tolerance. Tolerance is a percentage of the ordered quantity, so receiving in several deliveries does not widen it |
| "This purchase order is not open for receiving. Confirm it and check its product links first." | Confirm the order. For an order synced from other software with unlinked lines, use Link products again |
| "A purchase stock-in must reference its purchase order" | Supplier stock-in needs a purchase order is on. Receive through Receive inventory on the order |
| "{name}: RFID tags are required" | Require RFID for Stock In / Stock Out is on. Scan with the reader instead of typing |
| "{name}: {quantity} entered but {epcCount} tag(s) scanned" | RFID tags set the received quantity is on, so quantity must equal the number of tags |
| "EPC {epc} is already in stock and was skipped." | The tag was received before and re-receiving is off. Look it up under Tags → Check Item |
| Batch number is missing | The product is batch-tracked. Enter the batch number and expiry |
| "This purchase order comes from Haravan. Edit it in Haravan." | Haravan orders are read-only copies. Use Sync from Haravan |
| "This purchase order is managed by a shipment from a linked workspace." | Receive it through the shipment, not directly |
| You cannot choose the warehouse | The warehouse has Stock In turned off. Edit the warehouse, see Catalog and warehouses |
| The approve button is greyed out | The account lacks the approval right, see Users and security |
| Wrong warehouse entered | Cancel the document if it is not completed. If it is, move the goods to the right place with a stock transfer |
If the quantity or warehouse is wrong on a completed document, do not edit the stock figure. Raise an adjustment with a reason that keeps the trail back to the original document. See Issue, transfer, and adjust.
Read next
- Issue, transfer, and adjust stock: the outbound direction, and how to fix mistakes the right way.
- Debt and consignment: the supplier payable booked when you confirm an order.
- Count and reconcile stock: the periodic check that what you received is still on the shelf.