

Set up the system
An administrator does this once, when taking over the system. With the information prepared, it fits in one session. Take care: currency, timezone, and warehouse rules shape every later transaction, and some are hard to change once real stock exists.
Prepare these first: the company registration details and tax ID, the list of real warehouses and stores, a product catalog file if one exists, the staff list with each person's actual job, and the owner's answer to two questions: track stock by batch and expiry or not, and require approval on warehouse documents or not.
Rollout order
Follow this order. Each step builds on the previous one:
Finish the first-run wizard
A new workspace opens the setup wizard on the first admin sign-in. Its checklist on the left shows Business details, Country, Bill design, Starting data and Finish.
Sign in as an admin. The page opens with "Set up your business".
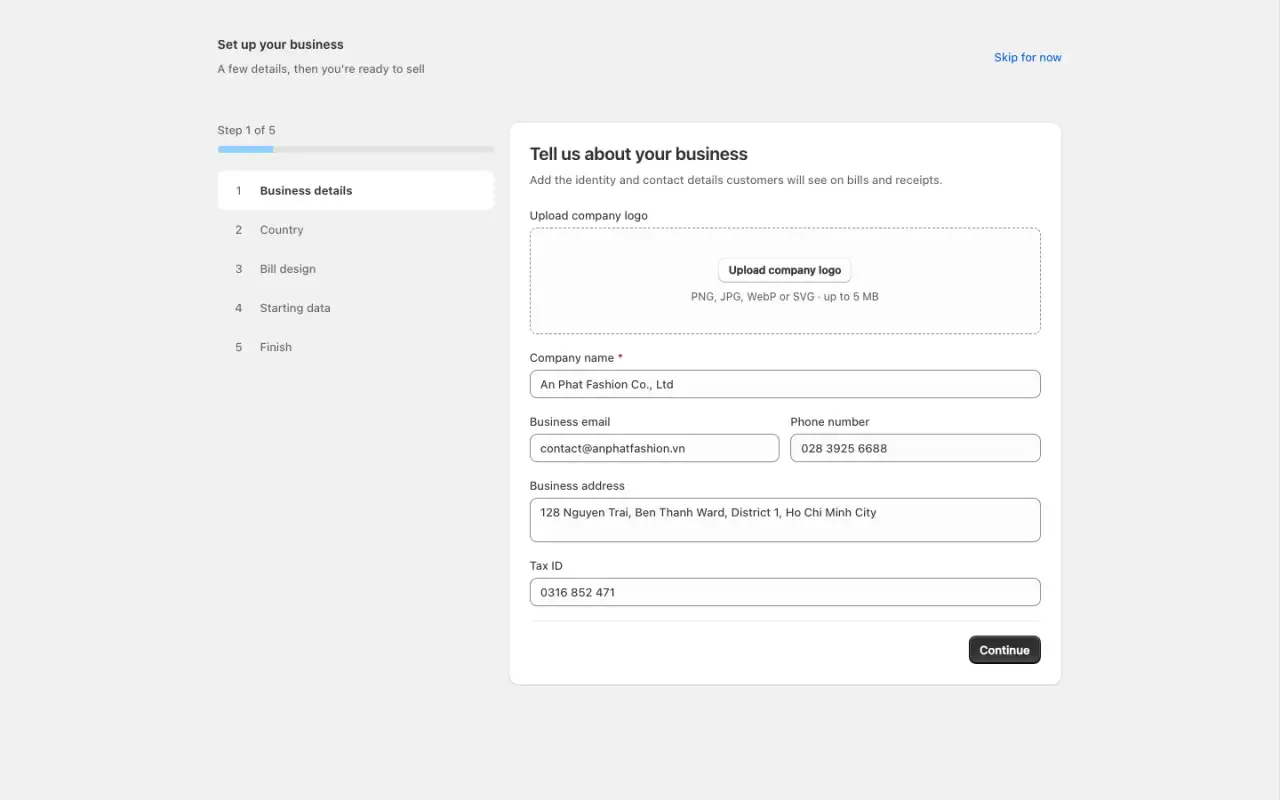
Enter the Company name (required; leaving it blank shows "Enter a company name to continue.") and, if you like, the business email, phone number, address and Tax ID. Click Upload company logo for a logo (PNG, JPG, WebP or SVG, up to 5 MB). Click Save and continue.
Choose a Country or region. It fills in the currency, number format and timezone, and you can change each one. Check the Amount preview, then click Save and continue.
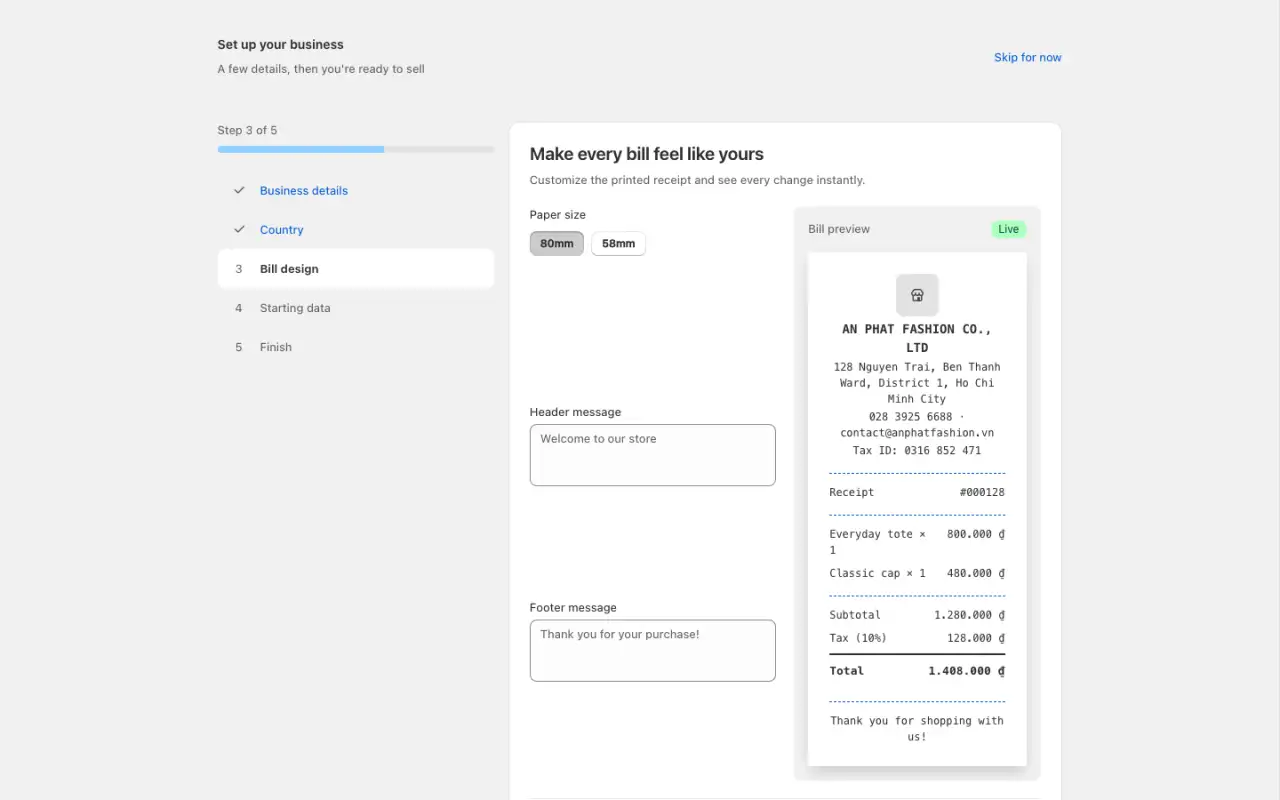
Choose the bill Paper size (80mm or 58mm), a Header message and a Footer message. The Bill preview updates as you type. Click Save and continue.
Under "How would you like to start?", choose Create sample data or Start empty. Choose Start empty if you are going straight to real data.
On "You're ready to go", click Open dashboard.
Skip for now ends the wizard at any step and counts setup as done. The wizard does not return by itself. To run it again, open Run setup again on the last screen. If an admin cannot see the wizard on a new workspace, check that the browser can reach the server: when it cannot, you are let in without the wizard.
Everything the wizard asks for can also be changed later in Settings, as described next.
General settings
Sign in with the provided admin account and change the initial password immediately.
Go to Settings → General Settings.
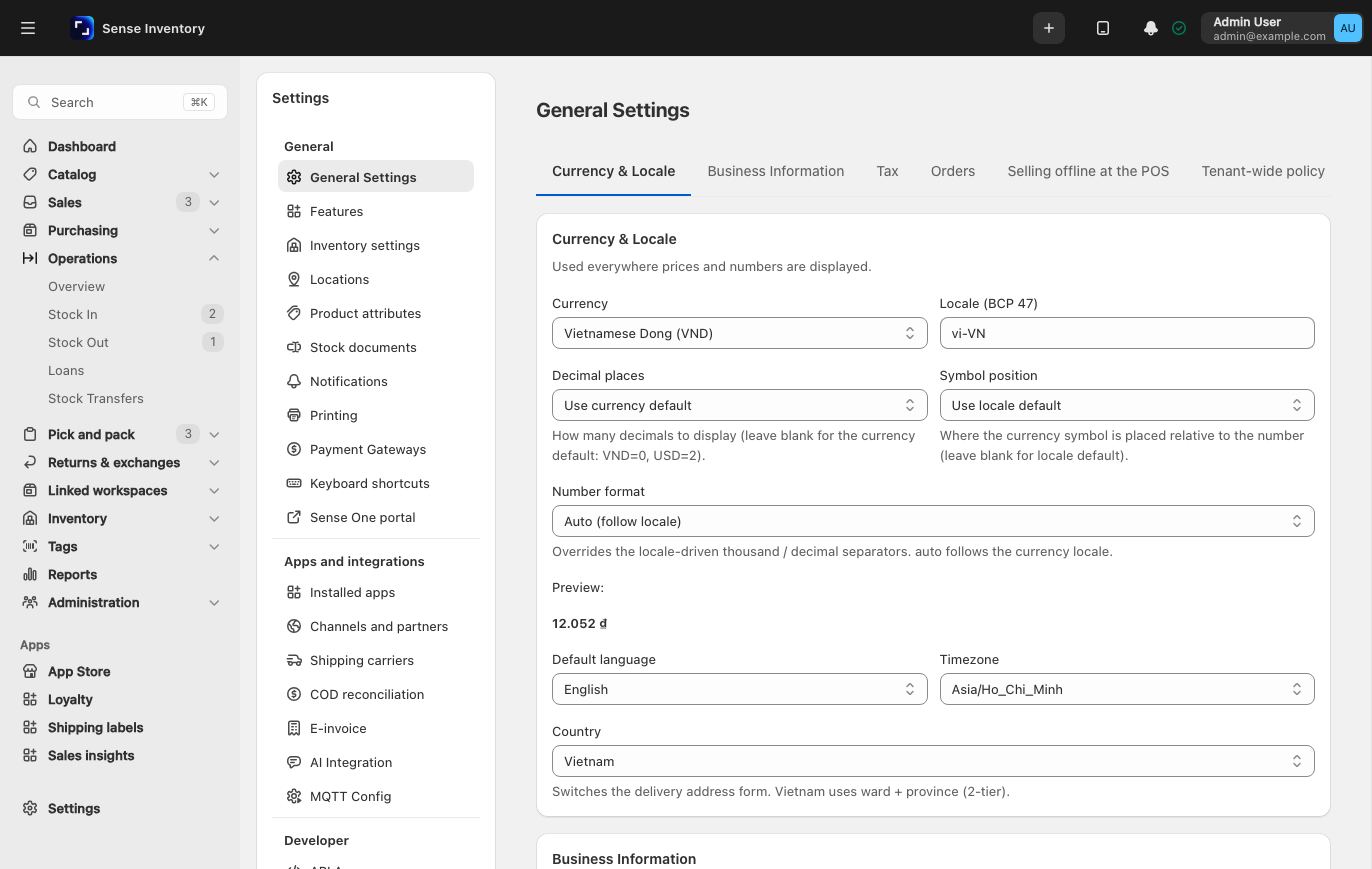
Under Currency & Locale, pick the Currency, Locale (BCP 47), and Decimal places. These decide how prices render on every screen.
Set the Timezone for where the business operates. The timezone defines "today" for the system. With the wrong timezone, tonight's sales land in tomorrow's report.
Enter the company name, address, phone, email, and Tax ID. These print on invoices.
Under Tax, set the Default tax rate (%) and decide whether Prices already include tax. If this is wrong, every selling price is off by one tax amount. Press Save.
Optionally set Country (Vietnam uses ward and province in addresses), Number format, Default language, Minimum order amount and Order code prefix. The prefix accepts 1 to 8 capital letters, and the default is DH. Invalid values refuse the save with a message beside the field.
Turn on the modules you need
Go to Settings → Features.
Under Modules, untick any module the business does not use, for example Stock counts. Modules with a Locked badge are not in your plan and cannot be changed here. A module you switch off disappears for everyone, admins included, on the web and on handhelds, and its data is kept.
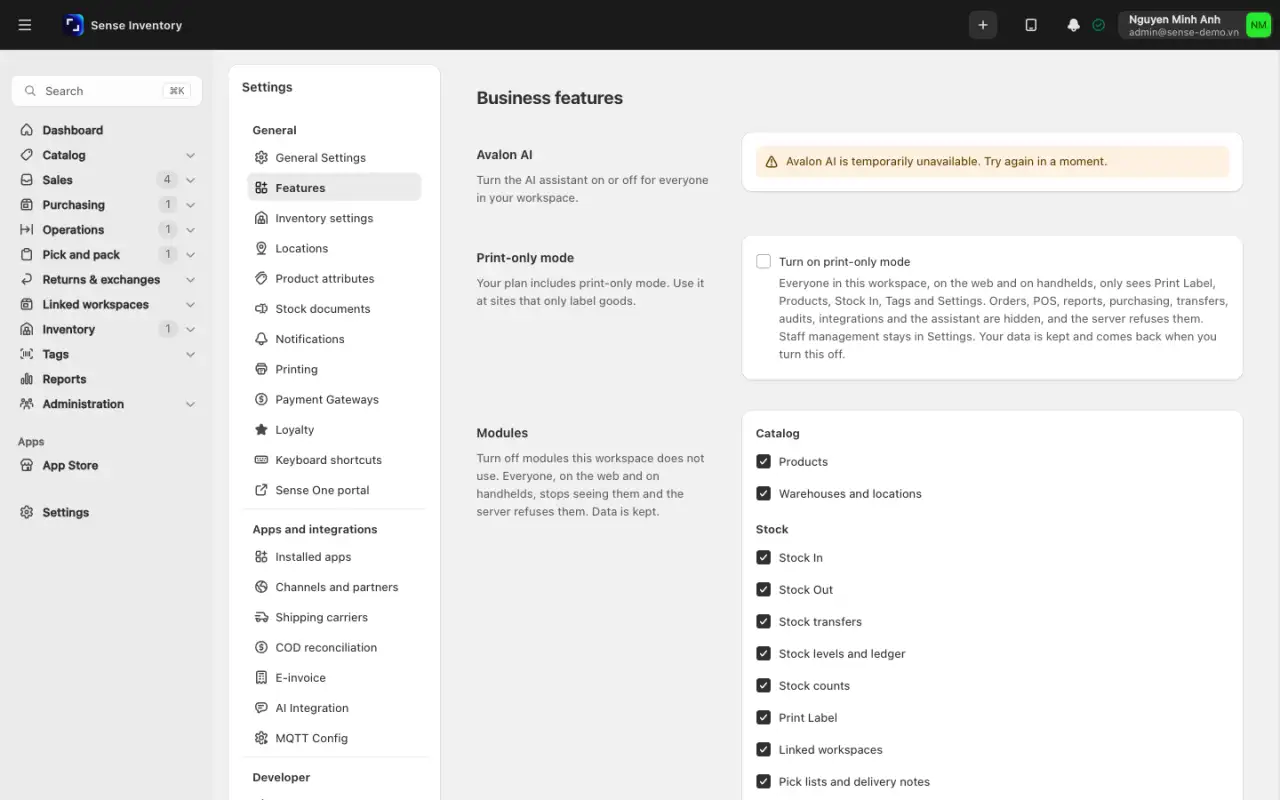
Switch on the features the business actually uses: Customer debt if you sell on credit, Suppliers and Purchase orders if you order formally, Consignment if you sell on behalf of others, Loyalty if you run points. A shorter menu is easier for new staff.
Press Save. The change applies right away.
Some switches depend on others, and the save is refused with a message that names the missing one:
- Consignment needs Suppliers (a consignor is a supplier) and Debts (settlements post what you owe the consignor). Turn those on first.
- Shipments between workspaces needs links with other workspaces, Purchase orders and Suppliers.
- Product combos cannot be turned off while active combo products exist. Deactivate them or change them to standard products first.
- Lend goods cannot be turned off while loans are open. Return them or report them lost first.
Turning a module off only hides its screens without deleting data, so changing your mind later is safe. If a screen reports "This is not available in this workspace. Ask an admin or your provider.", its module is off or outside the plan.
Warehouse rules
Go to Settings → Inventory settings. Read this section slowly: every switch changes how warehouse staff work each day.
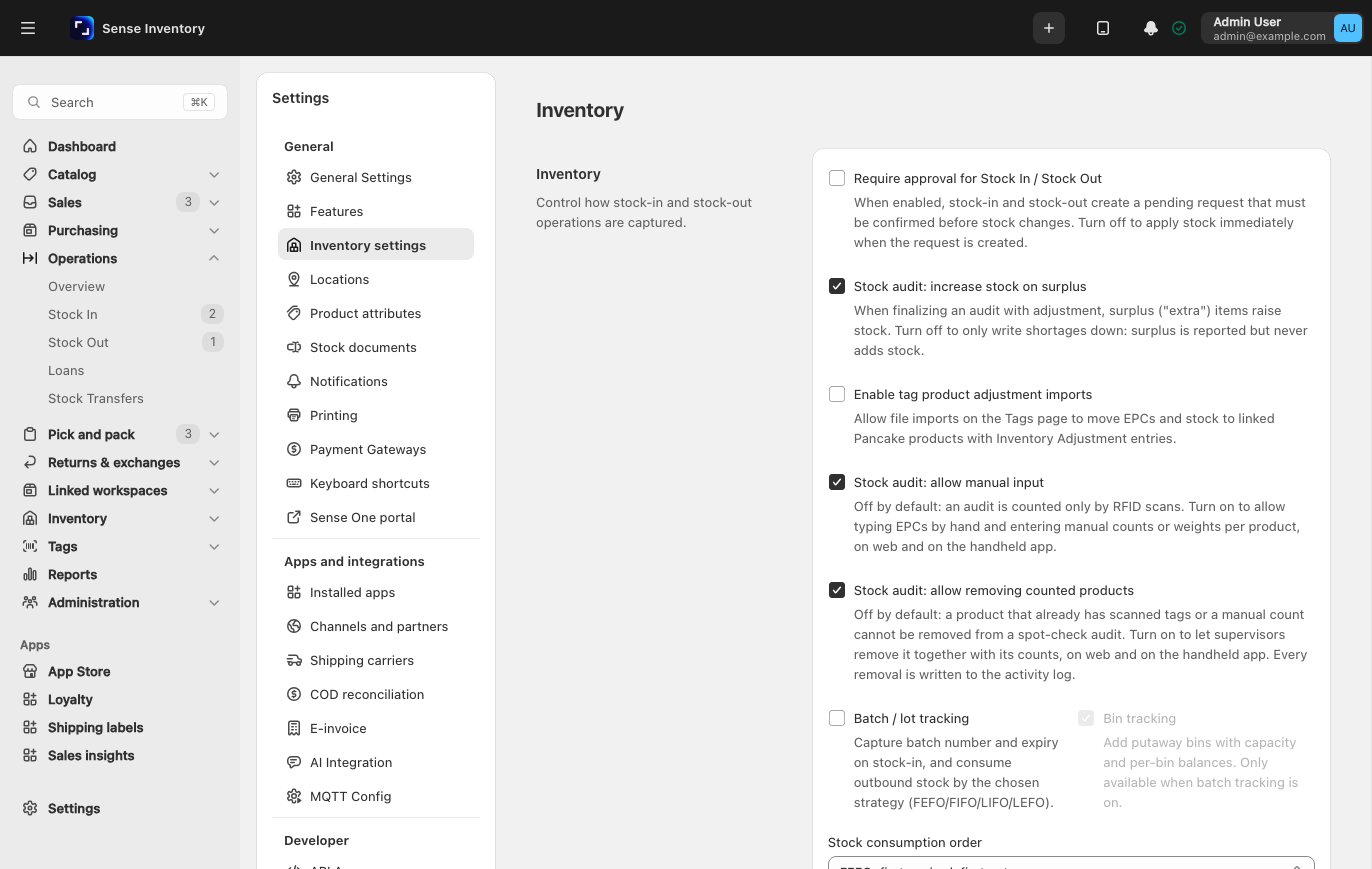
Require approval for Stock In / Stock Out
When on, stock-in and stock-out entries stop at Submitted until a person with the permission approves them. Only then does stock change. This separates the person who enters a document from the person who approves it, at the cost of one extra step per document. When off, stock updates as soon as the document is created.
Operational guidance
Turn this on when two or more people work in the warehouse.
Require RFID for Stock In / Stock Out
When on, stock-in and stock-out entries must be captured with an RFID reader, and quantities cannot be typed. The numbers get much harder to fake, but goods arriving without tags cannot be received at all. See Manage RFID.
Batch / lot tracking and Bin tracking
With Batch / lot tracking on, every receipt records a batch number with an optional expiry, and stock is counted per batch. Bin tracking works only when batch tracking is on. It adds putaway bins with capacity and per-bin balances. The cost is one extra step on every receipt.
Operational guidance
Turn on batch tracking for food, cosmetics, and pharmaceuticals. Decide before you load real stock, because stock recorded per batch is hard to walk back. If you are unsure, ask: will anyone ever need to know which batch expires first?
Stock consumption order
This applies only with batch tracking on. It decides which batch the system takes first on stock-out, sales, and transfers. The options are FEFO: first expired, first out, FIFO: first in, first out, LIFO: last in, first out, and LEFO: last expired, first out. Goods with an expiry date usually use FEFO. FEFO and LEFO depend on expiry dates, so they work only when expiry dates are entered on every receipt.
Allow overselling
When on, orders can be placed without enough stock and the ledger may go negative. When off, checkout fails with an out-of-stock message. Turn it on only if the business really sells before receiving. To read negative numbers, see Issue, transfer, and adjust stock.
Foundation data, in order
- Create warehouses and the catalog. Without these, documents and the POS have nothing to pick.
- Create roles and users. Build the role set first, then assign people.
- Load opening stock with stock-in entries using the Initial stock reason, see Purchase and receive. Do not load stock by editing numbers: every ledger line should have a traceable origin.
- Connect devices and channels last, once there is data to test with: RFID readers, sales channels.
Run one full trial before real data
Sample data is a built-in demo store you can install and later remove. Open Settings → Advanced → Sample Data. The page appears only while every module is on. Click Create sample data. It also sets the workspace currency, locale and decimals to the sample market (Vietnam, US or Singapore, chosen from your current currency), so set your real currency again afterwards. Sample records are named "NWC Sample …" or start with NWC-SAMPLE.
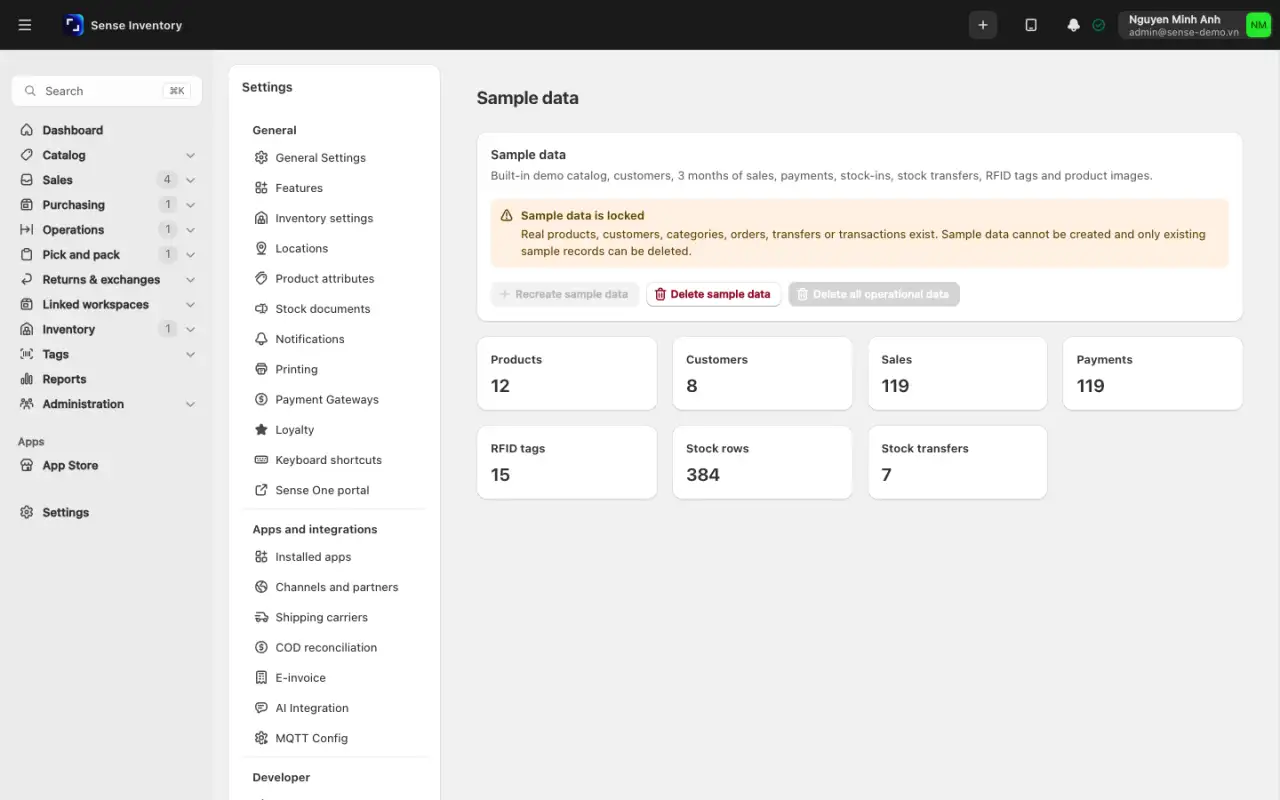
Sample data can only be created while no real product, customer, category, order, transfer or transaction exists. The button is disabled with "Sample data is locked" once one does. Delete sample data removes only sample records and refuses if real orders already use them. Delete all operational data is available only while no real data exists.
Create one test product and one test warehouse. Receive one unit with a stock-in entry, check that it appears in Stock Levels and the Stock Ledger, then issue the same unit out. Load real data only when the loop matches. Then clear the test data and the sample data on the Sample Data page, see Settings and integrations.
If reports land on the wrong day, go back and check the timezone. If a menu entry is missing, check in this order: module on, plan includes the feature, account has the permission.
Read next
- Create the catalog and warehouses: the very next step after this page.
- Settings and integrations: the map of the whole Settings area for later changes.
- Users and security: the starter role set for a store.