

Pick, check, and ship orders
Use this page to get online and store-pickup orders off the shelf, into a checked parcel, and out to the carrier. Counter sales change hands on the spot and skip this flow.
The work has three stages. Picking pulls the items off the shelves. Checking compares the parcel with the order before you seal it. Shipping posts the goods issue note, books the carrier, and hands the parcel over.
Stock does not drop when a pick list completes or when a parcel is checked. On-hand drops only when the goods issue note is submitted.
An order's path
Each stage has its own record:
| Document | Job | Touches stock |
|---|---|---|
| Pick list | The items to fetch for one order | No. Completing it reserves stock and drafts the goods issue note |
| Verify Order check | The scan of every item in the parcel against the order | No. It saves a Passed or Mismatch check on the order |
| Goods issue note | The official shipping document | Deducts stock when submitted |
Each order has one live pick list and one active goods issue note. The order status follows the work: creating a pick list moves a Paid order to Processing, completing it moves the order to Picked up, and submitting the note moves it to Shipped.
Goods Issue Notes are the per-order shipping documents. They are not the same as Stock Out, which you use for damaged goods or supplier returns, see Issue, transfer, and adjust stock.
Which orders can produce a pick list
An order can be picked only when all of these are true:
- The order is assigned to a warehouse that allows stock out.
- The delivery method is Shipping or Store pickup. Kiosk and POS orders change hands on the spot and skip this flow.
- The order status is Paid or Processing. Pending orders are also accepted when Allow picking before payment is on under Settings → Inventory settings.
- Shipping has not been skipped for the order, and the sales channel is not holding it.
- The warehouse holds enough stock for each product, counting the stock this order already reserved.
Orders synced from a marketplace are also accepted at Done, Picked up, Ready for pickup, Shipped, Delivering, and Delivered. Marketplaces can mark an order complete as soon as the customer pays, while the goods are still in your warehouse, see Process channel orders. A completed POS or web order is finished and cannot be picked.
Picking
Open Pick and pack → Pick Lists (Stock Documents → Pick Lists on the classic layout). The page opens on the Picking workstation. The Ready orders card has two tabs: Ready lists orders waiting to be picked, oldest first, and Skipped lists orders set aside.
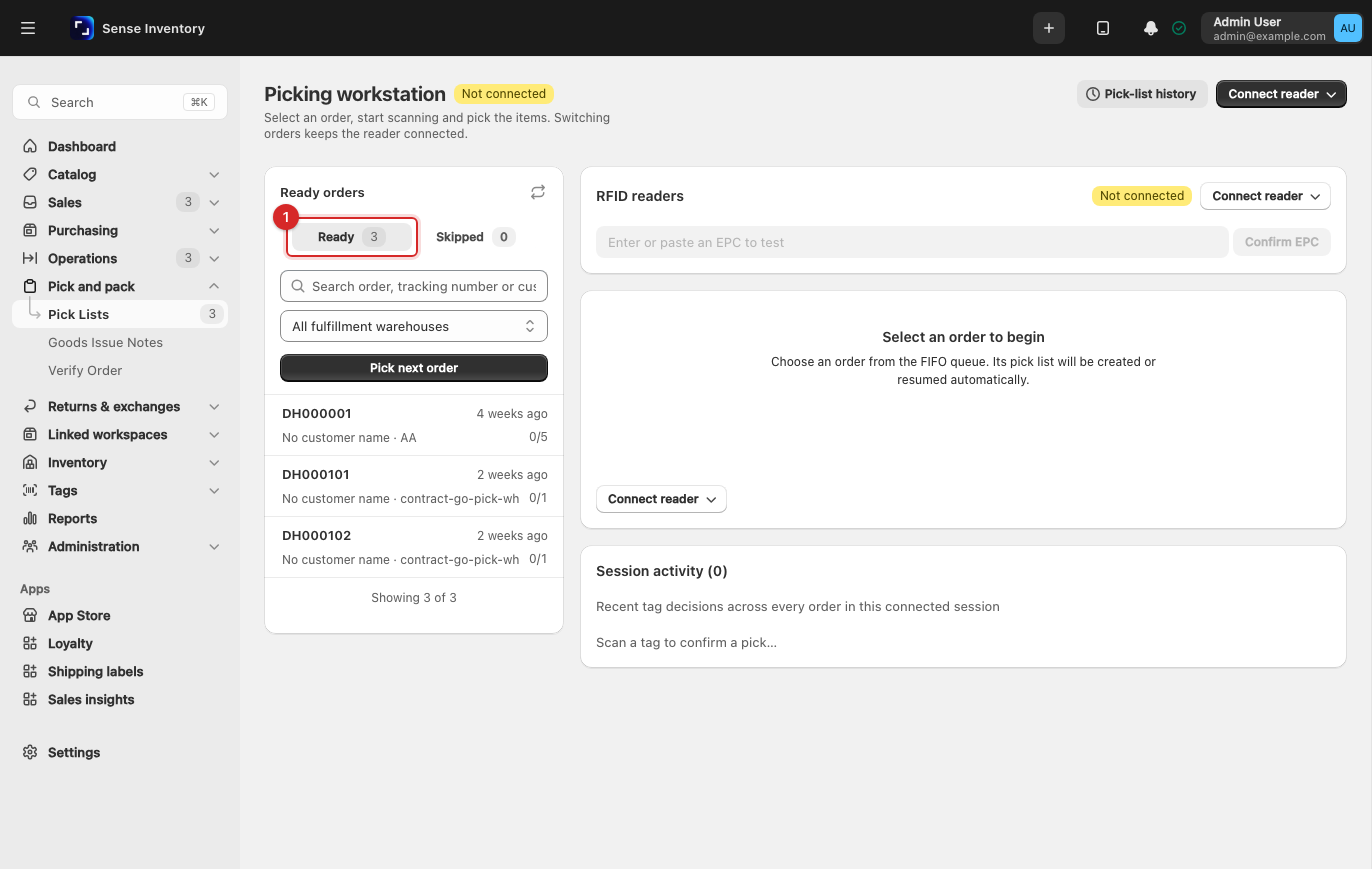
To see every pick list, click Pick-list history. Its views filter by status: All, Draft, Open, Completed, and Cancelled. Check the Items column before you hand a list to a picker: a list showing 0 came from an order with no lines, so check the source order first.
Pick at the workstation
Selecting an order on the workstation creates or resumes its pick list. The reader stays connected when you switch orders.
Click Connect reader, then choose USB reader or Bluetooth reader.
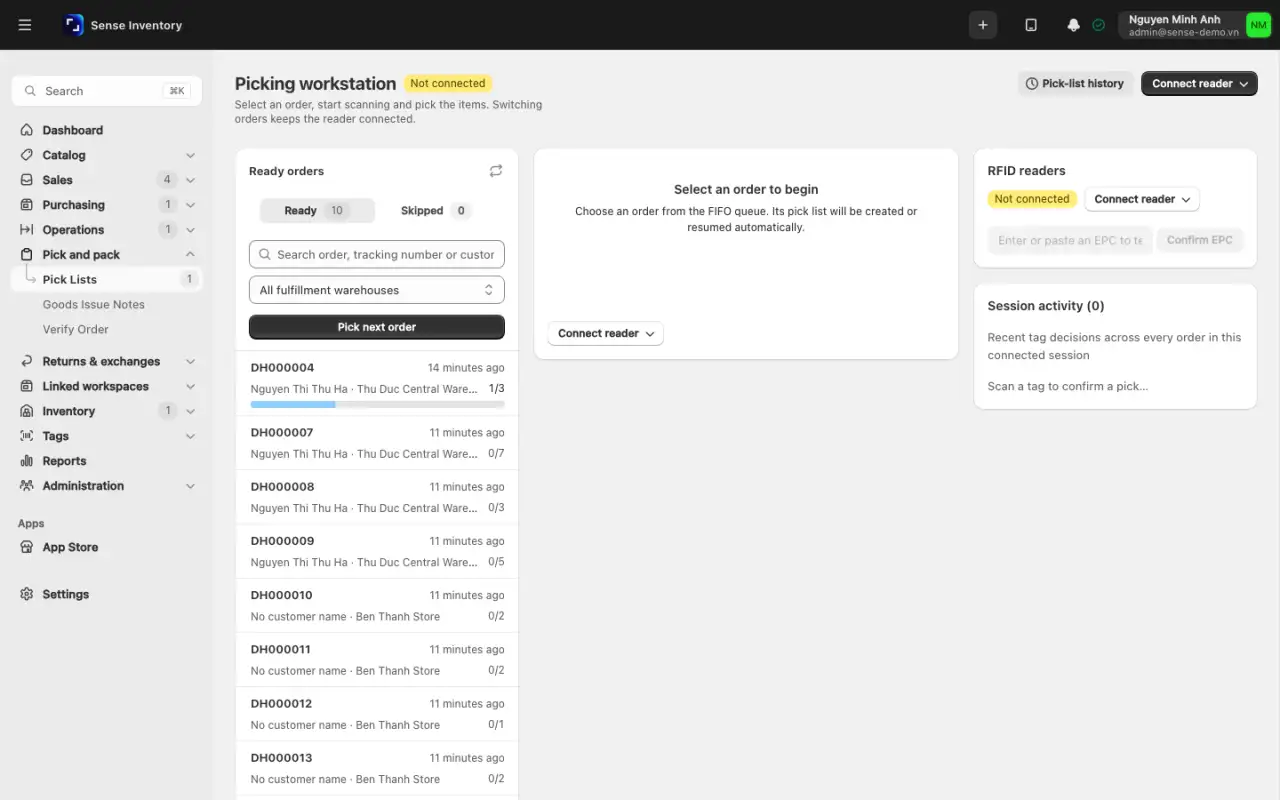
Optionally choose a Fulfillment warehouse, or search by order number, tracking number, or customer. You can scan a waybill straight into the search box.
Click an order on the Ready tab, or click Pick next order. Its pick list is created or opened.
Click Start scanning and scan the tags. Each scan shows Picked, Substituted, Already picked, Already on this order, or Not accepted. Session activity lists recent scans across every order in the session.
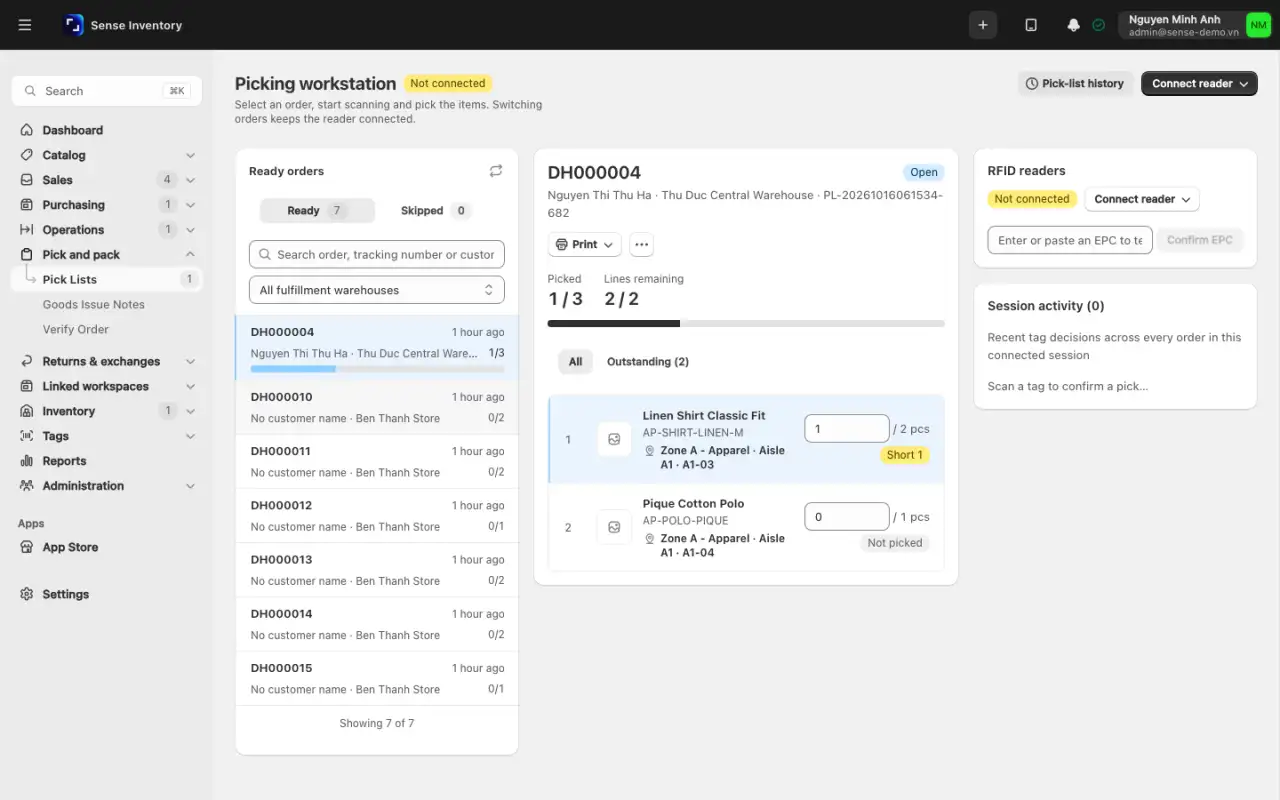
When every line is picked, the order completes ("Order {orderNumber} is fully picked") and the workstation selects the next oldest order. After switching orders, click Start scanning again.
To set an order aside, open Order actions → Skip shipping, give an optional Reason, and click Skip shipping. Its open pick list is cancelled and the order moves to the Skipped tab. Click Resume shipping there to put it back in the queue.
Unstarted orders older than the Picking queue window (14 days by default, under Settings → Inventory settings) are hidden from the queue and its search. Set the window to 0 for no limit. A tag that is already on an open or completed pick list shows Already picked. A tag that shipped and later came back into stock can be picked for a new order.
Pick from a single order
Open the order under Sales → Order History and choose Create pick list. Check the fulfillment warehouse and click Create pick list. The list opens as a Draft.
Click Get item locations, then click Open.
Compare the warehouse, products, variants, and quantities with the source order. Fetch the goods using the location shown on each line. Batch and bin locations appear only when that tracking is on. To find tagged goods, see Manage RFID.
Scan tags in the Scan to pick card, or type one in Enter EPC manually and click Confirm EPC. When RFID is not required, you can also type Picked quantities in the table.
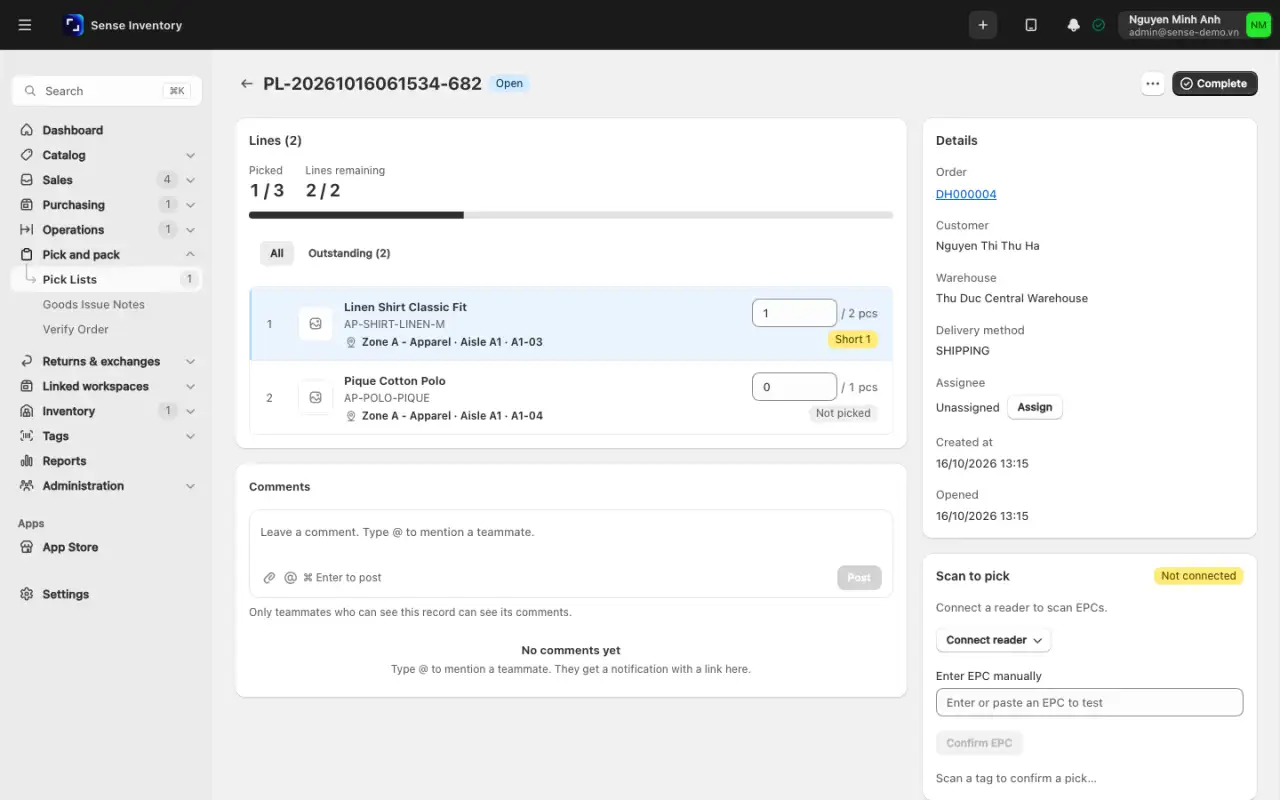
You can scan a different tag from the suggested one when it has the same unit and original quantity. The order line then switches to the scanned tag and the substitution is logged. You cannot pick more than a line requires.
Operational guidance
Record short, damaged, or misplaced items in the pick list Notes instead of skipping a line silently. The checker needs to know.
Assign a pick list
On the pick list, click Assign in the Details card.
Choose an Assignee and click Confirm. The list shows only active people who can edit pick lists and can access this warehouse.
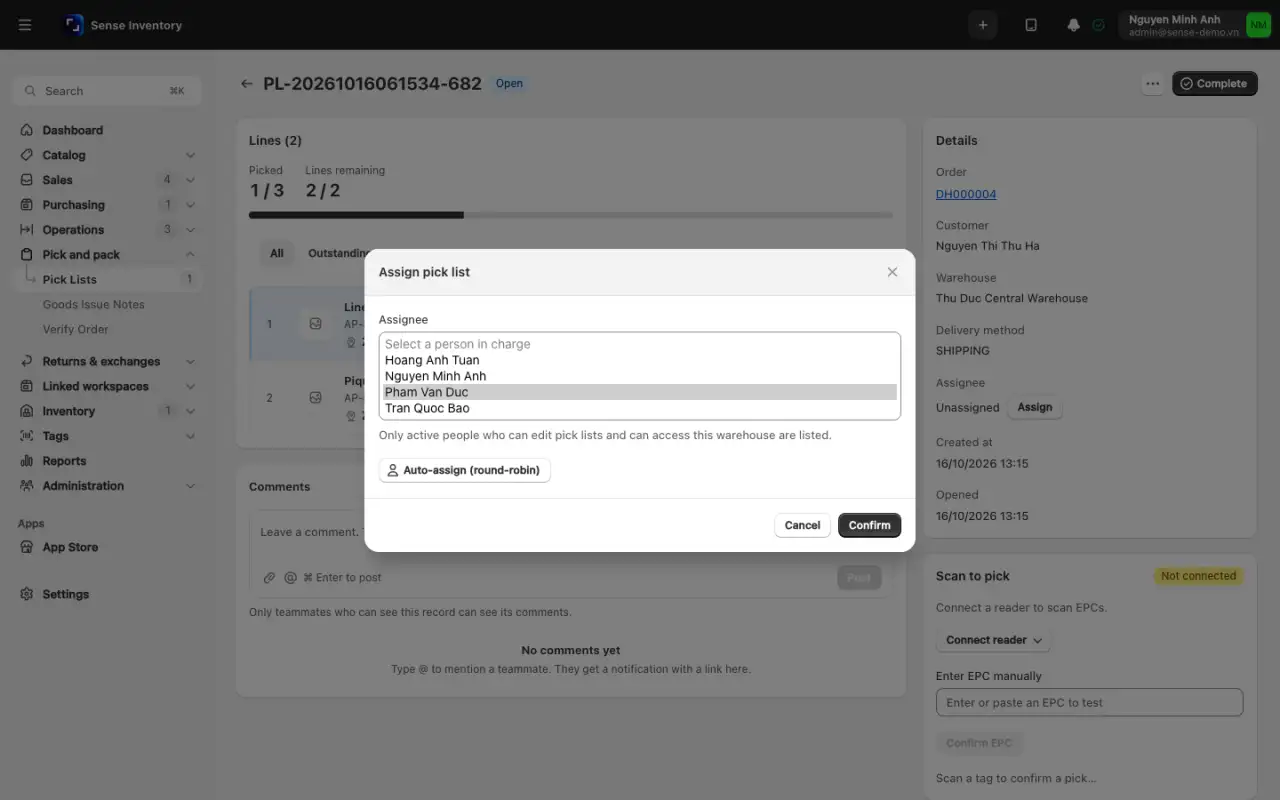
Or click Auto-assign (round-robin) to rotate the list through the same people. If nobody is eligible, an error says so.
Complete a pick list
- When every line is fully picked, the list completes by itself. Otherwise click Complete. At least one unit must be picked. If lines are short, confirm Complete with partial picks?. If kits are incomplete, confirm the prompt that lists the missing components.
- The order moves to Picked up and a draft goods issue note is created. The button changes to View goods issue note.
A short-picked order is final. The note carries only the picked quantities, a completed pick list cannot be reopened, and a second list for the remainder is refused. To complete several lists at once, open Pick-list history, tick the rows on the current page, and click Complete. To cancel a list that has not completed, open the ⋯ menu and choose Cancel pick list.
Checking
Checking catches mistakes before the parcel leaves.
Open Pick and pack → Verify Order (Stock Operations → Verify Order on the classic layout). Scan or type the Order number or waybill and click Find order.
The cursor moves to Scan product. Scan each item in the parcel. Sense matches each code by SKU, barcode, or tag EPC. A tag scanned twice counts once.
Read the result per line:
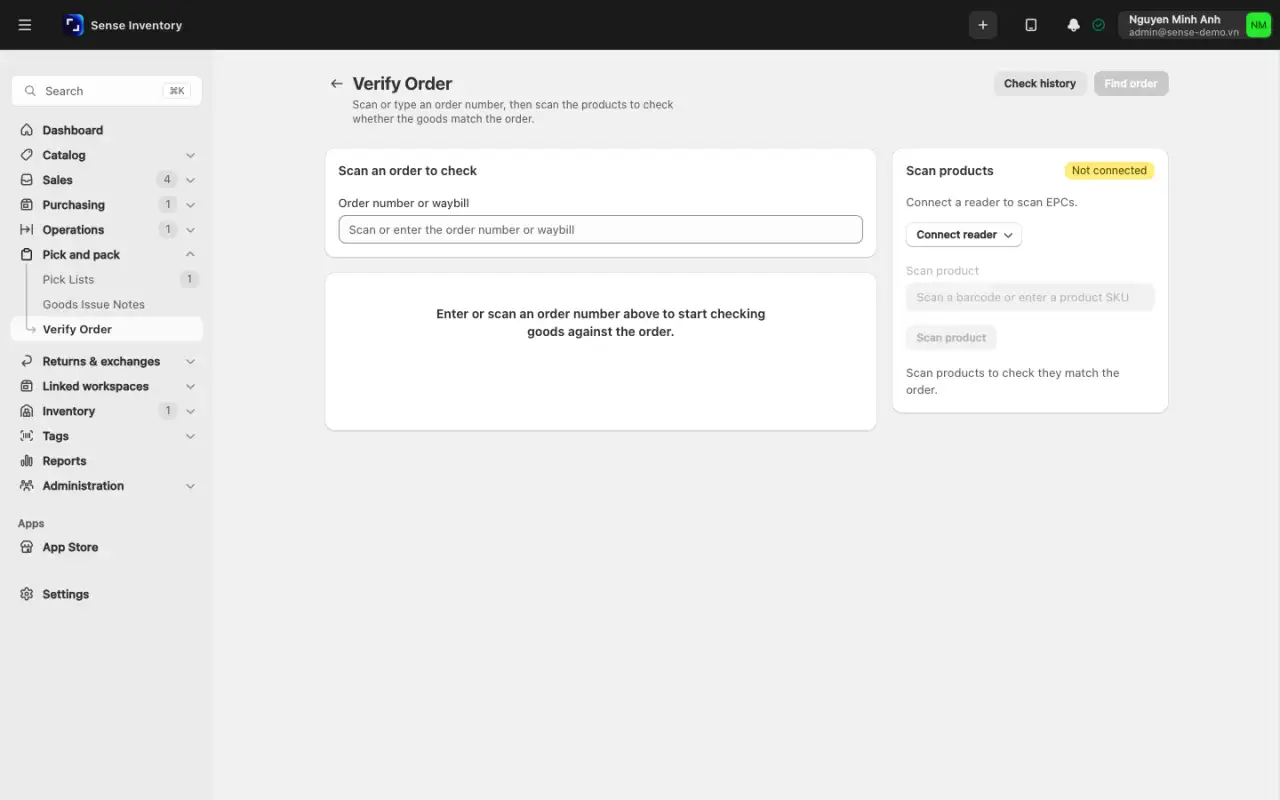
Status Meaning What to do Not scanned Nothing scanned for this line yet Find the missing item in the parcel Match Scanned count equals the order Nothing Short n n fewer than the order Add the goods and keep scanning Over n n more than the order Take the extras out of the parcel Also check for codes that belong to no line. A known product that is not on the order shows as Wrong product. A code Sense does not know shows as Unrecognized. Either one means something else is mixed into this parcel.
Seal the parcel only when the result reads "Matches the order…": every line is Match and nothing is wrong or unrecognized. One stray code keeps the result at "Does not match…", even when every line has its quantity.
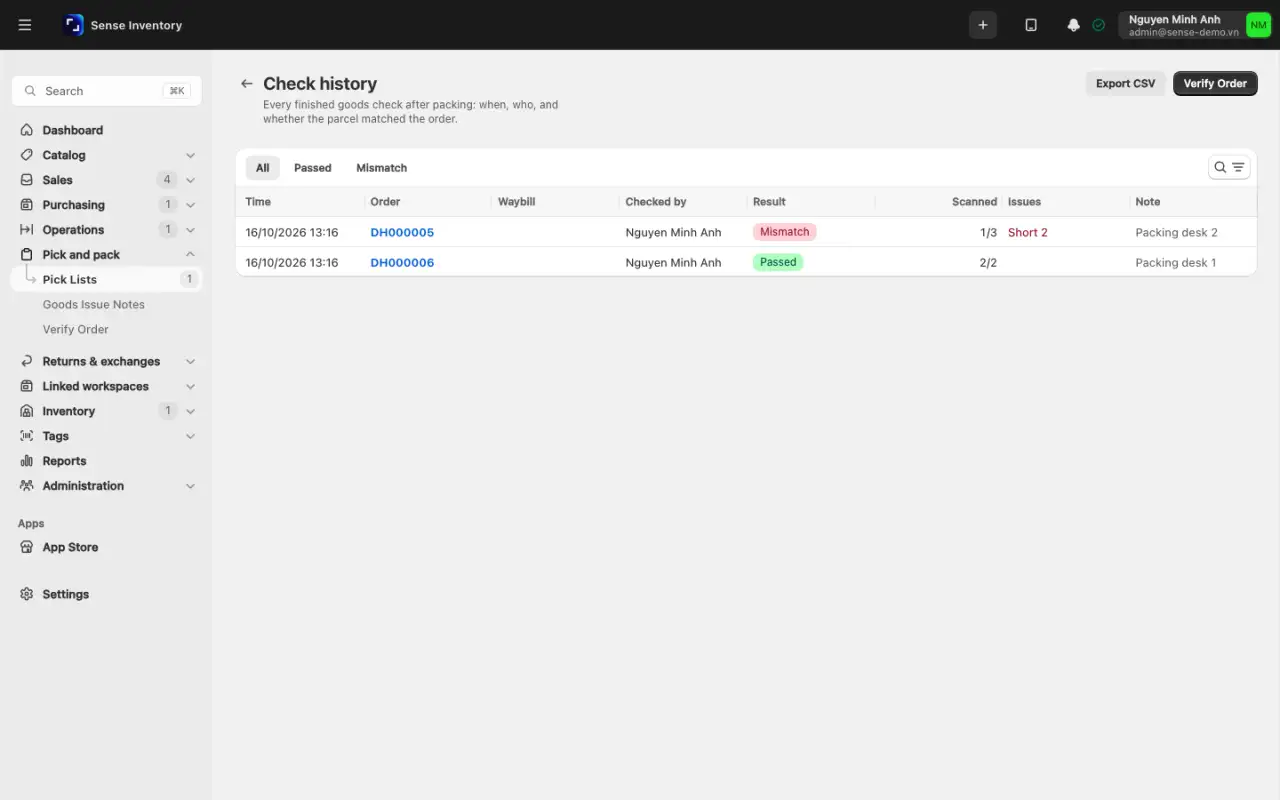
Add a Note if needed and click Finish check. The check is saved on the order as Passed or Mismatch, with the person, warehouse, waybill, every line, and every scan.
Checking changes neither stock nor the order status. Click Check history to see past checks. Filter by Date, Checked by, or result, click Export CSV, or open a check to see its lines and scans and click Check again.
Shipping
Submit the goods issue note
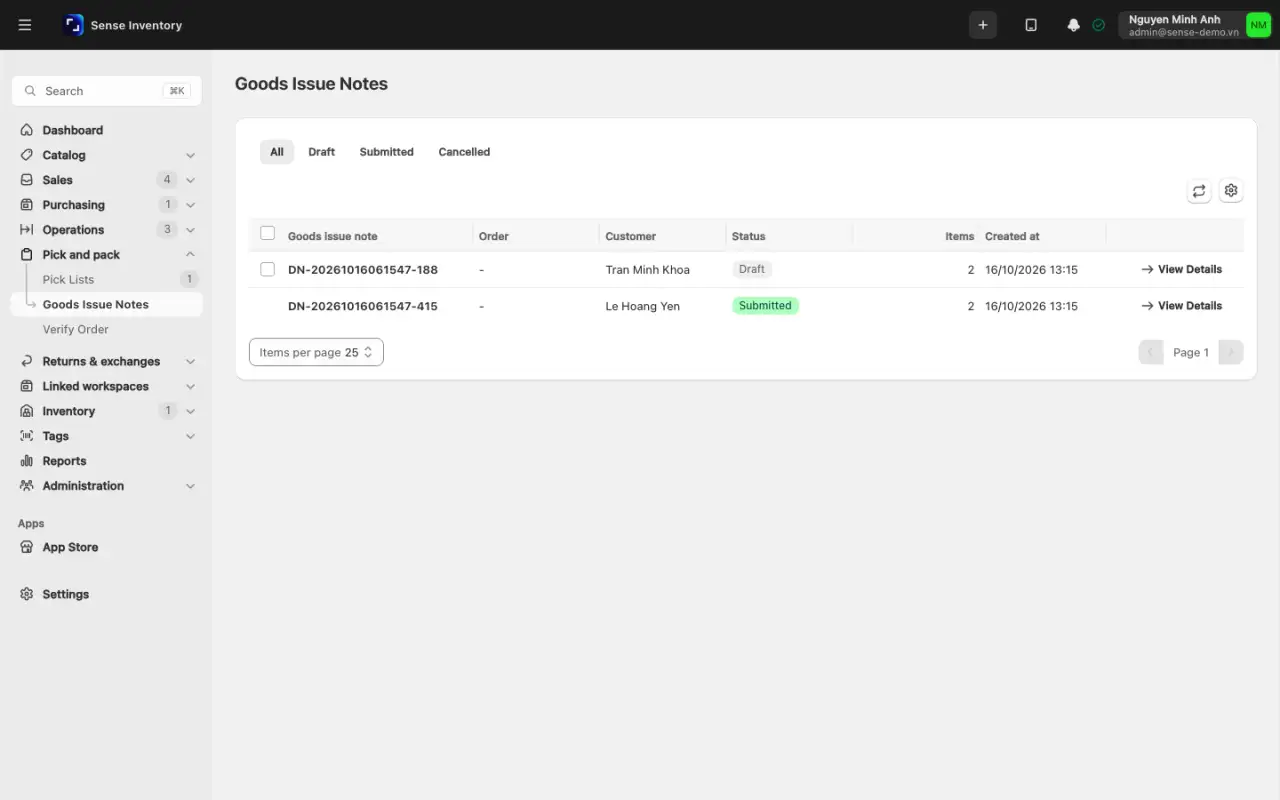
Open Pick and pack → Goods Issue Notes (Stock Documents → Goods Issue Notes on the classic layout), or click View goods issue note on the pick list. The note is built from the completed pick list, not from the order. It carries what was actually picked, which differs from the order whenever something was short.
Open the note. Check the customer, warehouse, and items. Each item lists the tags picked for it under Scanned EPC.
Click Submit and confirm Submit goods issue note. Stock drops now and the ledger records the goods leaving. Plain tags become sold, and the order moves to Shipped.
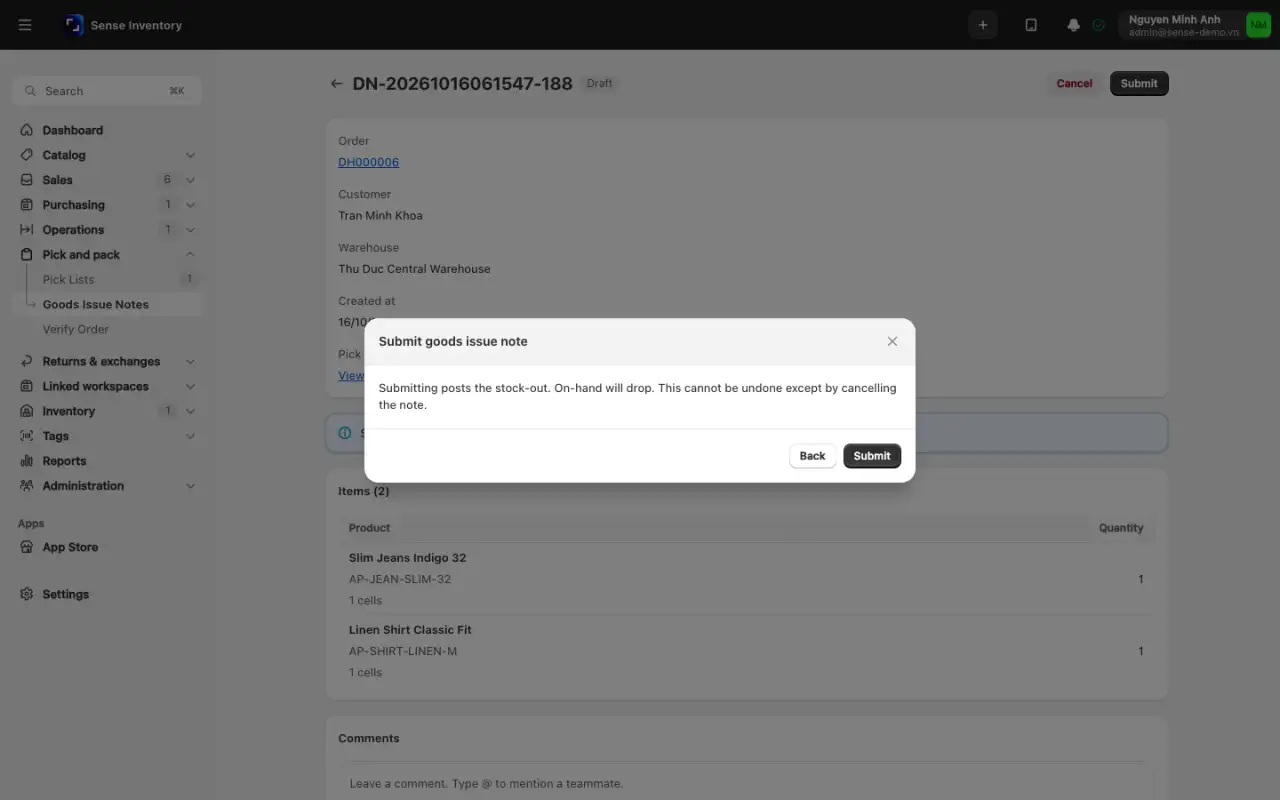
To undo, click Cancel, give an optional Reason, and confirm. Cancelling a draft note changes nothing. Cancelling a submitted note reverses the stock movement, puts the goods back as a reservation, makes the tags active again, and moves the order back to Picked up.
To submit several notes at once, tick the drafts on the list and click Submit. If some have incomplete kits, one confirmation lists them all. In the mobile app, tap Create goods issue note and then Submit on the note screen. Offline actions are queued, except for Haravan orders, which need a connection.
Create a waybill
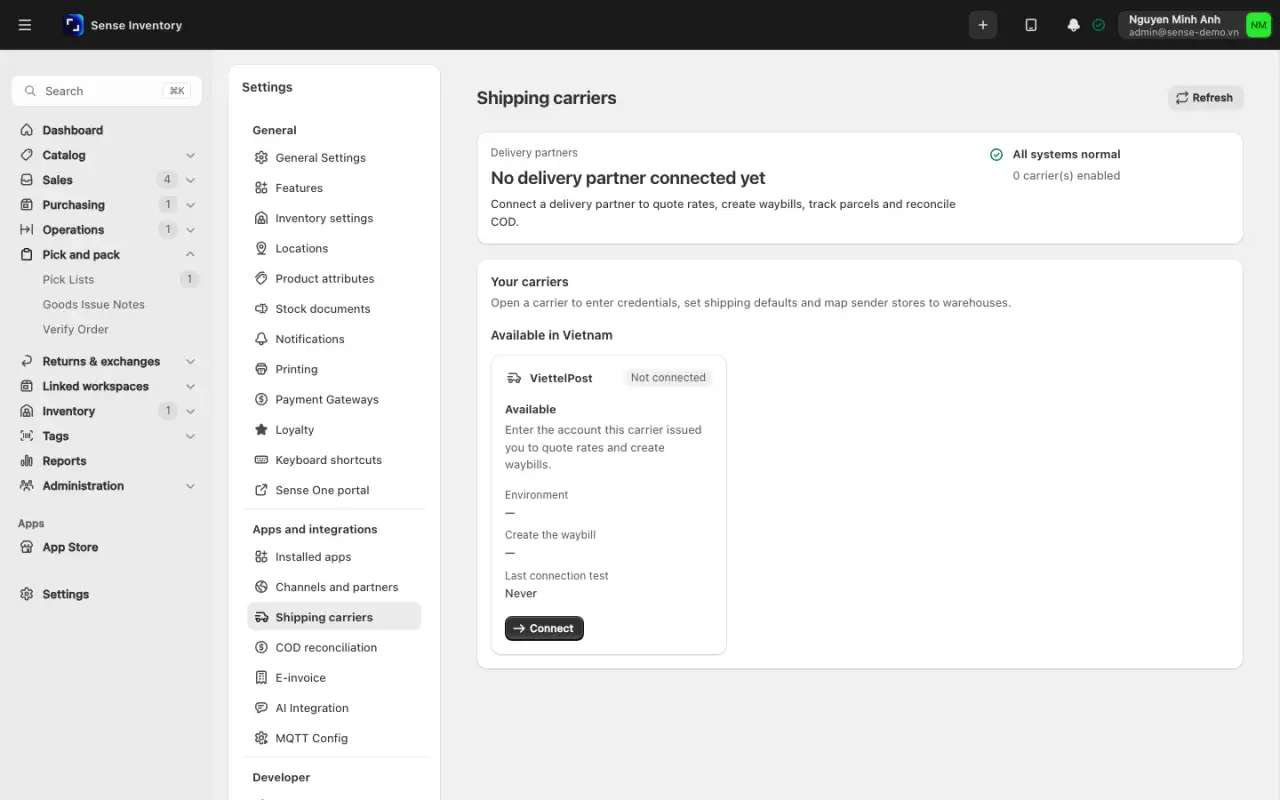
A waybill books the parcel with the carrier. ViettelPost is the built-in carrier. Connect it once:
Open Settings → Shipping carriers and click Connect on the ViettelPost card.
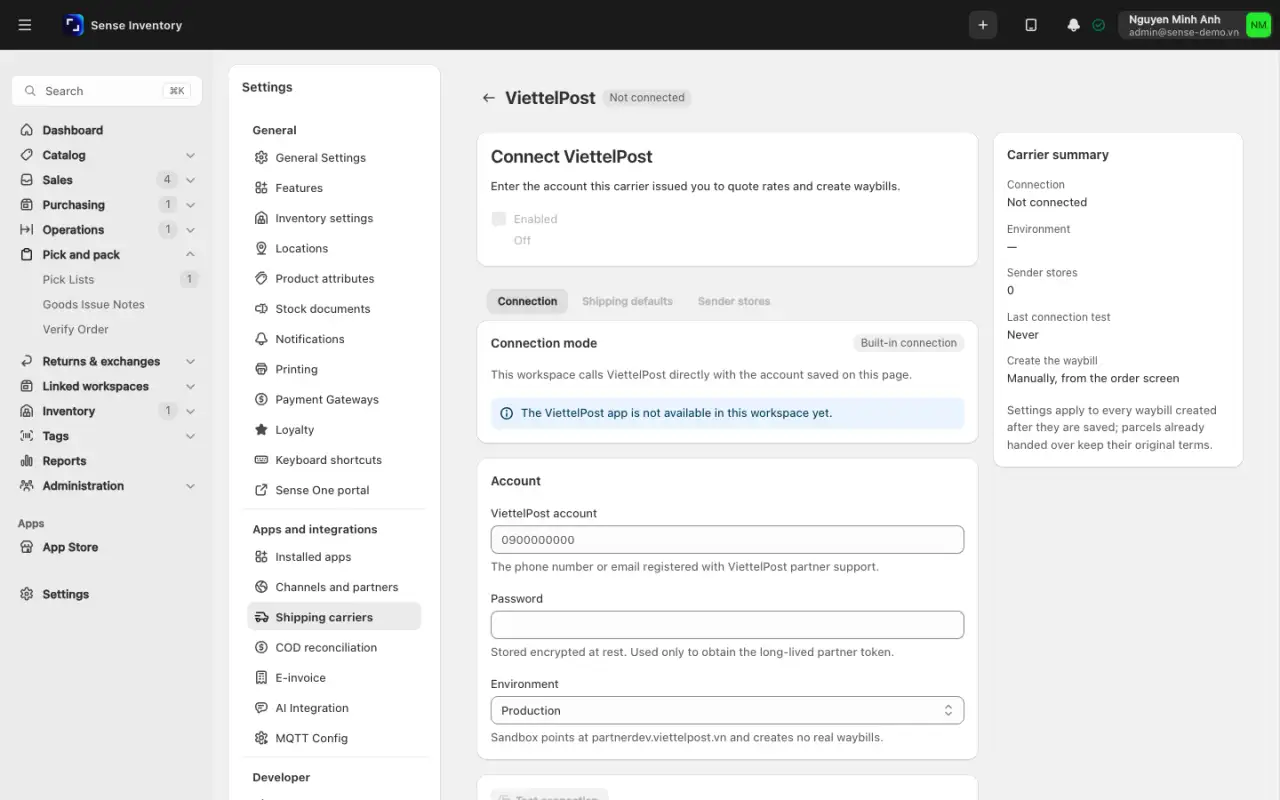
On the Connection tab, enter the ViettelPost account and Password, choose the Environment (start with Sandbox, which creates no real waybills), and click Save.
Click Test connection. You should see "Connected. Found {count} sender store(s)."
Turn Enabled on. On the Sender stores tab, choose the warehouse for each store, click Make default on the main one, and click Sync address catalog.
On the Shipping defaults tab, set Who pays freight, Fallback parcel weight (g), Label size, and Declare value above, then Save.
Then, for each order shipped by carrier:
- Open the order and click Create waybill on the Delivery partner card. Check the Delivery route, Ship from, Parcel details, and Collection & instructions. If Check the delivery address appears, confirm the province, district, and ward.
- Cash on delivery starts at 0. Type the amount to collect.
- Under Delivery service, click Get rates, choose a service, and click Create waybill. The card shows the Tracking number, Service, Carrier fee, and Estimated delivery. Use Print label or Cancel waybill.
An order can have only one live waybill. If the carrier call fails, Sense keeps retrying in the background, so a second Create waybill is refused until you cancel the first. To create waybills automatically, set Create the waybill to automatic on Shipping defaults and fill in a Default service code. With Collect cash on delivery on, automatic waybills collect the unpaid balance. Status updates from the carrier move the order to Shipped, Delivering, and Delivered. A returned or cancelled parcel does not change the order. Start a carrier return instead, see Sell, return, and use kiosk.
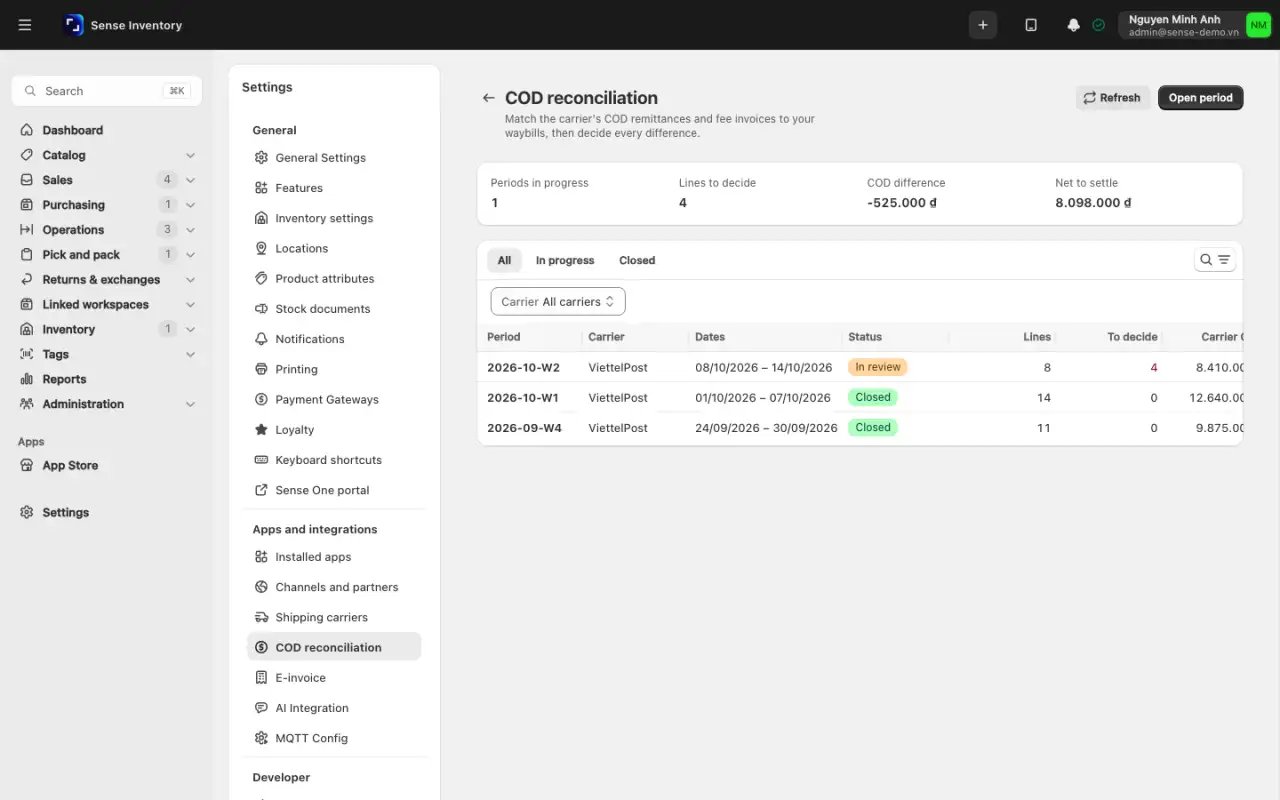
Reconcile COD and carrier fees
At the end of each period, check that the carrier paid back the right cash-on-delivery amounts and charged the right fees.
Open Settings → COD reconciliation, click Open period, choose the carrier, enter a period code such as 2026-07, and set the start and end dates.
On the period page, click Pull and match again. Sense pulls the carrier's statements and matches them to your delivered or returned shipments by tracking number, not by amount.
Open the To decide tab. For each line, choose Accept carrier's figure, Keep our figure, Write off, File a complaint, or Defer to next period, with an optional note.
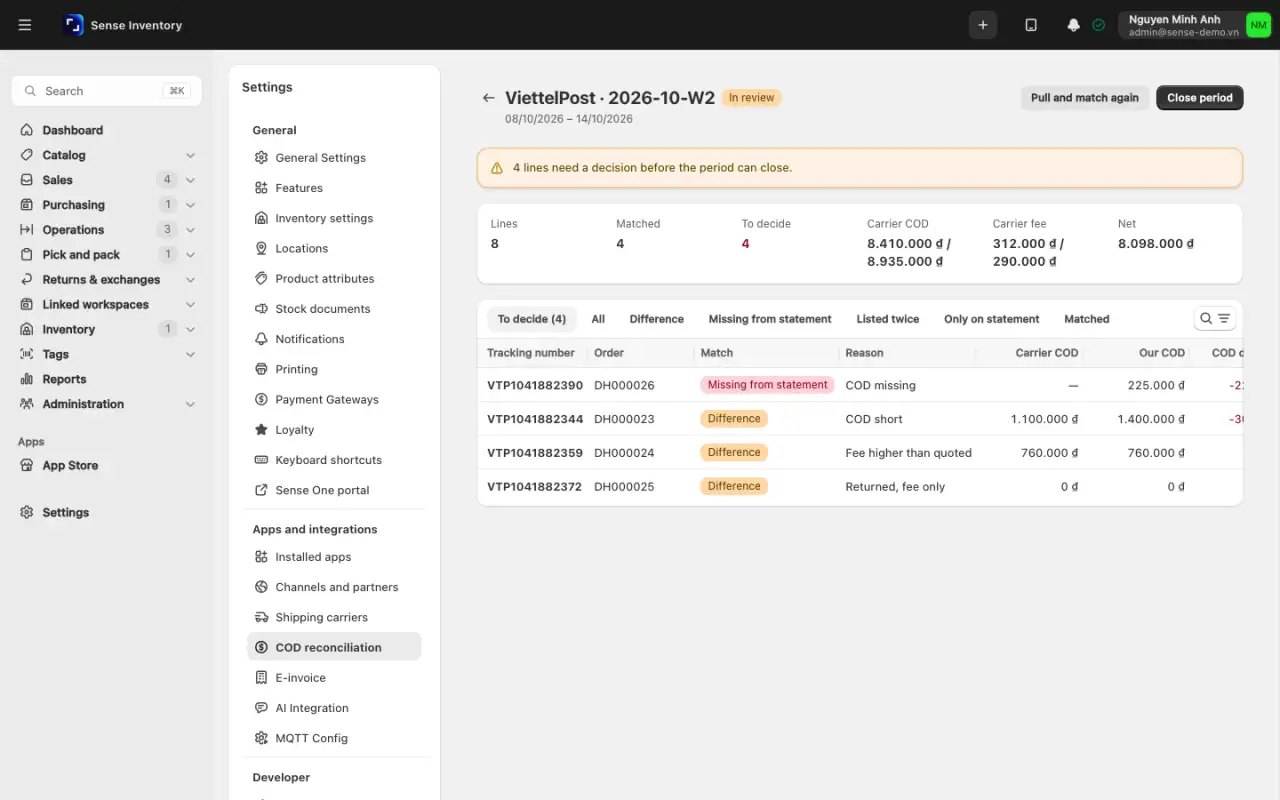
When nothing is left to decide, click Close period. To post the net as one supplier debt entry, tick Post the net amount to debts. This needs the carrier's supplier record set in the carrier settings.
Lines with a difference, a duplicate, or a waybill missing from the statement must be decided before the period can close. A closed period is final.
When something goes wrong
| Symptom | Likely cause | What to do |
|---|---|---|
| Cannot create a pick list for an order | Missing warehouse, wrong delivery method, wrong status, shipping skipped, or a channel hold | Check the conditions at the top of this page on the source order |
| "The warehouse does not have enough {product} to create a pick list" | On-hand plus this order's own reservation does not cover the order | Receive stock or fix the quantity, then try again |
| "This order already has a pick list." | A Draft, Open, or Completed list exists | Cancel the old list if it is not completed, or open the existing one |
A pick list shows 0 products | The source order has no lines | Inspect the order before handing out the list |
| "The EPC does not belong to the order's fulfillment warehouse" | The tag's home is another warehouse | Pick a tag from the right warehouse |
| "The EPC could match multiple order lines." | Several lines with suggested EPCs fit | Scan the suggested tag, or select the correct line |
| Stock did not drop when the pick list completed | Completing only reserves stock | Submit the goods issue note |
| Order missing from the workstation queue | Older than the queue window, skipped, on channel hold, already completed, unpaid, not Shipping or Store pickup, or no warehouse | Check the Skipped tab, then each other reason in turn |
| Someone is missing from the Assignee list | They must be active, able to edit pick lists, and have access to the warehouse | Fix their role or warehouse access, see Users and security |
| Order not found at checking | Wrong number or waybill | Recheck the number |
| Scans register on no line | The product has no barcode or SKU in the catalog | Add the codes, see Catalog and warehouses |
| A line shows Over despite a correct parcel | One barcode item was scanned twice | Click Clear scans and rescan the whole parcel |
| Parcel correct but still unmatched | A Wrong product or Unrecognized scan remains | Remove the stray item from the parcel |
| "This order already has an active waybill" | The carrier call is still retrying or already succeeded | Click Cancel waybill first if you need different details |
| The carrier connection switched itself off | Repeated failed sign-ins | Fix the password, click Test connection, then turn Enabled back on |
| Tracking status is not updating | The carrier has not sent an update yet | Sense also asks the carrier for updates every 30 minutes |
Operational guidance
If goods are short, stop packing and check stock, locations, and the pick list. If scanning turns up extra or wrong items, take them out and rescan. Do not complete a document just to clear a warning: a wrongly shipped order cannot be undone.
Read next
- Process channel orders: the main source of orders for this flow.
- Issue, transfer, and adjust stock: how this differs from the Stock Out operation.
- Manage RFID: tags, EPCs, and how a tag's status affects picking.
- Sell, return, and use kiosk: returns, exchanges, and refunds after the parcel has left.