

Configure the system and integrations
Settings decides how Sense Inventory behaves: which modules are on, which rules the warehouse follows, which channels are connected, and which devices may talk to the system. This page maps that area: where each entry lives, when to change it, and which parts need extra care. To set up a brand-new workspace, use Set up the system. Use this page when the system is already running and you need to change one thing.
You see a Settings entry only when your account has the matching permission, the module is on, and the subscription plan includes the feature. If a colleague sees an entry you do not, check those three things first. See Users and security. By default only administrators see API Access, Webhooks, apps, MQTT Config, and Telemetry. Managers see most of the rest.
Which group changes when
By how often they change, Settings entries fall into three kinds. Each needs a different level of care:
| Kind | Entries | When it changes |
|---|---|---|
| Foundation | General Settings, Features, Inventory settings, Notifications | Set once at rollout; changing them later needs a plan |
| Channels and devices | Channels and partners, Shipping carriers, Payment Gateways, Printing, the Kiosk group, the Security group (security gates), RFID Readers, MQTT Config, workspace links | Changes when you open a new channel, add a counter, or add a device |
| Technical | API Access, Webhooks, Apps, Custom data, AI Integration, Telemetry, Sample Data | Engineering or administrators only |
The three foundation entries
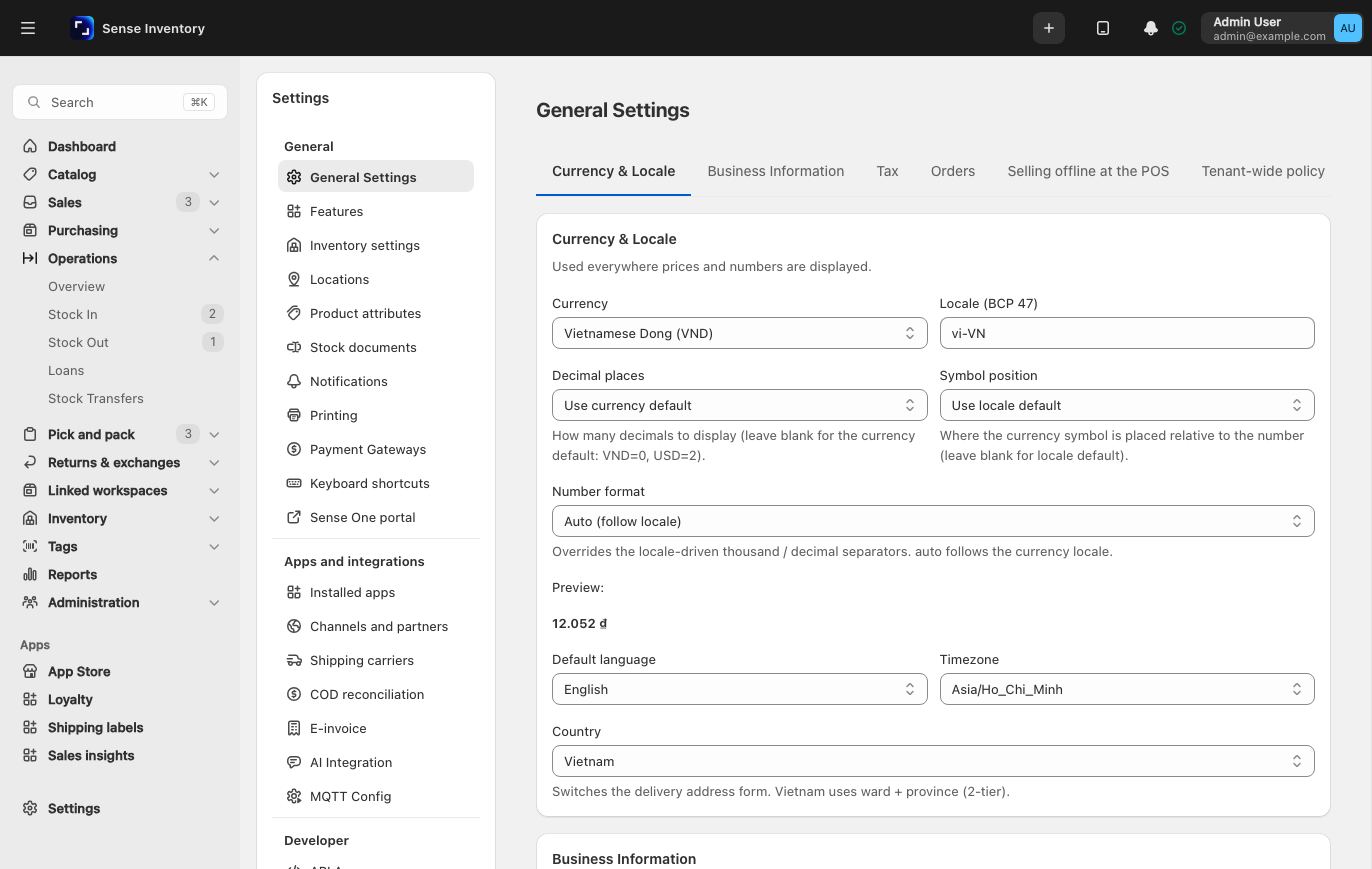
General Settings holds business details, currency, regional format, time zone, tax, and the sign-in policy. A wrong time zone pushes late sales into the next day on every report. If you must fix it, do it when no one is selling.
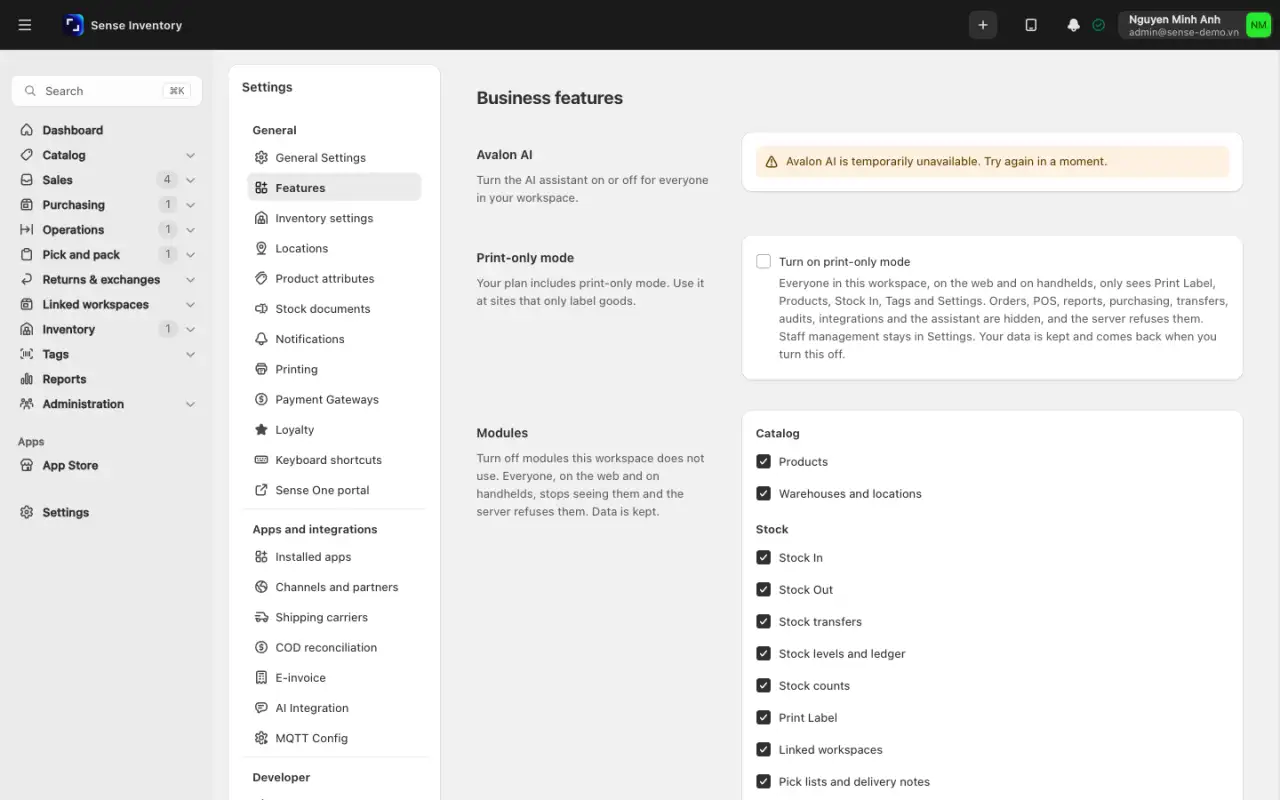
Features is a set of switches for business modules: purchasing, debts, consignment, kiosk, RFID, links with other workspaces, and the Avalon assistant. Turning a module off only hides its screens. The data stays and comes back when you switch the module on again, so feel free to turn off what the store does not use. Some switches depend on others: you can turn on Shipments between workspaces only when links, purchase orders, and suppliers are already on.
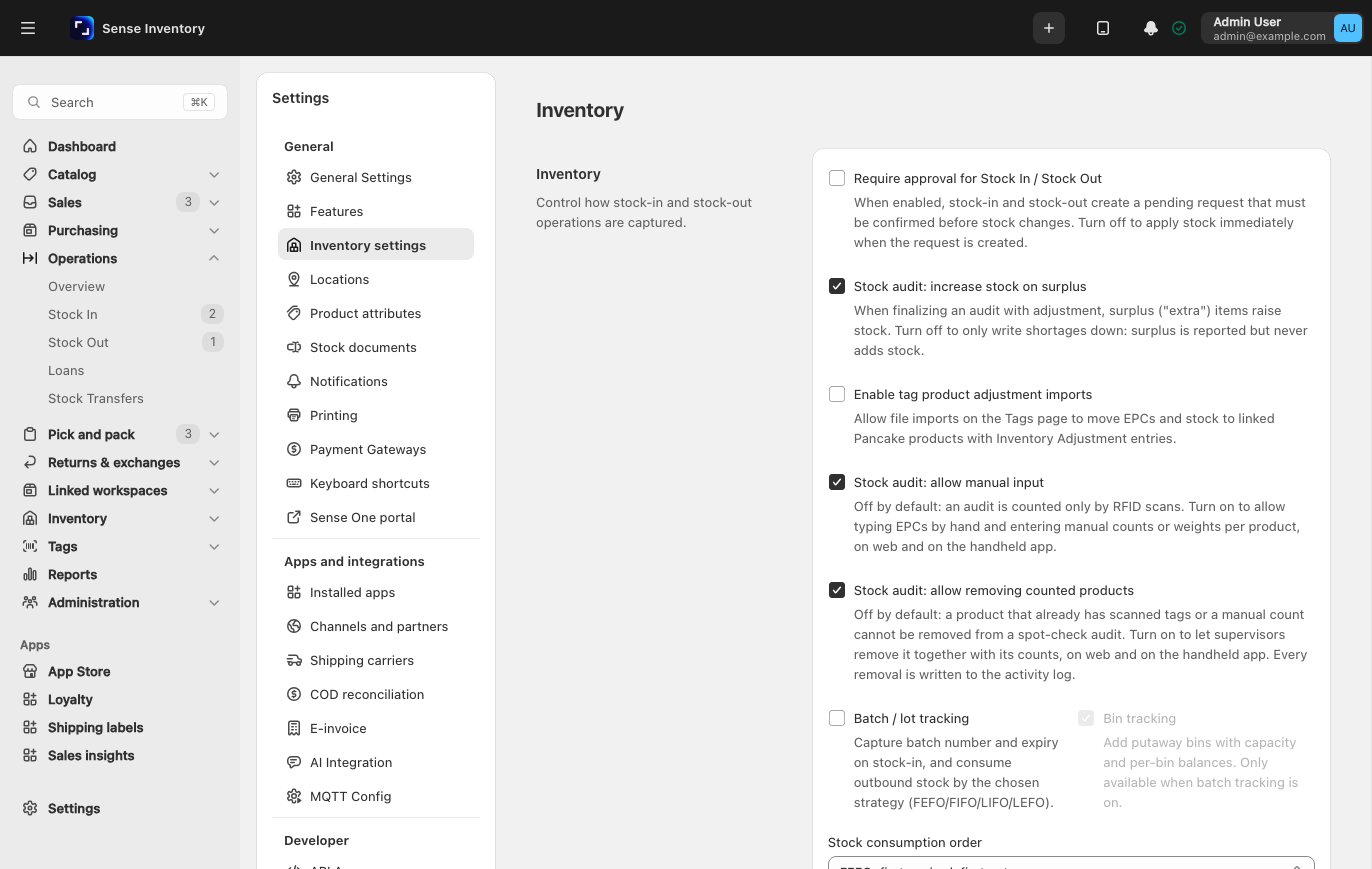
Inventory settings holds the rules that affect every document: Require approval for Stock In / Stock Out, batch and bin tracking, Stock consumption order (for example FEFO or FIFO), Allow overselling, and Require RFID for Stock In / Stock Out. Each switch changes how warehouse staff work every day. Set up the system explains each choice.
Sales channels, shipping, and payment
Channels and partners, under the Apps and integrations group, is the directory of connections to marketplaces and other software. It has the tabs All, Connected, Sales channels, Accounting and ERP, and E-invoice. Sales channels are Sapo, Haravan, KiotViet, Pancake, Nhanh.vn, Salework, and Circa. Accounting and ERP connections are MISA AMIS CRM, MISA AMIS Accounting, and Odoo. Sense Inventory does not replace these systems. It is the source of truth for physical stock, while the other systems keep orders and accounts.
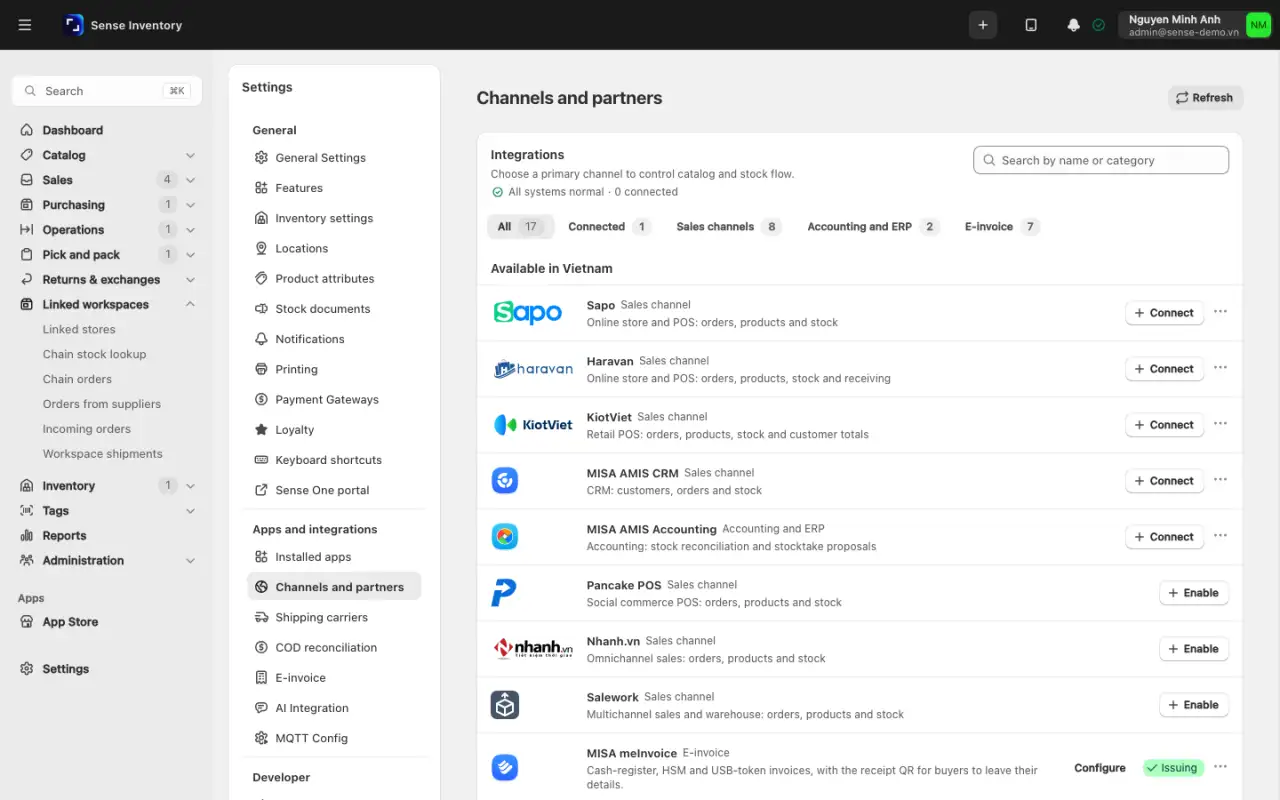
A connection works only when the plan includes it and someone in the workspace has clicked Enable in the directory. Plans include connections by default unless your provider turned one off. A connection missing from your plan is hidden from the directory, and its page says "Not included in your plan". With several channels connected, one is Primary and leads catalog and stock updates. The others are mirror channels. Change the primary channel with Make primary.
The rule for every sales channel: a sale takes stock out exactly once, in one system. Importing a channel order never takes stock. Stock leaves when you submit the goods issue note, or when picking completes if that option is on. Sense Inventory then sends the channel the full on-hand quantity, never a difference. The status and payment of an imported order belong to the channel, so you cannot edit or cancel them in Sense Inventory. Daily order handling is in Process channel orders.
Enable and connect a channel
Open Settings → Channels and partners, pick the tab that holds the connection (for example Sales channels for Haravan), and click Enable. The message may mention a restart, but the connection normally starts at once. Restart only if the connection page shows Restart required.
Click Configure and open the Setup tab. Every connection has the tabs Overview, Setup, Sync, and Activity.
Enter the channel's credentials:
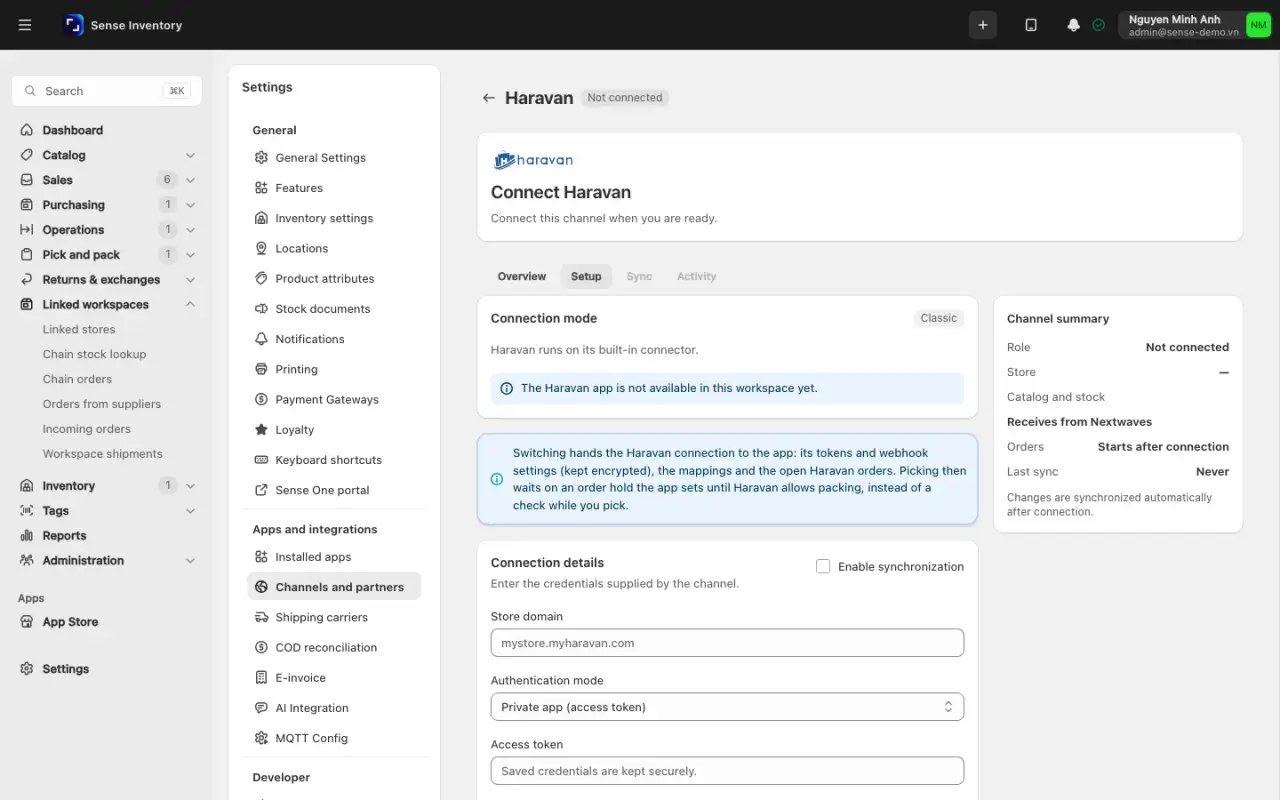
Haravan: choose OAuth (connect) and click Connect via OAuth, or choose Private app (access token) and enter the Store domain and Access token.
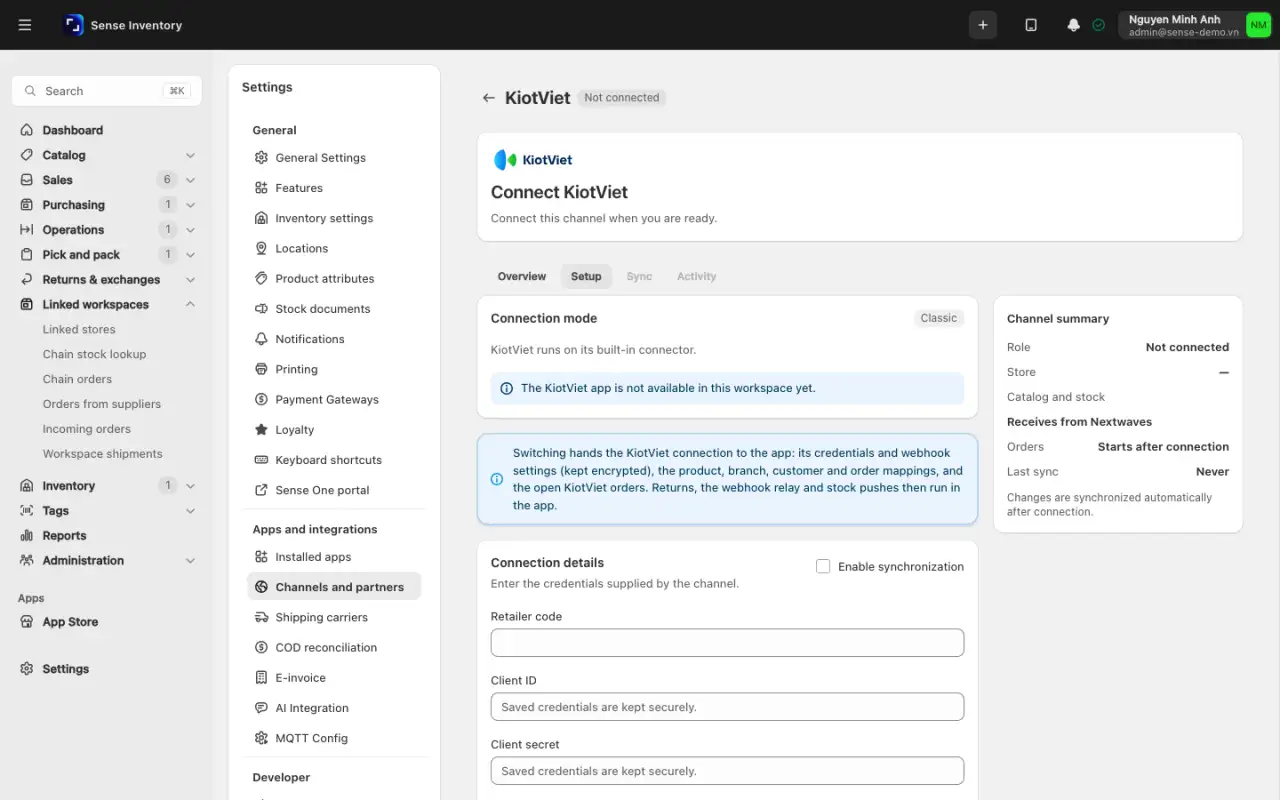
KiotViet: in KiotViet's API connection settings, allow access to customer, invoice, and order information. Then enter the Retailer code, Client ID, and Client secret.
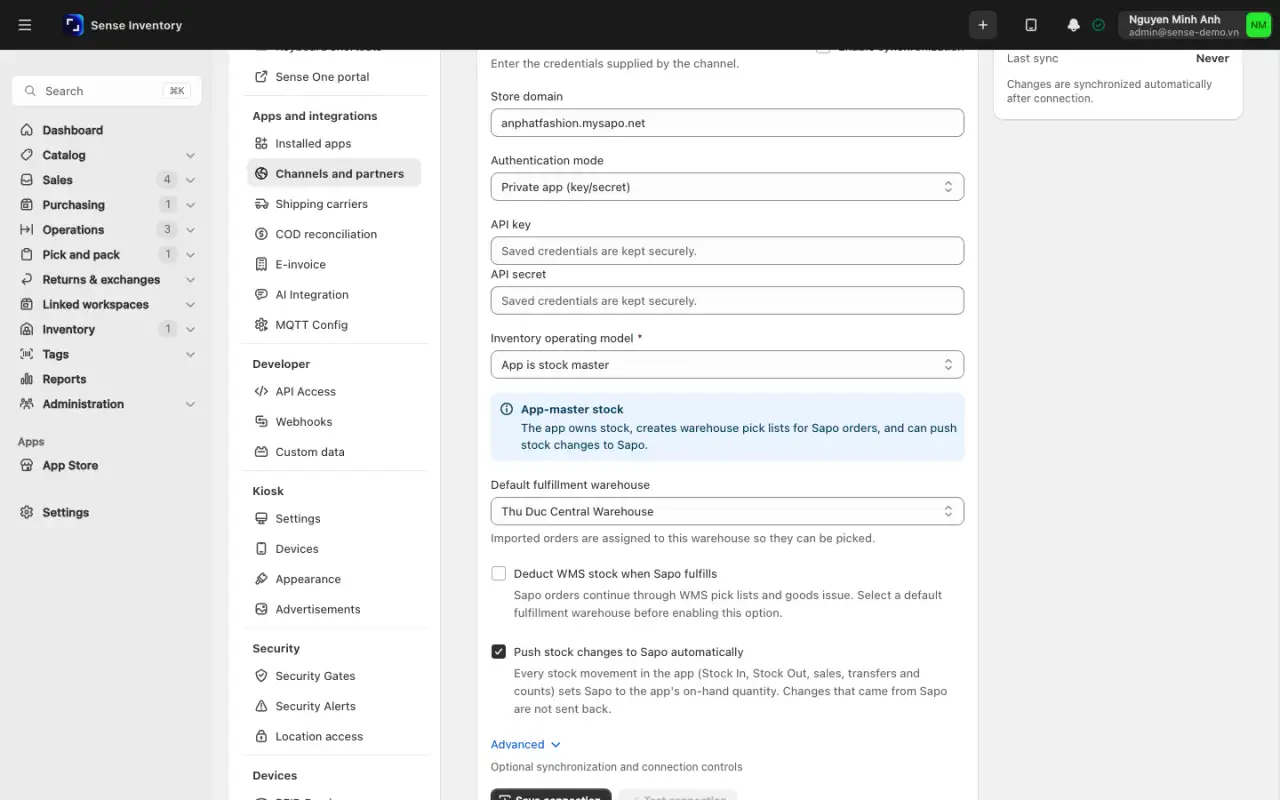
Sapo: enter the Store domain, choose OAuth or a private app (API key and secret), and choose who owns stock: App is stock master or Sapo is stock master. This choice is required. If Sapo owns stock, every stock push is blocked.
Salework: copy the Client ID and token from Admin → Open API in Salework. Pancake, Nhanh.vn, and Circa connect from the same directory. MISA AMIS CRM needs an AppID and client secret. MISA AMIS Accounting needs an App ID, access code, branch ID, and inventory account. It only files proposals for an accountant to approve and never posts to the books.
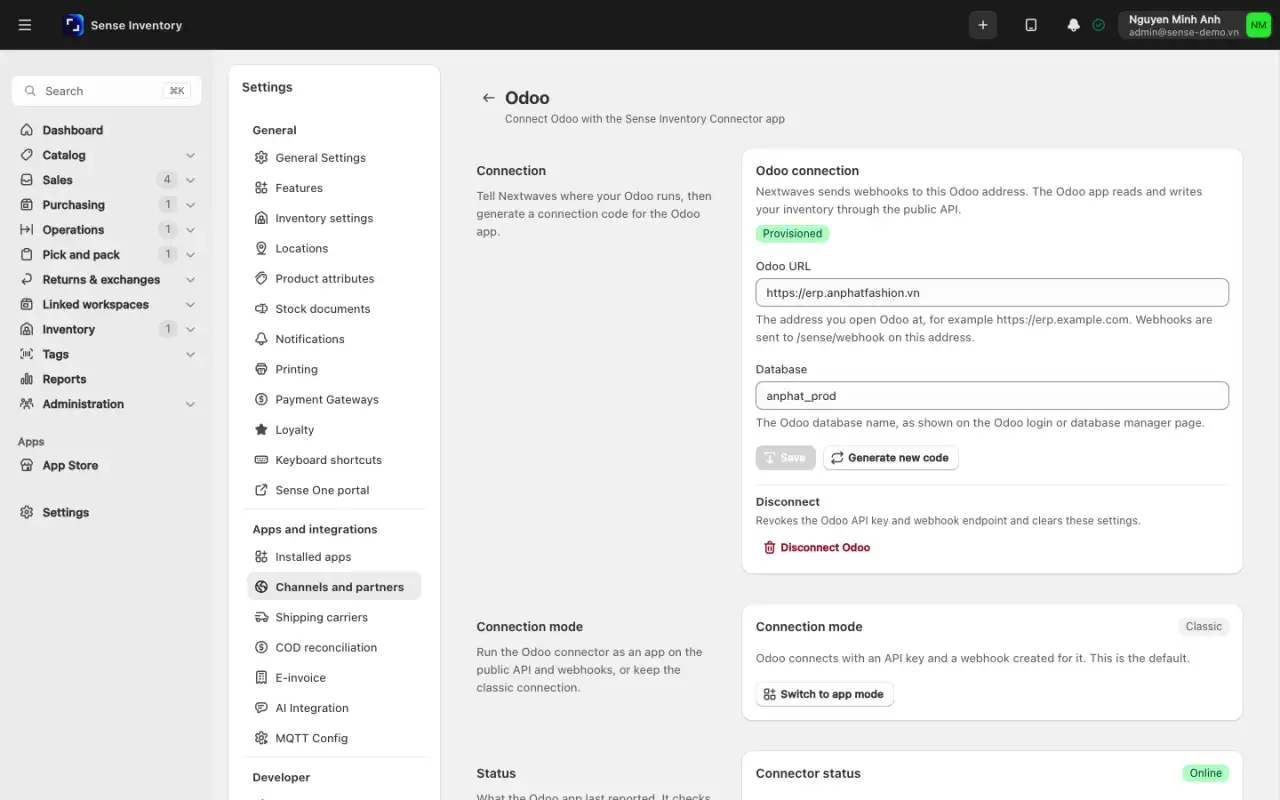
Odoo: enter the Odoo address (it must start with https://) and the database, click Save, then click Generate connection code and paste the code into the Odoo connector wizard. The code is shown once. If you lose it, generate a new one; the old code then stops working.
Choose the Default fulfillment warehouse, which imported orders are assigned to. Decide whether to push stock automatically, then click Save connection and Test connection.
For channels that use webhooks, register them as the Setup tab describes. A Haravan private app needs the address added by hand in Haravan admin. Sapo and KiotViet have a Register webhooks button. Map each channel location to a warehouse.
Open the Sync tab, click Run initial import (Run initial backfill for Sapo and Haravan), and confirm twice. Cancel sync stops it if needed.
Operational guidance
Run the initial import outside busy hours.
Once the connection runs, Inventory → Channel sync (Inventory & Audit → Channel sync on the classic layout) compares stock with the primary channel:
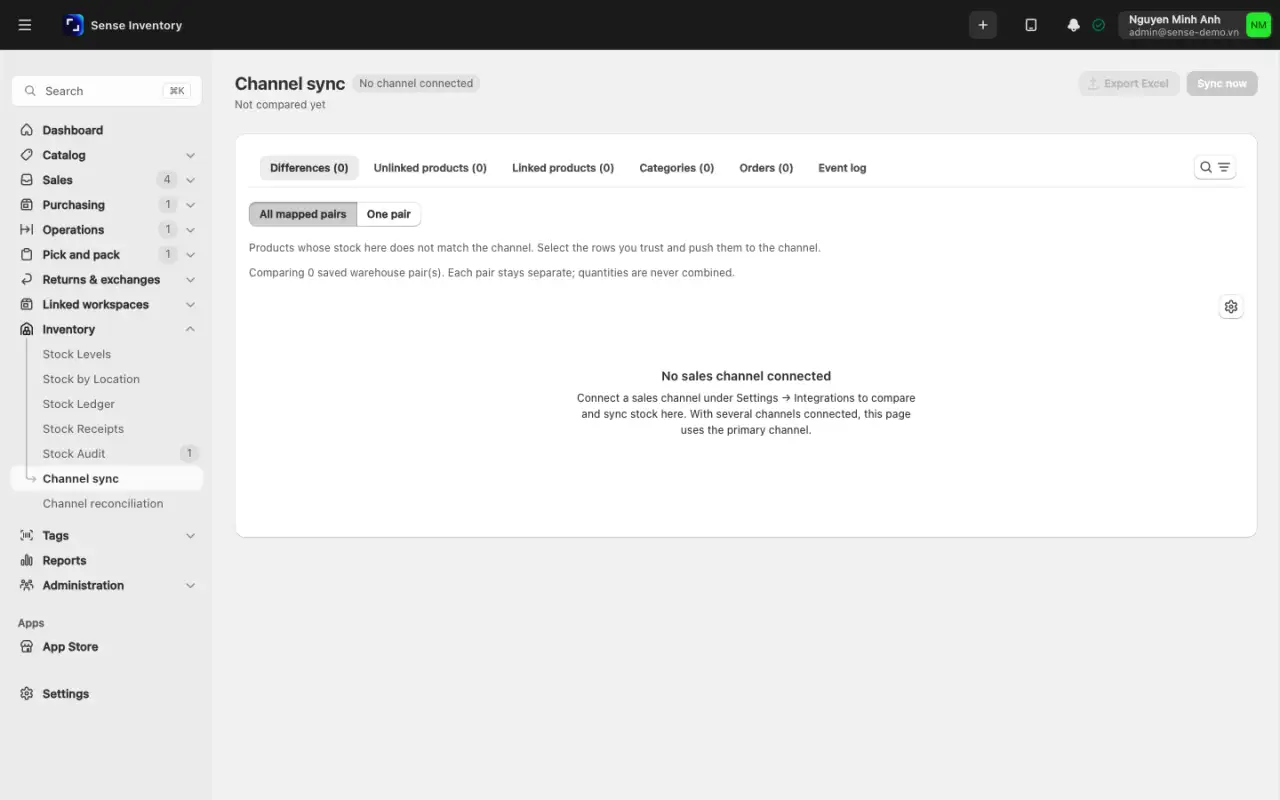
Select rows and click Push to channel. The system reads the current on-hand quantity again and sets exactly that number on the channel, so repeating the push gives the same result. Viewing the page changes nothing.
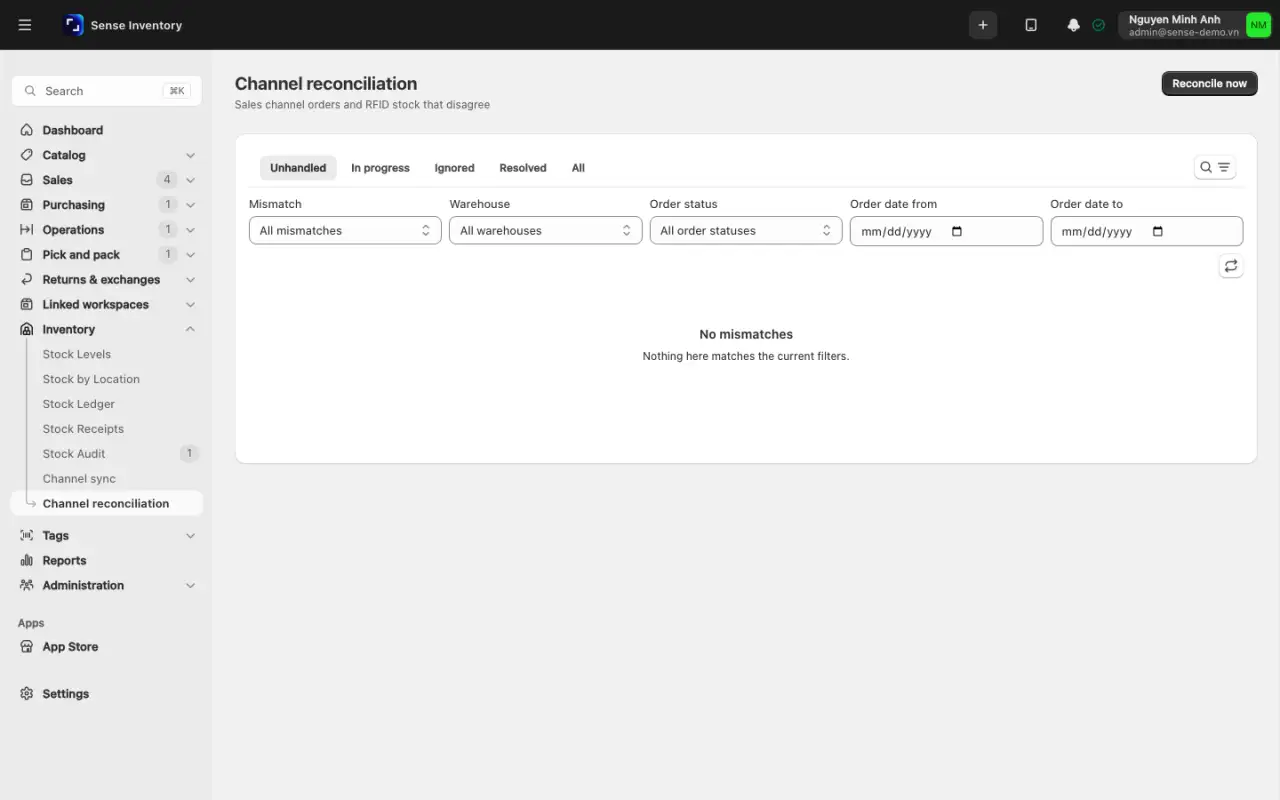
If you use KiotViet, you can turn on Reconcile channel orders with RFID stock-outs under Settings → Features. The system lists orders where the RFID stock-out and the channel disagree as exceptions for staff to resolve. It never changes stock by itself.
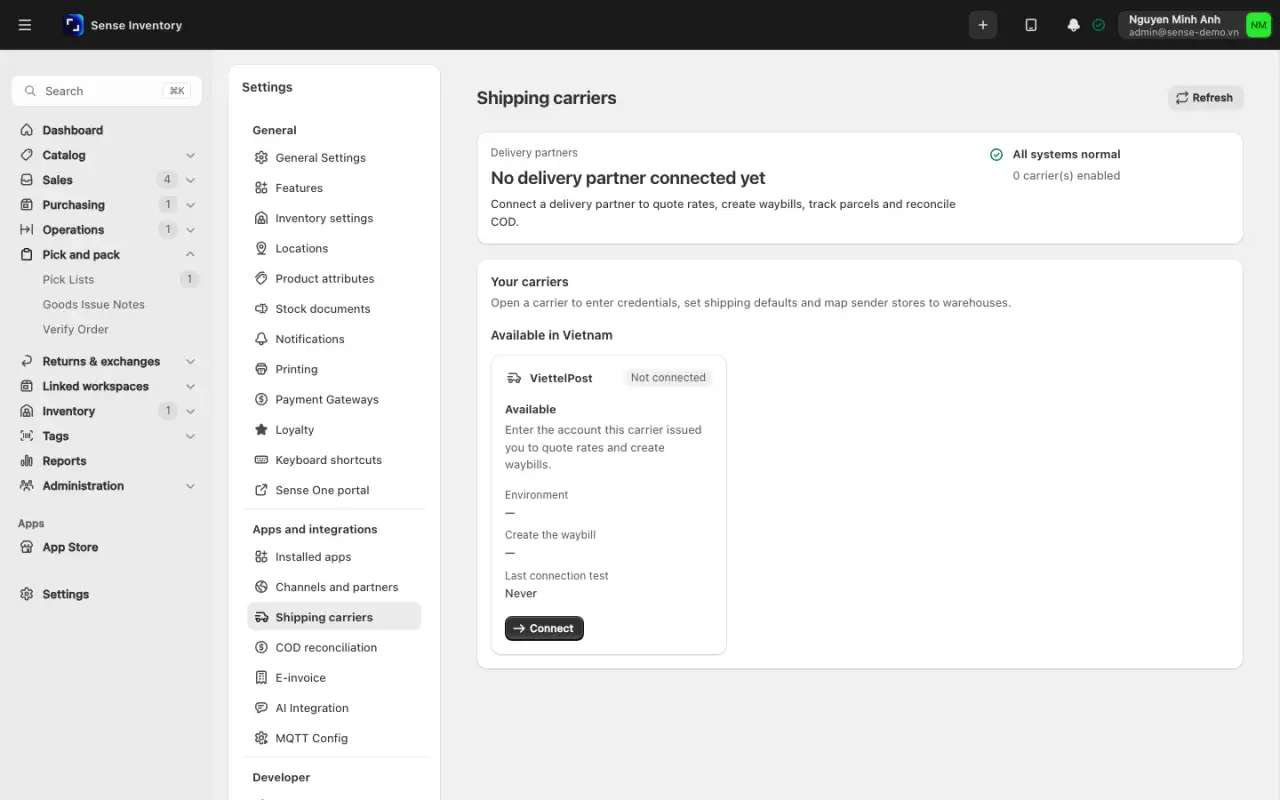
Shipping carriers holds the carrier accounts and delivery setup used when you ship orders. See Pick, check, and ship.
Payment Gateways sets the payment methods a customer can choose at the counter. See Sell, return, and use kiosk.
Operational guidance
After changing Payment Gateways, run a test transaction at a real counter. Mistakes here only show up when money is taken.
Printing and RFID labels
Printing has three tabs: Defaults, Print templates, and QZ Tray. Template types are Receipt, Invoice, Refund, Order, Goods issue note, Pick list, and Purchase order. The workspace template is the default, and you can override it per user, warehouse, or kiosk. Default paper sizes: 80 mm for Receipt, Invoice, and Refund; A4 for Order and Purchase order; A5 for Goods issue note and Pick list. Templates and QZ settings work whenever the Orders, POS, or Print Label module is on.
Customize a template for one warehouse
Open Settings → Printing, tab Print templates, and choose the template type.
Set Scope to Warehouse, click Select entity…, and pick the warehouse. A new override starts as a copy of the workspace default.
Edit the blocks (Add block, or select a block and use Properties), the paper, and the layout. Check the Preview and use Test print.
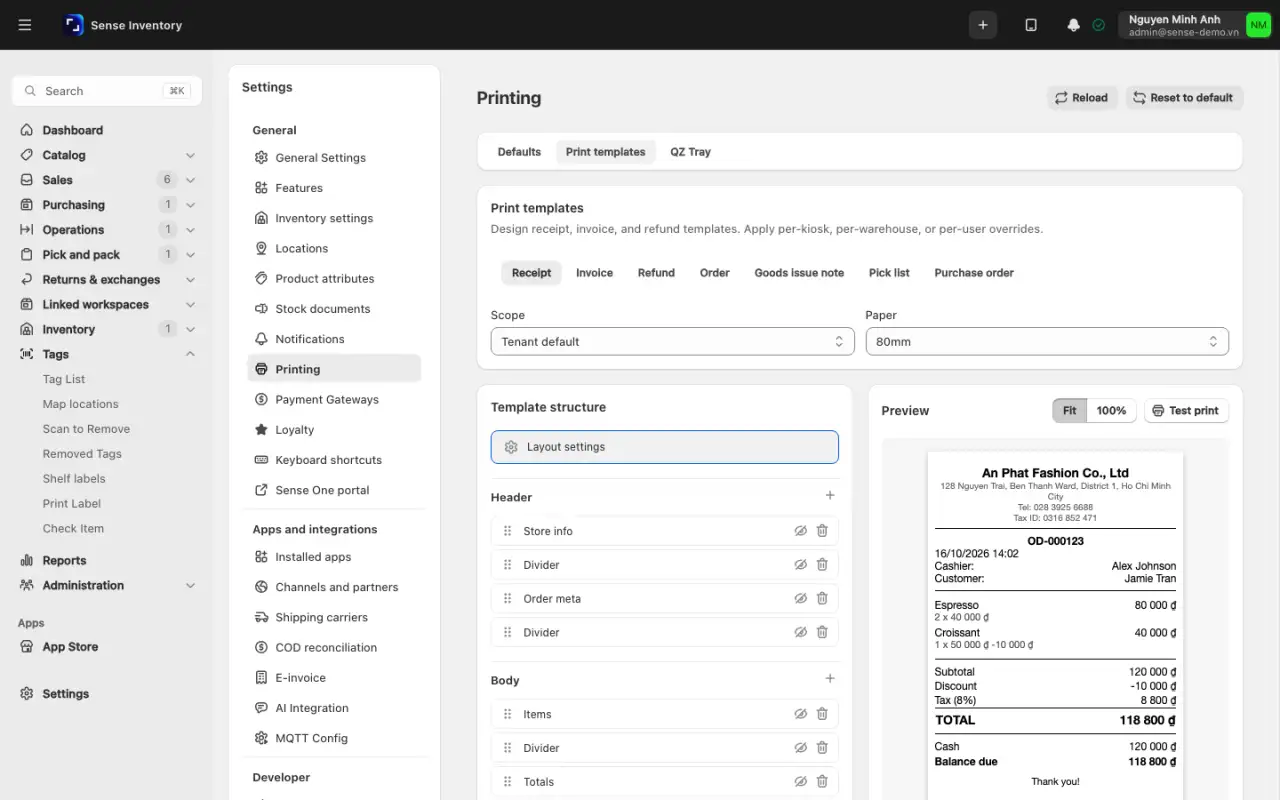
Click Save in the save bar. To undo later, use Revisions → Restore, or Remove override. A change can take up to 60 seconds to reach every server.
Set up an RFID label station for the first time
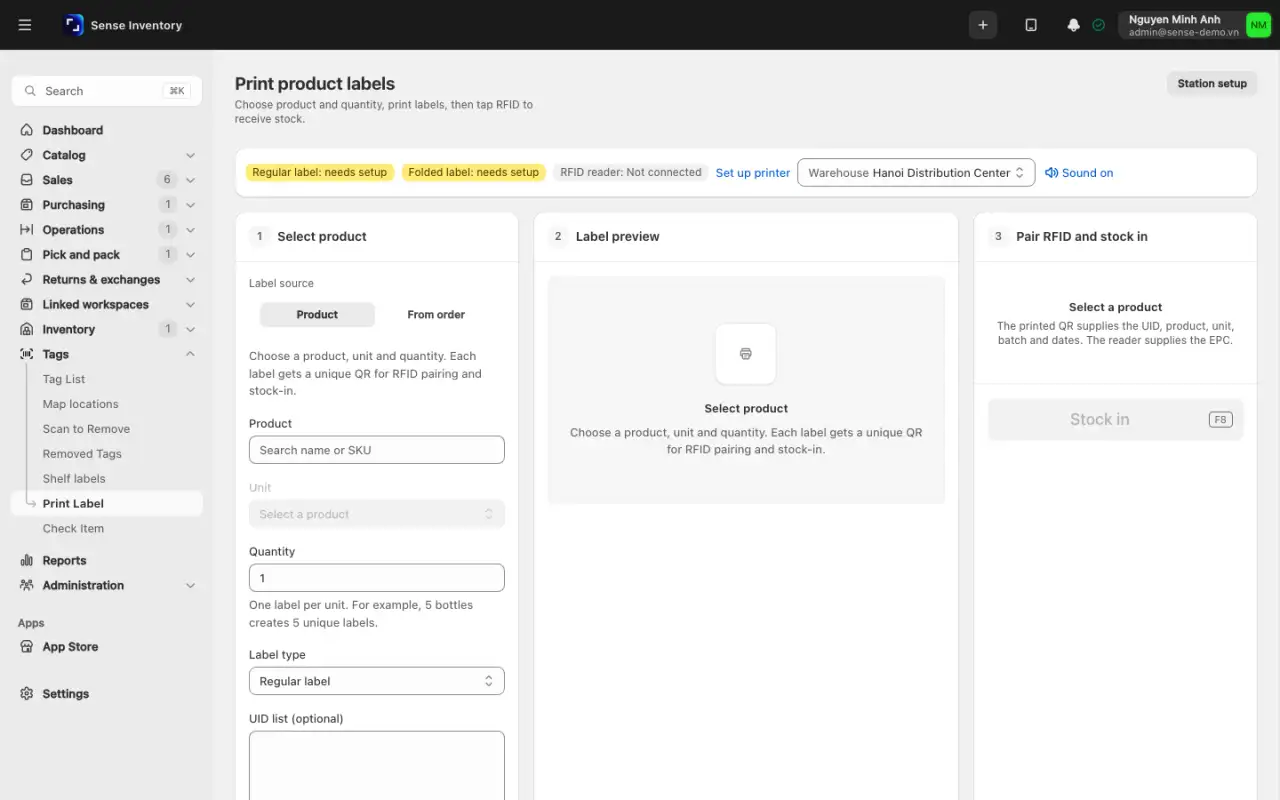
The label station is a browser workstation that turns a scan into a thermal RFID label, sends it to the printer through QZ Tray, then pairs the label with a tag and receives it into stock. The station setup is saved only in that browser, so a new computer or cleared site data means setting it up again. Anyone who may print labels can set up their own station.
Install QZ Tray on the Windows or Mac computer and add the GoDEX or Zebra printer in the operating system.
Open Print Label and click Station setup.
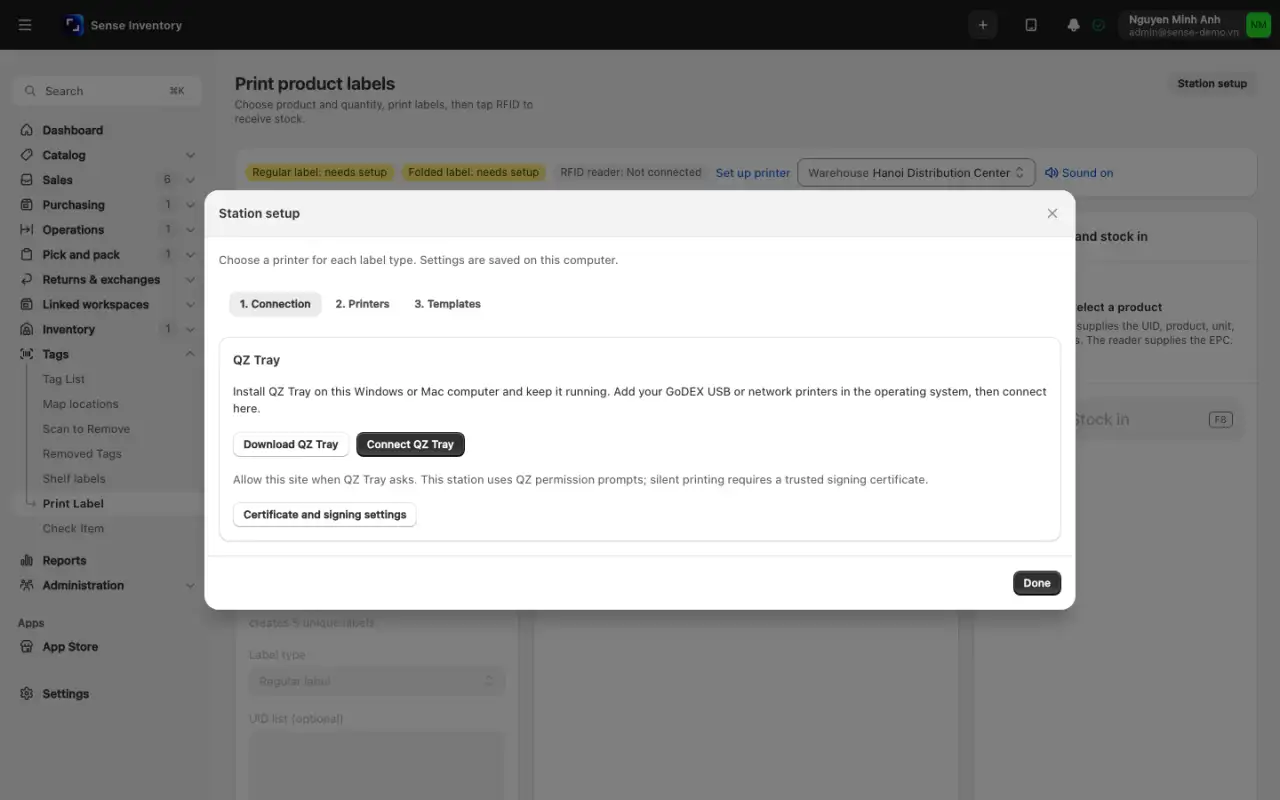
Step 1. Connection: click Connect QZ Tray and allow the site in QZ.
Step 2. Printers: click Add printer, enter the name, the exact printer model, the destination, label type, resolution, and size, then tick Use this printer for {type}.
Step 3. Templates: keep a starter design or click Import NWL template for a design made in the Nextwaves Label tool.
Click Print test label, check the alignment, scan the QR code, then tick Label printed correctly and QR scans. The status shows Ready. Changing the model, destination, resolution, size, or design needs a new confirmed test. Renaming a printer does not.
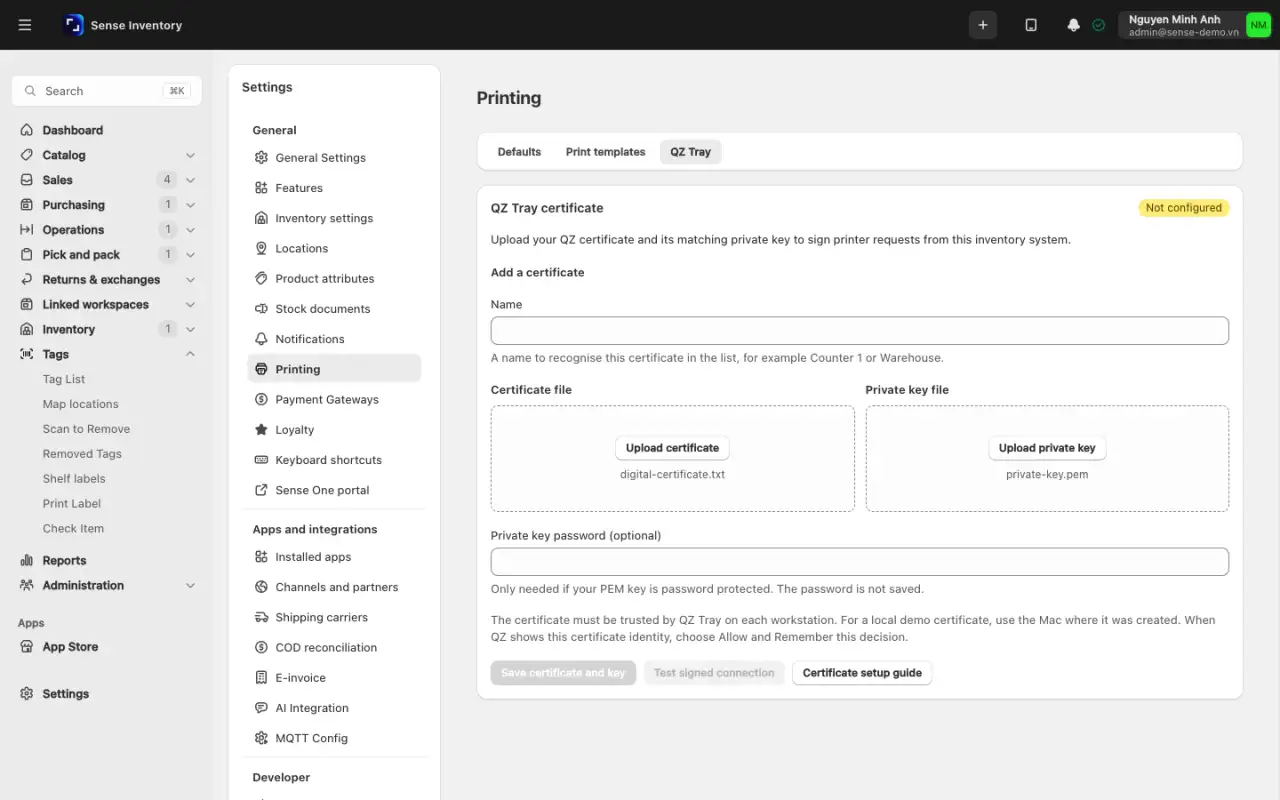
To print without an approval prompt each time, an administrator adds a signing certificate on the QZ Tray tab:
- Open Settings → Printing, tab QZ Tray.
- Enter a name, click Upload certificate, then Upload private key, add the key password if there is one, and click Save certificate and key. The certificate must be RSA, 2048 bits or stronger, and at most 32 KB.
- Click Test signed connection. You see "QZ Tray returned {count} printers. No label was printed." On each computer, choose Allow and Remember in QZ Tray.
- With more than one certificate, each station picks one with Use on this station.
Printing labels, pairing tags, and receiving stock are covered in Manage RFID.
Devices in the store
RFID Readers registers each fixed reader and the warehouse it stands in. MQTT Config sets up the link between readers and Sense Inventory. Readers do not call the application directly. They send messages through a relay called an MQTT broker, and each workspace has its own broker. If the broker stops, every screen that scans tags goes quiet. When RFID suddenly fails everywhere, check here first.
Set up the MQTT broker
Open Settings → MQTT Config, tab Configuration.
Set a Username and Password, or tick Allow anonymous clients. Leave Enabled on, then click Save.
Click Test connection and read the results for the local broker and the external hostname.
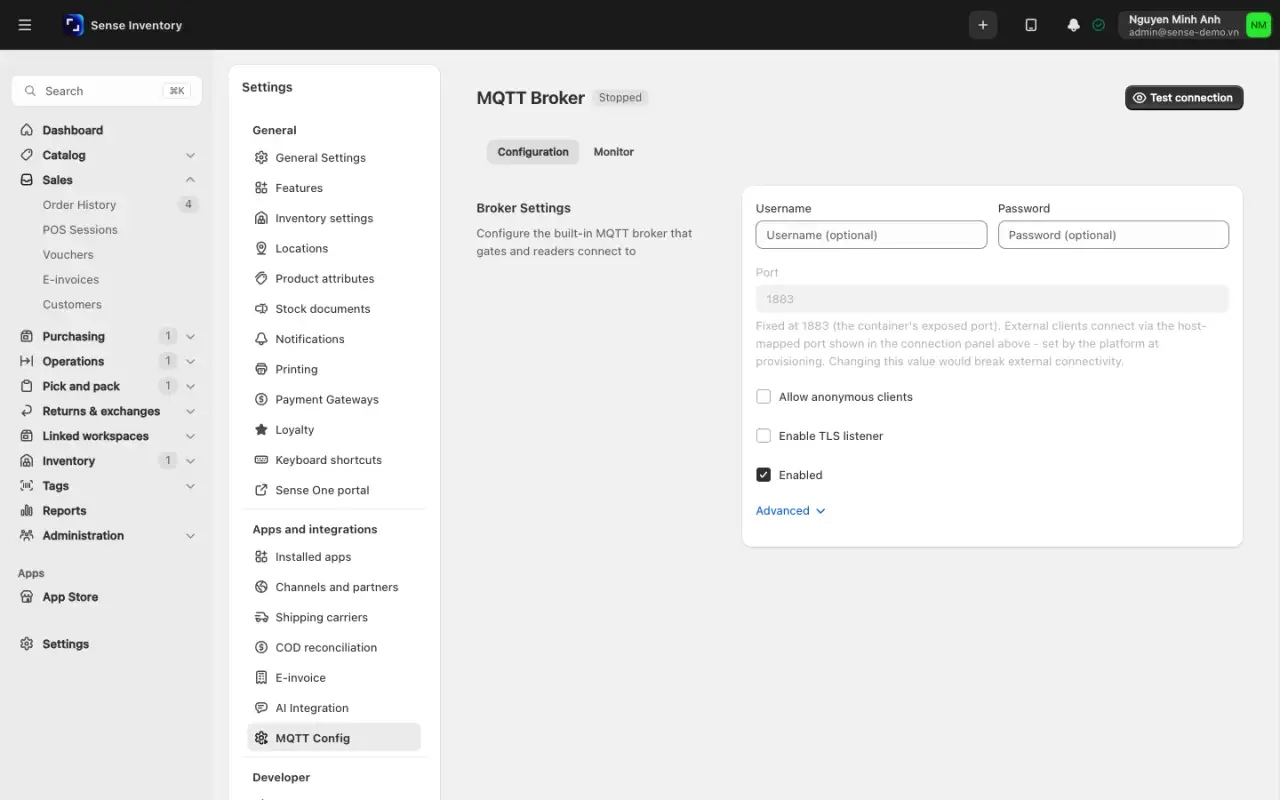
Enter the host, port, and credentials shown in the panel into the reader's own MQTT settings. The authentication line says "Not required" only when anonymous clients are allowed. Leave the port at 1883. Changing it breaks outside connections.
Open the Monitor tab to watch the reader messages arrive.
Register a fixed reader
Open Settings → Devices → RFID Readers and click Add Reader in the registered readers table. You need the permission to manage readers.
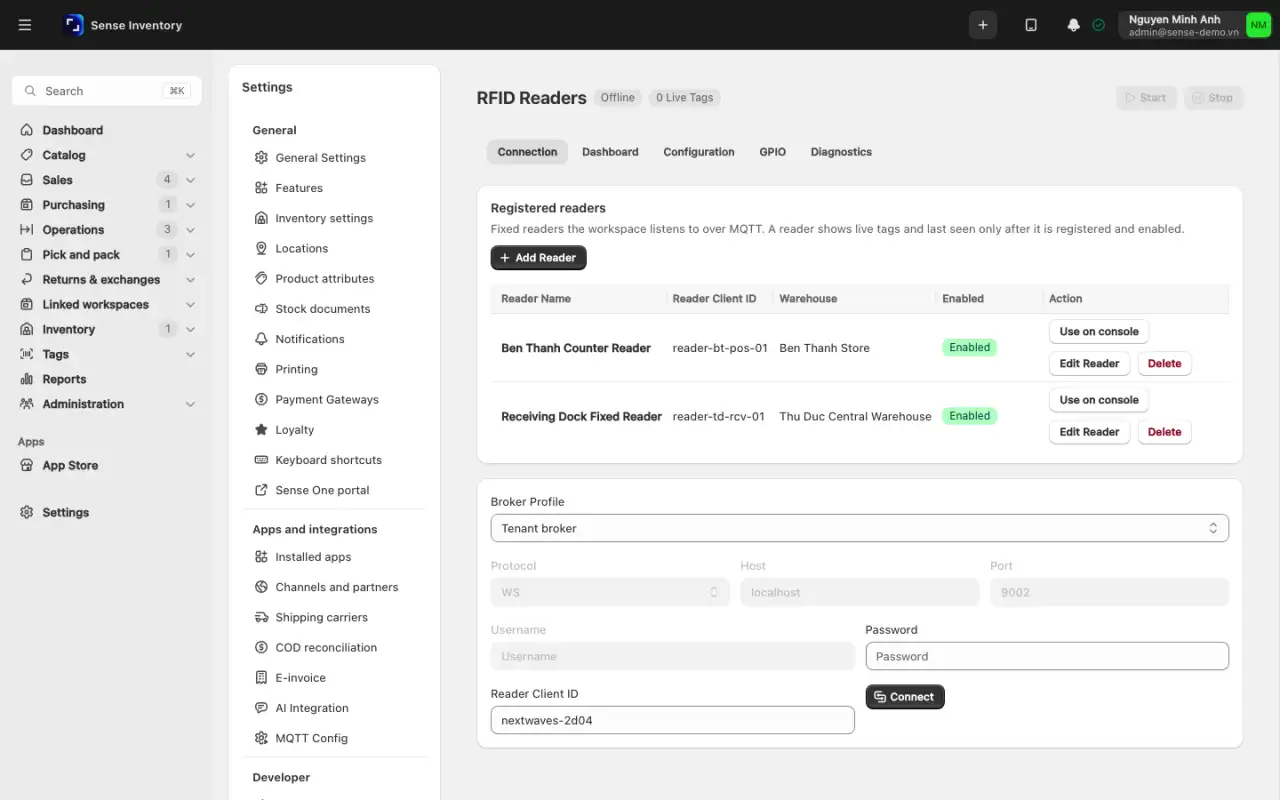
Enter the name, the Reader Client ID (for example
nextwaves-2d04), the warehouse, and the Stream Mode (Batch or Fast). Leave Enabled on.Save. The system starts listening to the reader at once. A disabled or unregistered reader can still publish to the broker, and you see it on the Monitor tab, but the system ignores it and shows no live tags.
To test and tune a reader, open the Connection tab, pick a broker profile, enter the password and Reader Client ID, and click Connect. Then use Start, Configuration, GPIO, and Diagnostics. The password is never saved.
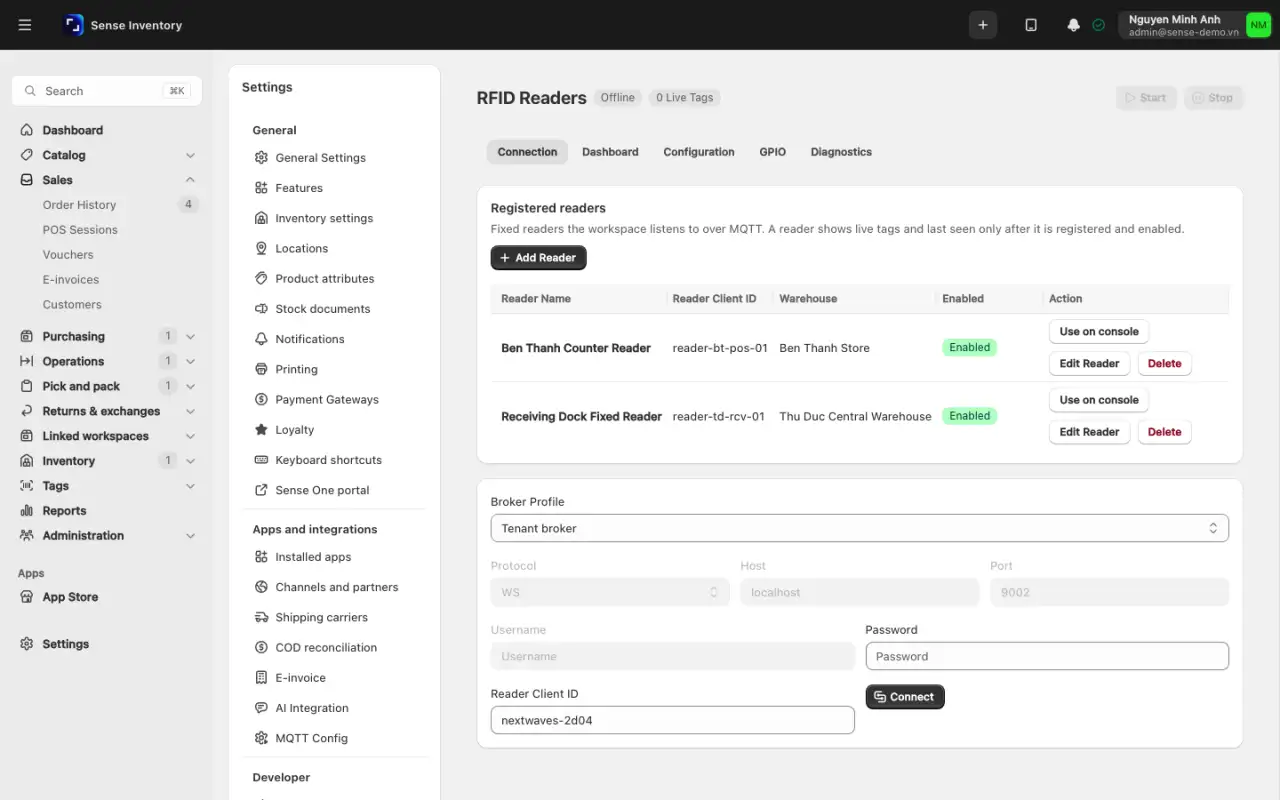
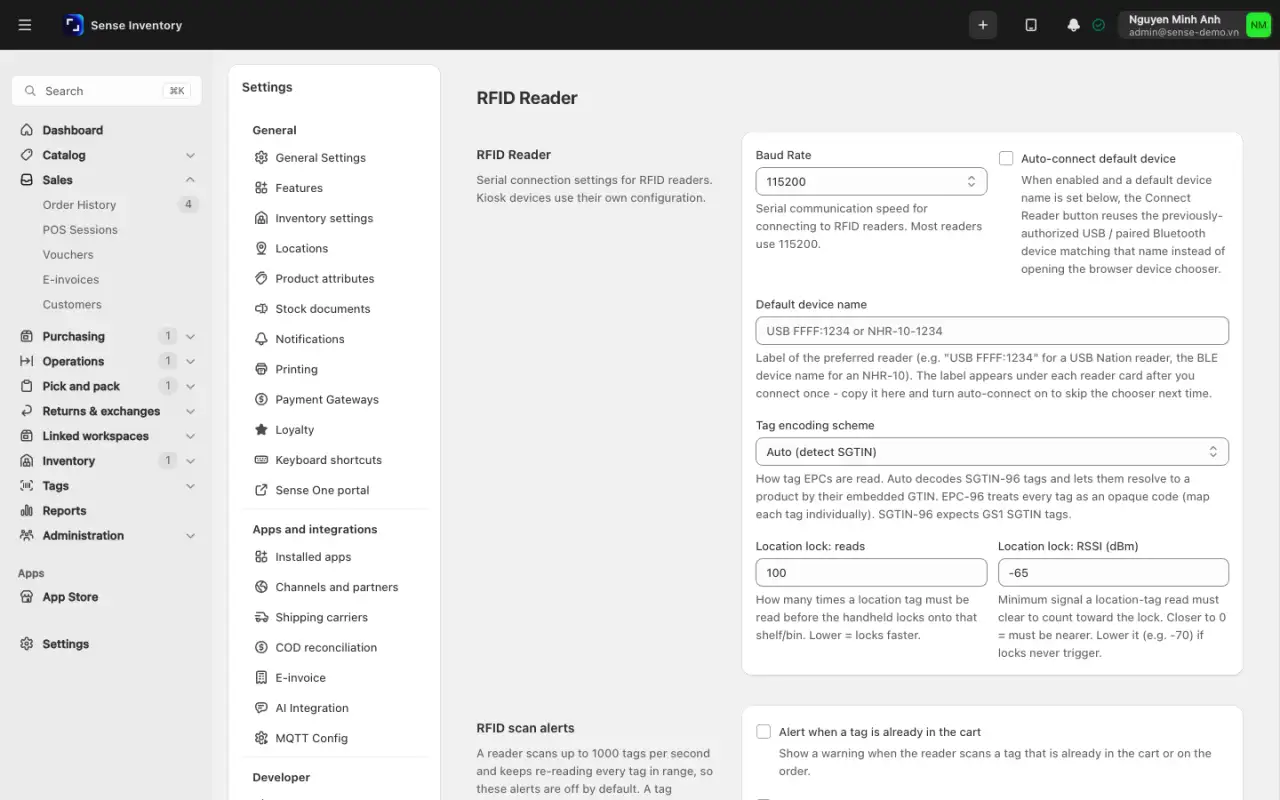
The plan limits the number of fixed readers. RFID settings (baud rate, default device, tag encoding, location lock) are read-only if you cannot update settings:
To pair a tablet or handheld with a QR code, or remove a lost device, see Pair or remove a tablet or handheld. Each QR code works once and expires after 10 minutes by default.
A local agent is a small program on a POS or kiosk computer that talks to the card terminal. Under Settings → Devices → Local Agents, click Register agent and enter an agent code. Copy the token at once, because it is shown only once, then paste it into the configuration page on that computer. The status turns Online, then Connected. Rotating the token or revoking the agent takes effect at once.
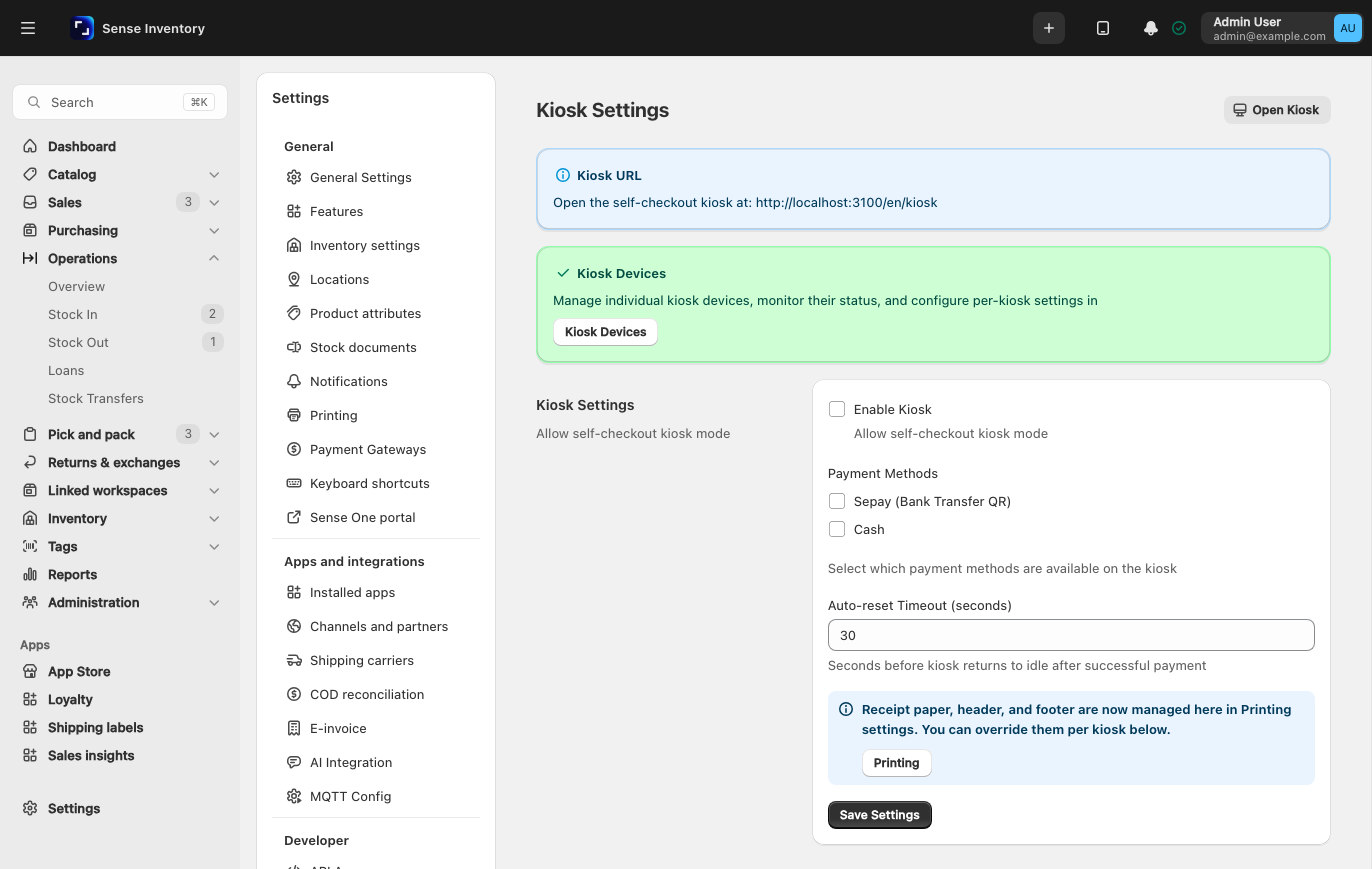
The Kiosk group configures self-service machines: which device is a kiosk, how it looks, and which ads it shows. Daily kiosk use is in Sell, return, and use kiosk. Two kiosks that keep switching between online and offline are usually cloned machines sharing one machine ID.
Operational guidance
After any device change, run one test at the real location: scan a tag, print a receipt, carry an item through the security gate. For devices, a "saved" message does not prove that the device works.
Security gates against theft
A security gate is an RFID reader at the exit that checks each tag against sales and loans in real time. Only goods that have not been paid for raise an alarm. The plan must include security gates. Without it, the Security Gates and Security Alerts entries are hidden.
Every confirmed read of a registered tag creates an event with a payment status: Paid, Unpaid, Unknown, or Unauthorized (the tag's home warehouse differs from the gate's warehouse). An event that is not Paid and not silenced becomes an alert. The alert shows live, is sent by email or Telegram if those are on, and triggers the reader's siren. Unregistered tags create no event.
Add a gate
Open Settings → Security → Security Gates.
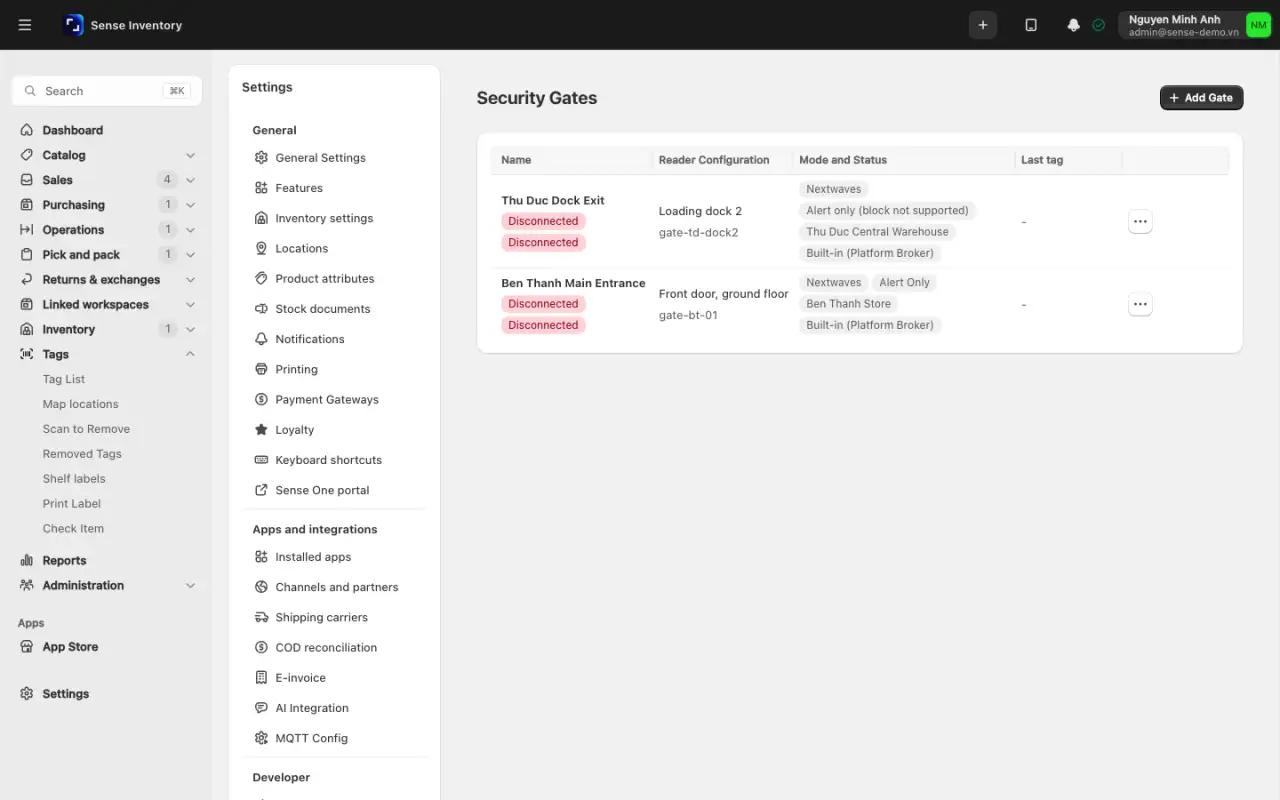
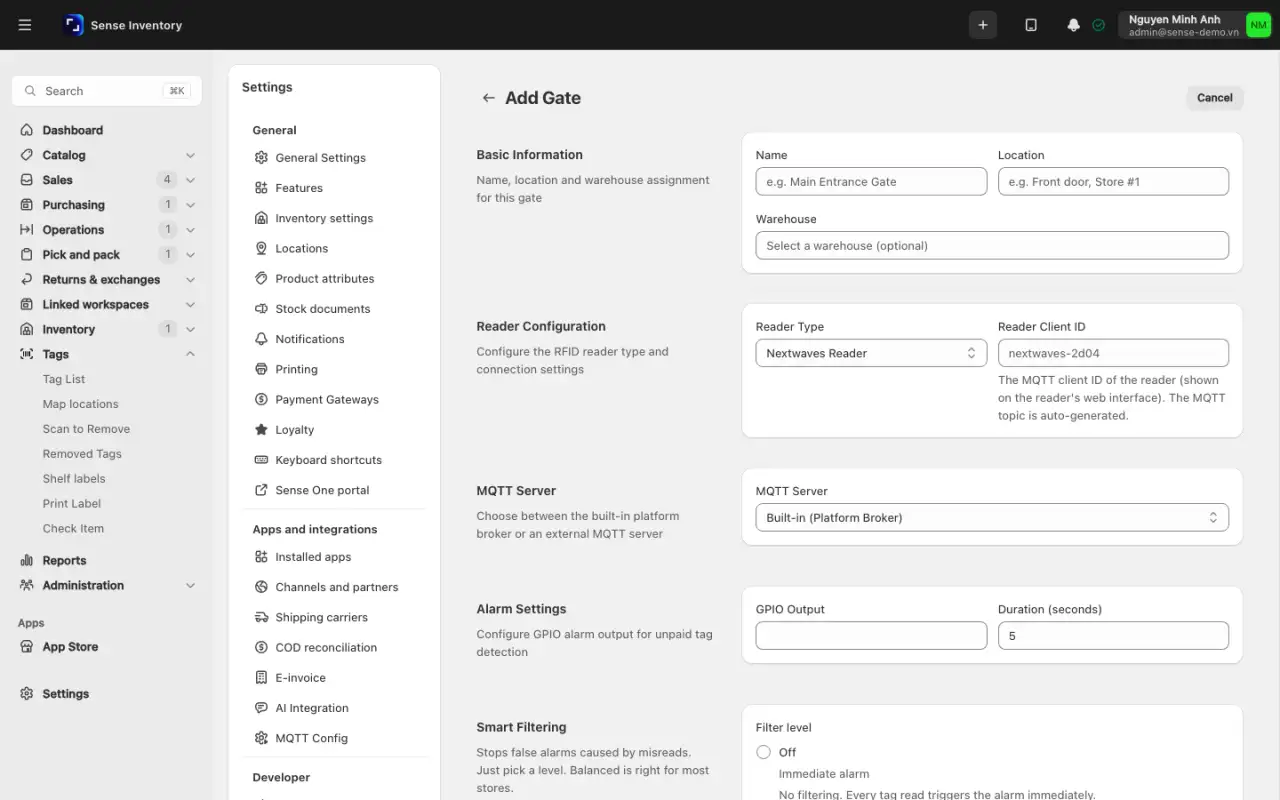
Click Add Gate. Under Basic Information, enter the name (for example "Main Entrance Gate"), location, and warehouse. The warehouse drives the Unauthorized check and decides who receives live alerts.
Under Reader Configuration, choose Nextwaves Reader and enter the Reader Client ID from the reader's own web page. Leave the MQTT topic blank.
Under MQTT Server, choose Built-in (Platform Broker), or External MQTT Server with host, port, username, password, and TLS, then click Test Connection.
Under Alarm Settings, pick a GPIO output (for example OUT1) and the duration. Without a GPIO output, the siren does not sound.
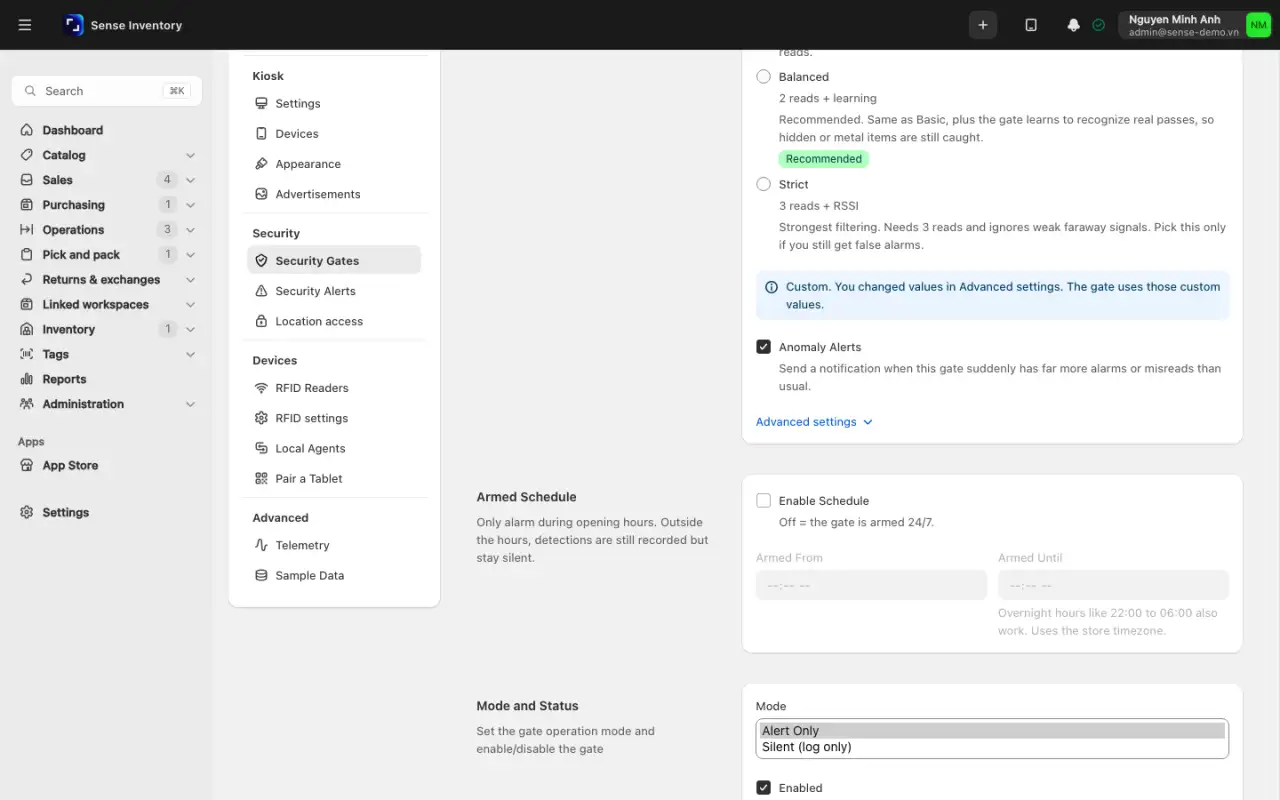
Under Smart Filtering, choose Balanced to cut false alarms from misreads.
Under Mode and Status, choose Alert only, or Silent (log only) to record events without alerting. Tick Enabled and save. You see "Security gate created". A gate cannot stop anyone. Its output only triggers the siren.
If the status shows "Connected" but not "Reading", open the row menu and choose Start Reader.
To arm a gate only during set hours, edit the gate, open Armed Schedule, turn on Enable Schedule, and set the start and end times in the store time zone. Overnight windows such as 22:00 to 06:00 work. Outside those hours, events are still recorded but silenced. To move the gate, choose another warehouse or clear the warehouse.
Handle an alert
Open Security Alerts, or the gate's row menu → View Events.
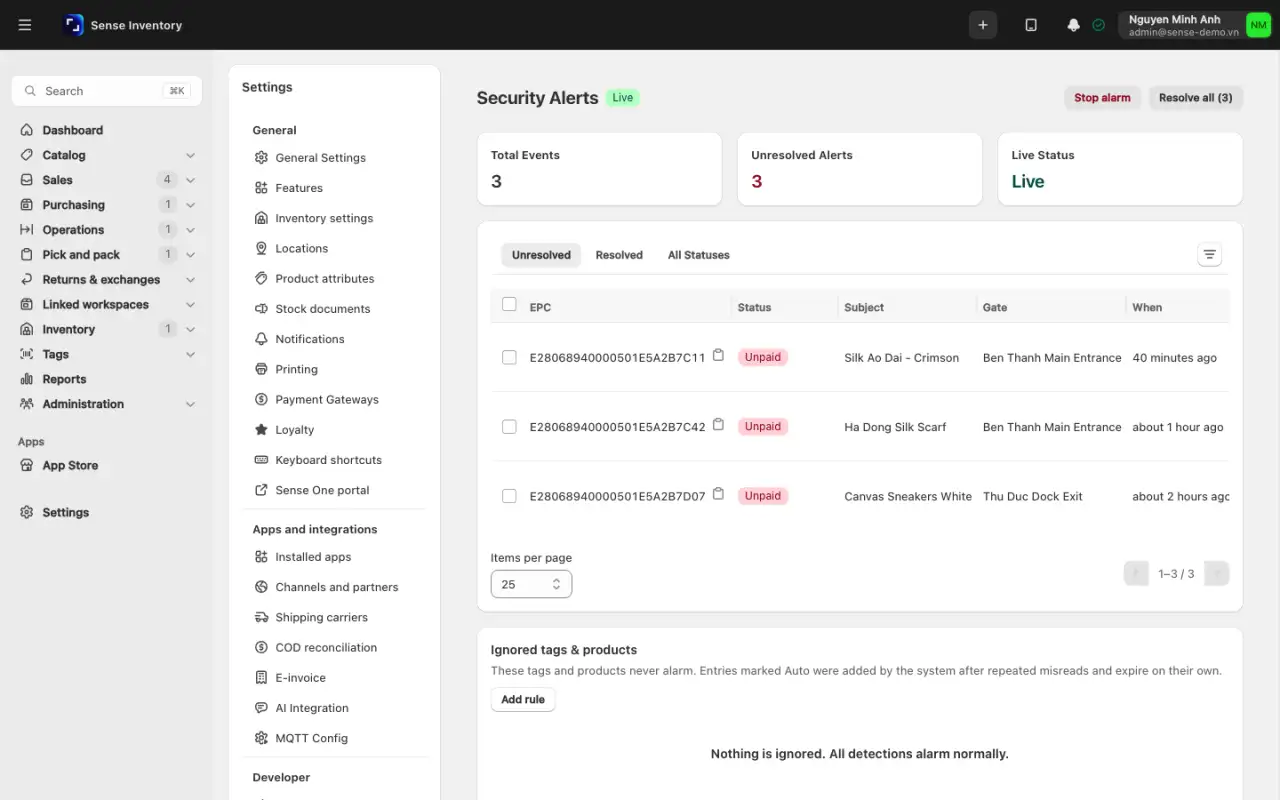
Use the Unresolved or Resolved tab and check the status badge, subject, gate, and time.
To silence a siren that is sounding, click Stop alarm.
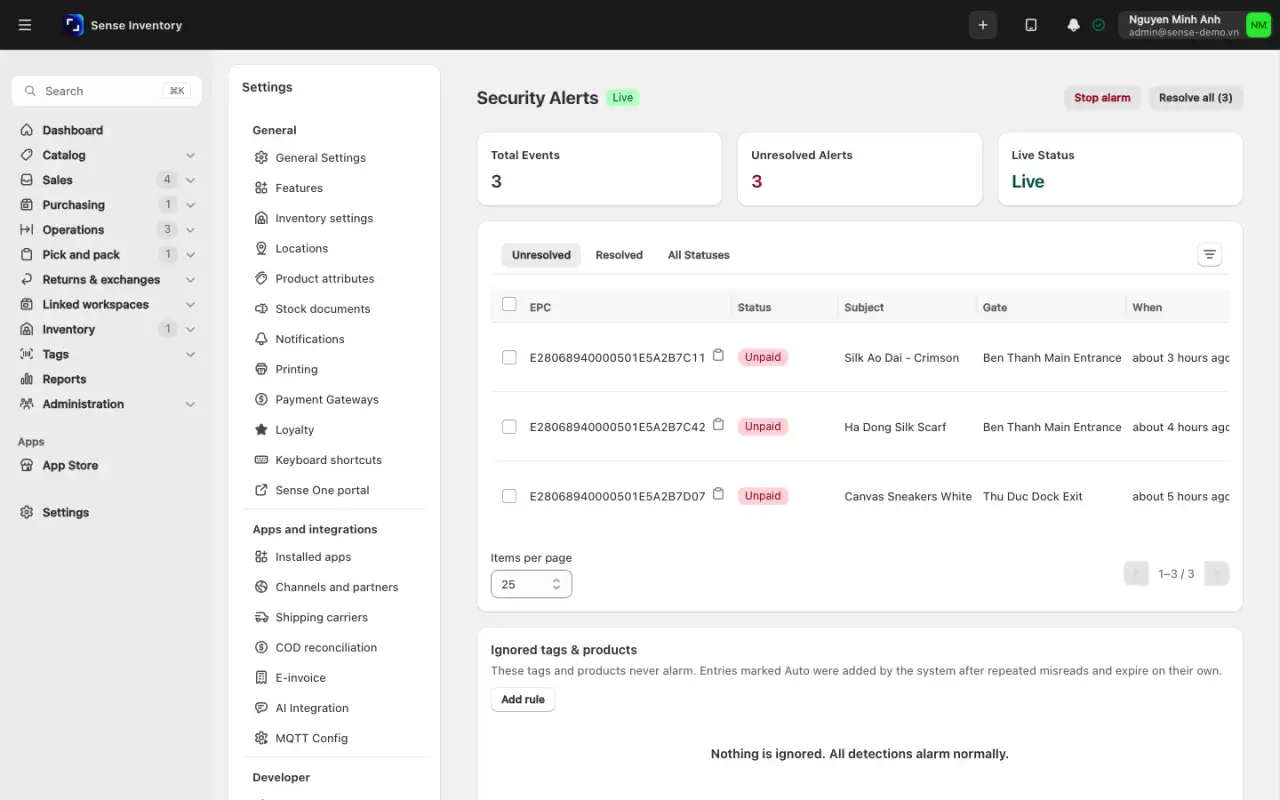
Click Resolve. You see "Alert resolved". You can also tick several rows and resolve them together, or resolve all and confirm. A Paid event never becomes an alert.
Stop a source of false alarms
On the alert row, open the Ignore menu and choose Ignore this tag or Ignore this product.
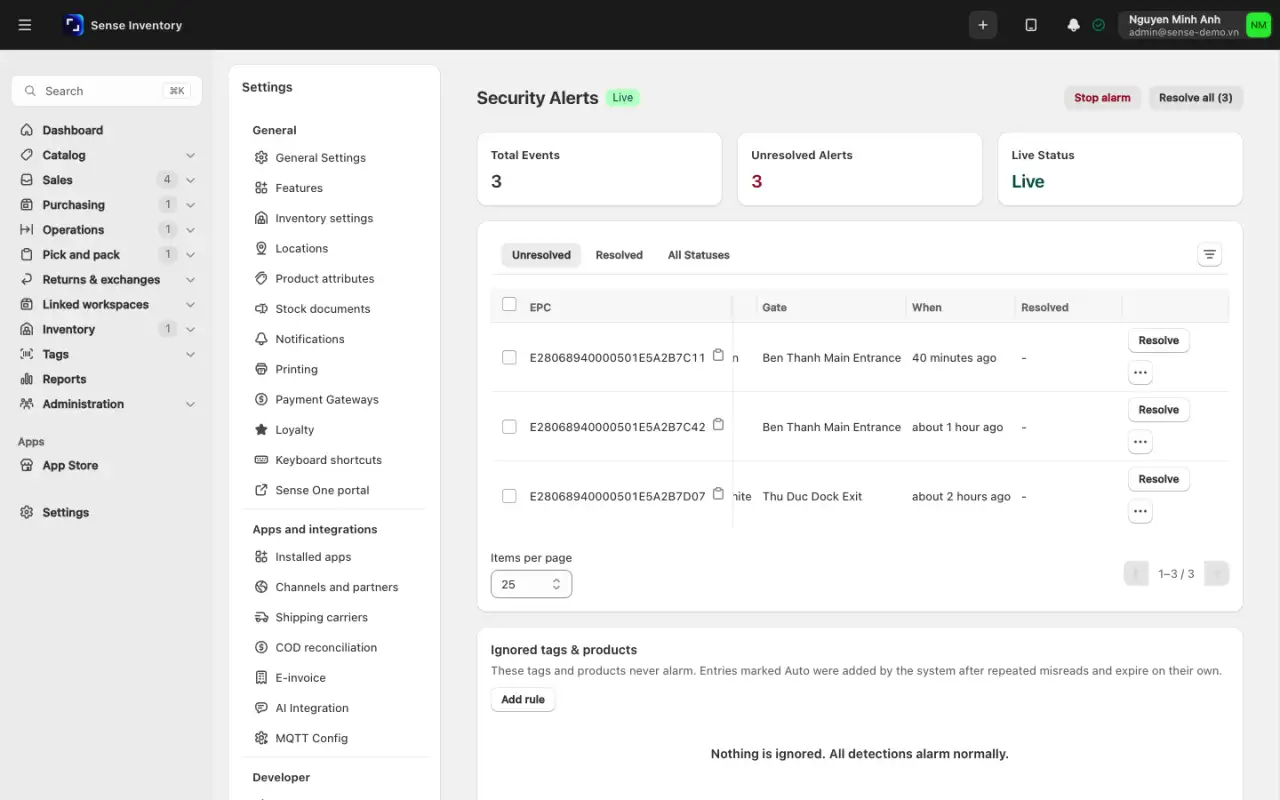
Choose the Duration (1 hour, 24 hours by default, 7 days, or Permanent (until removed)), Apply to (this gate or all gates), and an optional reason, then click Ignore. A rule is created and the alert is resolved automatically.
For tags that misread often, use Require multiple reads or Smart-suppress alarm instead of ignoring them. An Always alert rule is for items that are hard to read: even one weak read raises an alarm.
To add a rule directly, use Add rule on the Ignored tags & products card of the alerts page. If a tag shows no event at all, check whether it is unregistered or covered by an Ignore rule. This includes the 1-hour automatic rule the system creates when a tag keeps misreading.
Linked workspaces and the store network
Brands, distributors, and franchisees are separate businesses that trade every day. Linked workspaces let them see chain stock, send orders, and ship goods with RFID proof, while each keeps its own books. Stock never moves directly between them. Each side posts its own stock-out or stock-in, and the two sides exchange signed messages.
There are two relationships: Same owner (one organization, stock moves at cost, the link is active at once) and Trading partner (separate companies, the other side must accept). The allowed modes are Transfer, Sale, or both.
Link two workspaces
Turn on Settings → Features → Links with other workspaces. To send goods, also turn on Shipments between workspaces, which needs links, purchase orders, and suppliers to be on.
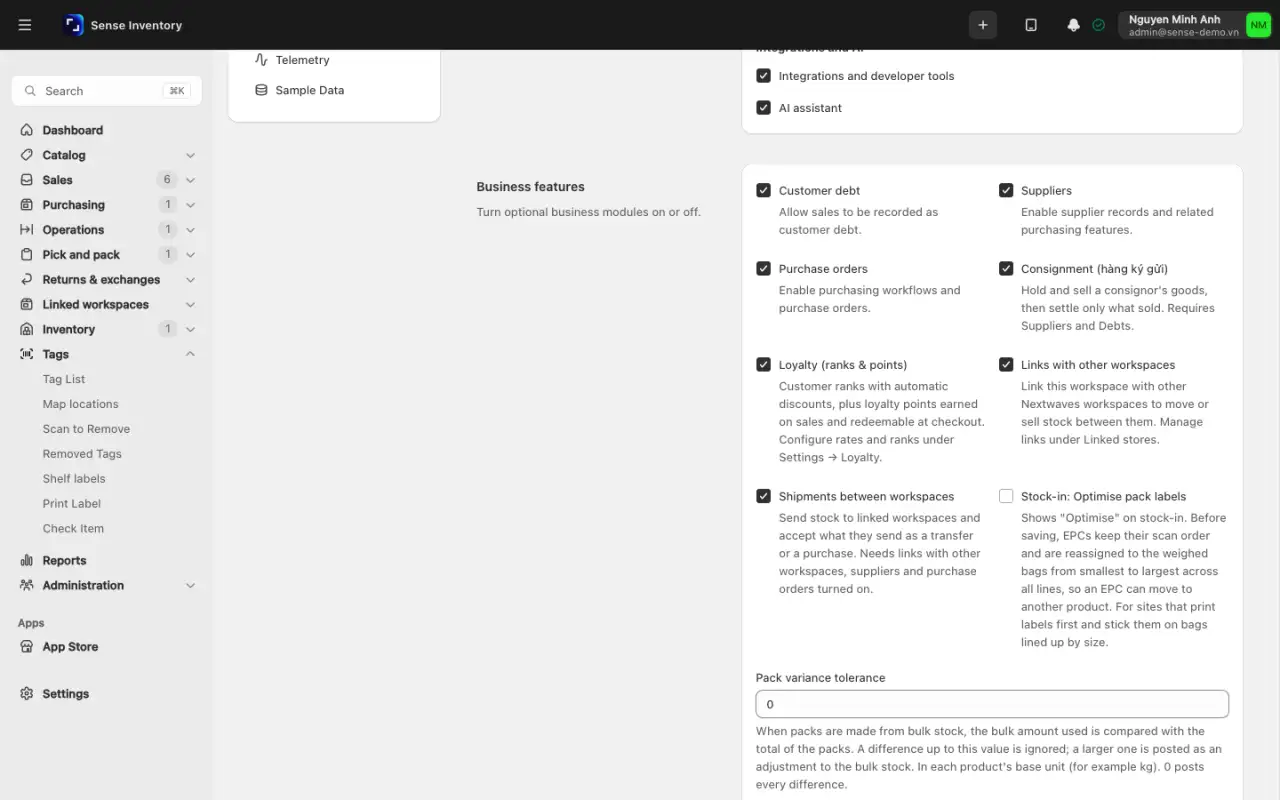
Open Linked workspaces → Linked stores and click Link a store.
In Request a workspace link, enter one or more workspace addresses. The address is the first part of the web address, for example
acme. Each one is looked up and shows Ready, Already linked, or Cannot link. Choose the Relationship and Allowed modes. Optionally tick Let the receiver switch the mode and add a note.Click Send request. A same-owner link is active at once. A trading-partner link shows Pending.
The other workspace sees "1 link request is waiting", opens Link requests, and clicks Accept or Reject. When accepting, it can narrow the terms but never widen them. Only administrators answer requests, change sharing, and sync products. Managers can only view.
A link can be Suspended (only the side that suspended it can Resume) or Revoked (final; a new request is needed). Messages wait while a link is suspended and are resent when it is active again.
Share stock, orders, and tags
- Open the linked store → Details and sharing → Edit.
- Under Share stock and orders, switch on Share stock with {name} and Share sales orders with {name}, and pick All warehouses or Selected warehouses. The other side can only read, and never sees cost, prices, phone numbers, or addresses. Under Share tags, choose All tags, Selected products, or Selected categories.
- Click Save. A same-owner link shares stock and orders of every warehouse by default until someone saves different settings. A trading-partner link shares nothing by default.
Send and receive stock between workspaces
Open Linked workspaces → Workspace shipments and click New shipment.
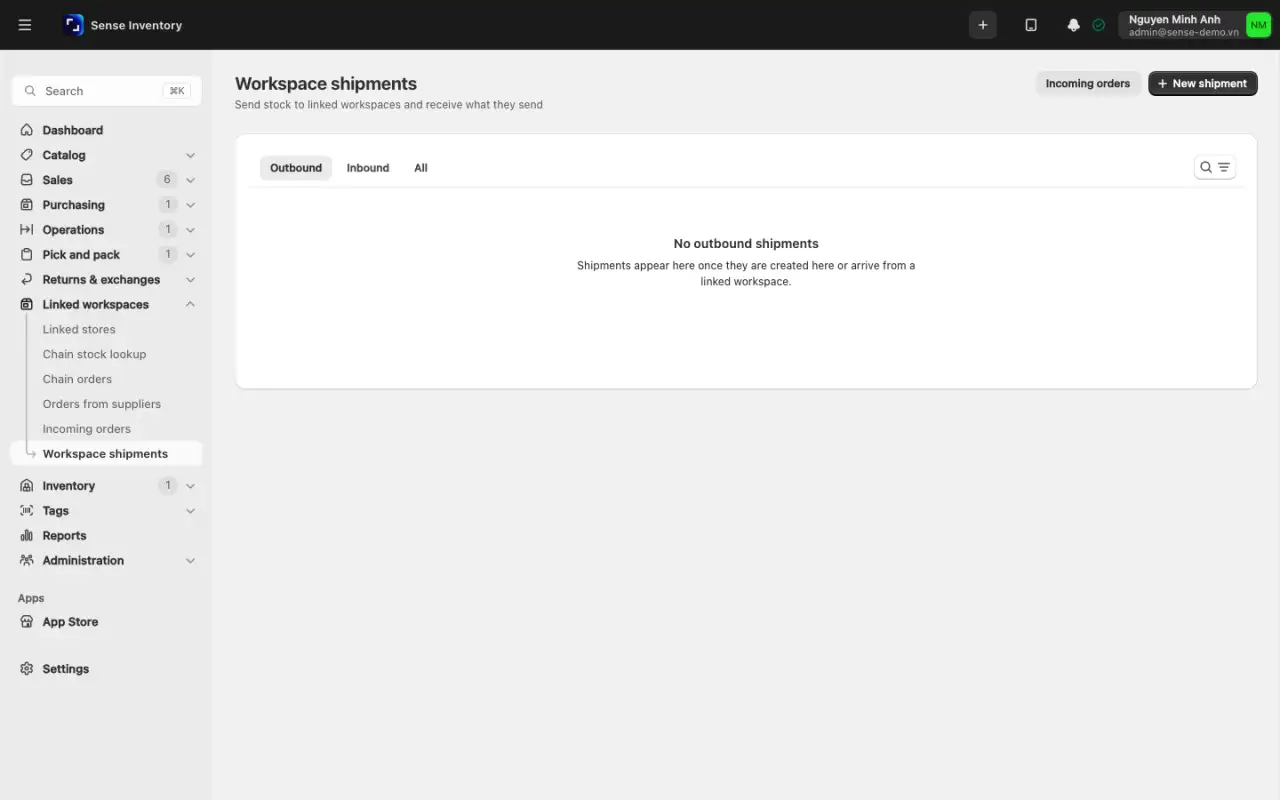
Choose the link, mode, source warehouse, and currency, then add products. Scan EPCs on tagged lines. Sale mode needs a unit price on every line.
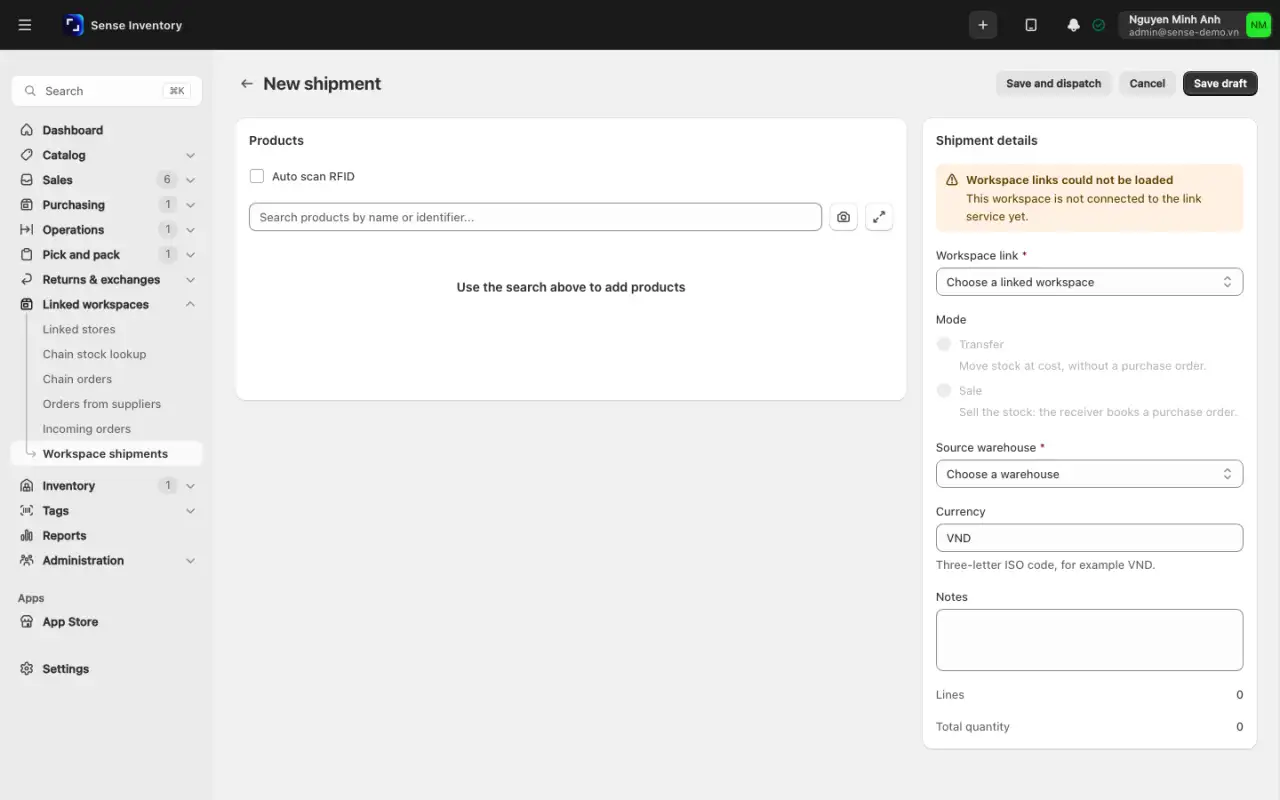
Click Save draft, or click Save and dispatch and confirm. The stock-out completes at once. To undo after dispatch, click Request cancellation and give a reason.
The receiver opens the Inbound tab and maps each line to one of its own products. Nothing is matched or created silently. The receiver then clicks Accept and chooses Transfer or Sale with the receiving warehouse (Sale needs a supplier), or clicks Reject with a reason. When the goods arrive, click Receive, enter the received quantity per line, and scan exactly the tags that were sent. A short receipt is allowed and closes the purchase order automatically. An over-receipt is refused.
To order from a linked store, set the link's Supplier in its shipment defaults, then choose Order from this store. The seller accepts, maps the lines, and ships. If you see "Integrity error", do not accept. Reject the shipment and ask the sender to request cancellation and send it again.
Stock moves on either side are not pushed to sales channels automatically. If you sell on a channel, run Channel sync afterwards.
Notifications and alerts
The bell in the page header (the Inbox tab on mobile) lists notifications: order status changes, stock falling below its minimum, loans falling due, e-invoices needing attention, security gate alerts, Sapo or Haravan sync results, and comments that mention you. Read status is kept per person. A low-stock alert fires once when stock drops below the minimum, not again as it keeps falling.
Choose which notifications you receive
- Click the bell and follow the link to your Profile.
- Turn In-app pop-ups on or off.
- Switch each notification type on or off for push to your phone, such as security alerts, mentions, and e-invoices. The list in the bell always shows everything.
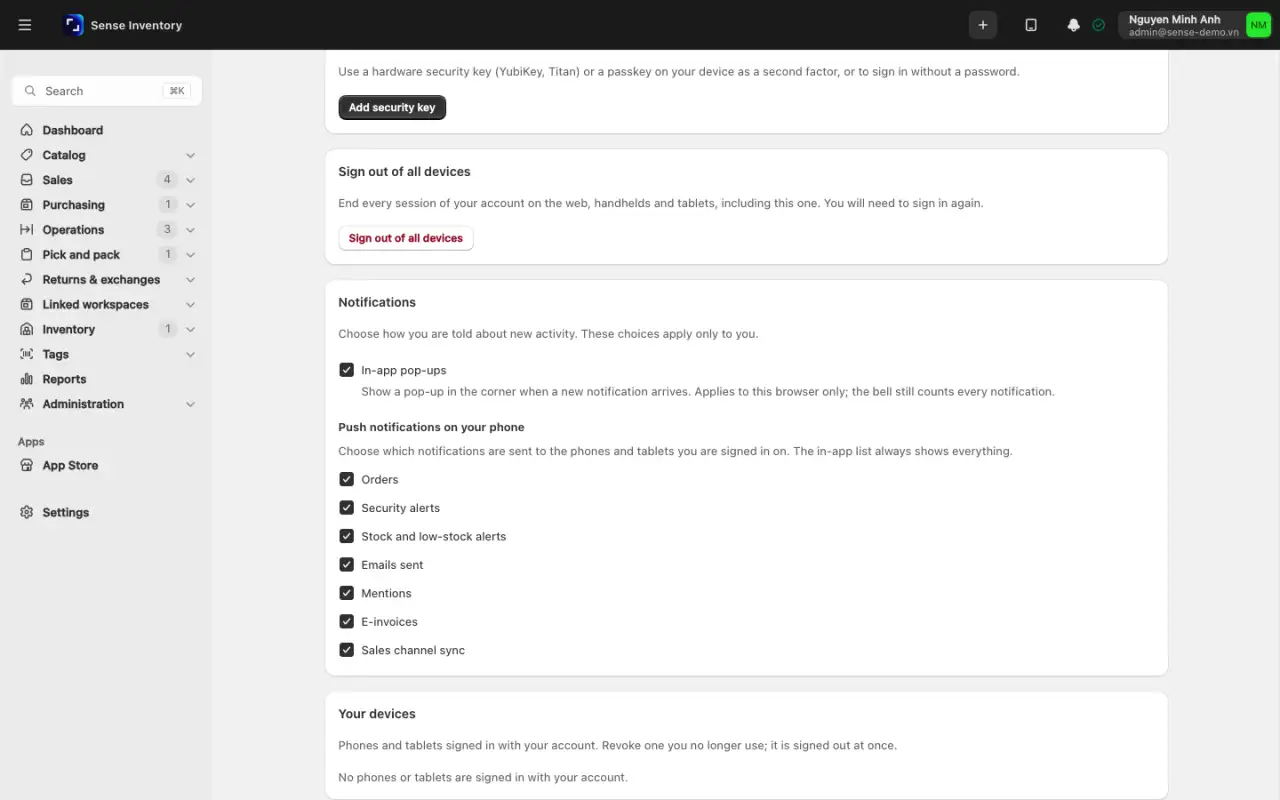
Phone push needs the plan feature, notification permission on the device, and the type switched on.
Send security alerts by email and Telegram
Open Settings → Notifications.
Under SMTP (email), tick SMTP and fill in the host, port, TLS on connect (on for port 465, off for 587 or 25), username, password, From address, and From name.
Under Security gate alerts, tick Send security alerts by email and enter the Email recipients, separated by commas. If you leave it empty, mail goes to the From address.
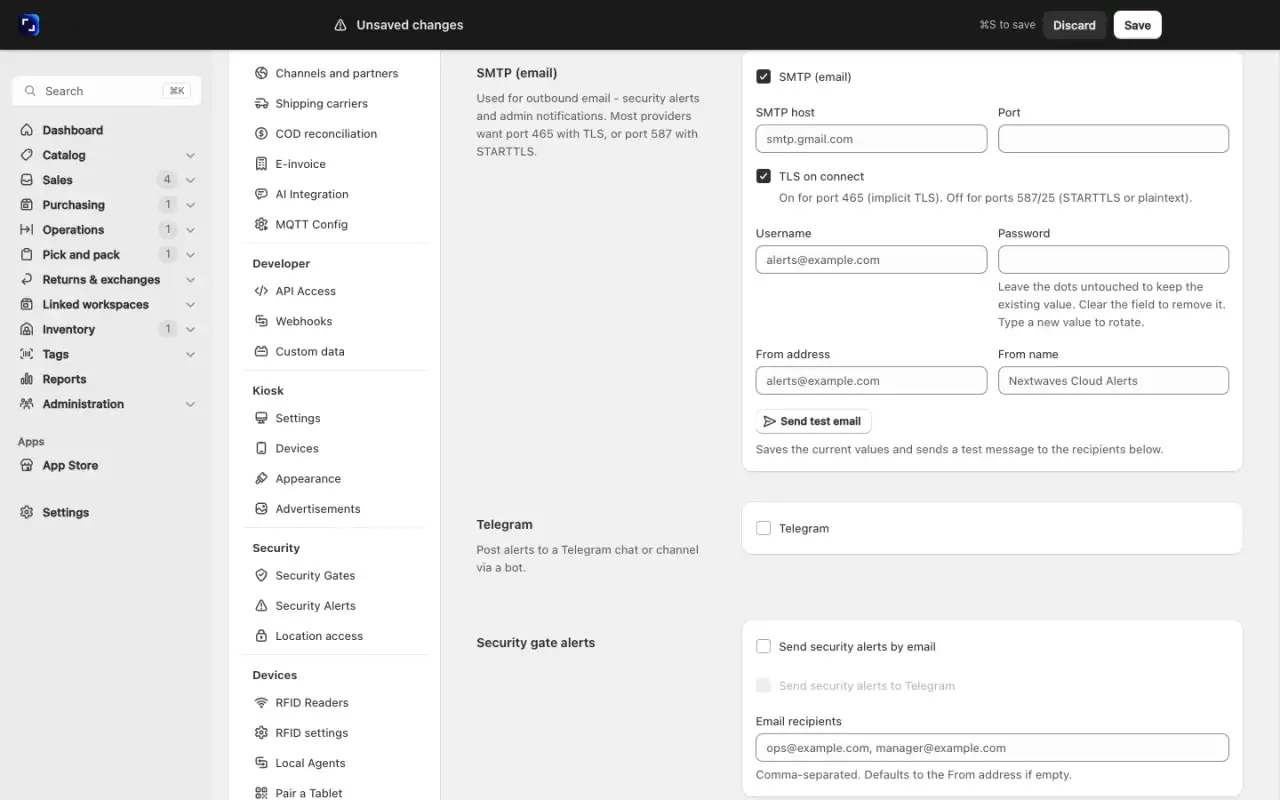
Click Send test email. You see "Test email queued. Check the recipient inbox." or "Test failed: {detail}".
For Telegram, create a bot with @BotFather and add it to your channel. Tick Telegram, paste the Bot token and the Chat / channel id (it starts with -100), click Send test message, then tick Send security alerts to Telegram.
Click Save.
API access and webhooks
These two entries are for engineers who connect the company's own software to Sense Inventory. API Access issues keys that let other systems call Sense Inventory. Webhooks registers addresses that Sense Inventory notifies when events happen. By default only administrators see them.
Operational guidance
Treat API keys and webhook secrets as passwords. Save them as soon as they are created, because the system never shows them again. Give each key only the scope it needs, and revoke keys that are no longer used.
Create an API key
Open Settings → Developer → API Access and click Create key.
Enter a Key name (for example "Warehouse sync") and choose the Access scope: read only or read and write.
Confirm. The Your new API key dialog shows the secret and a ready-made Authorization header. Copy the secret now. It is shown only this once.
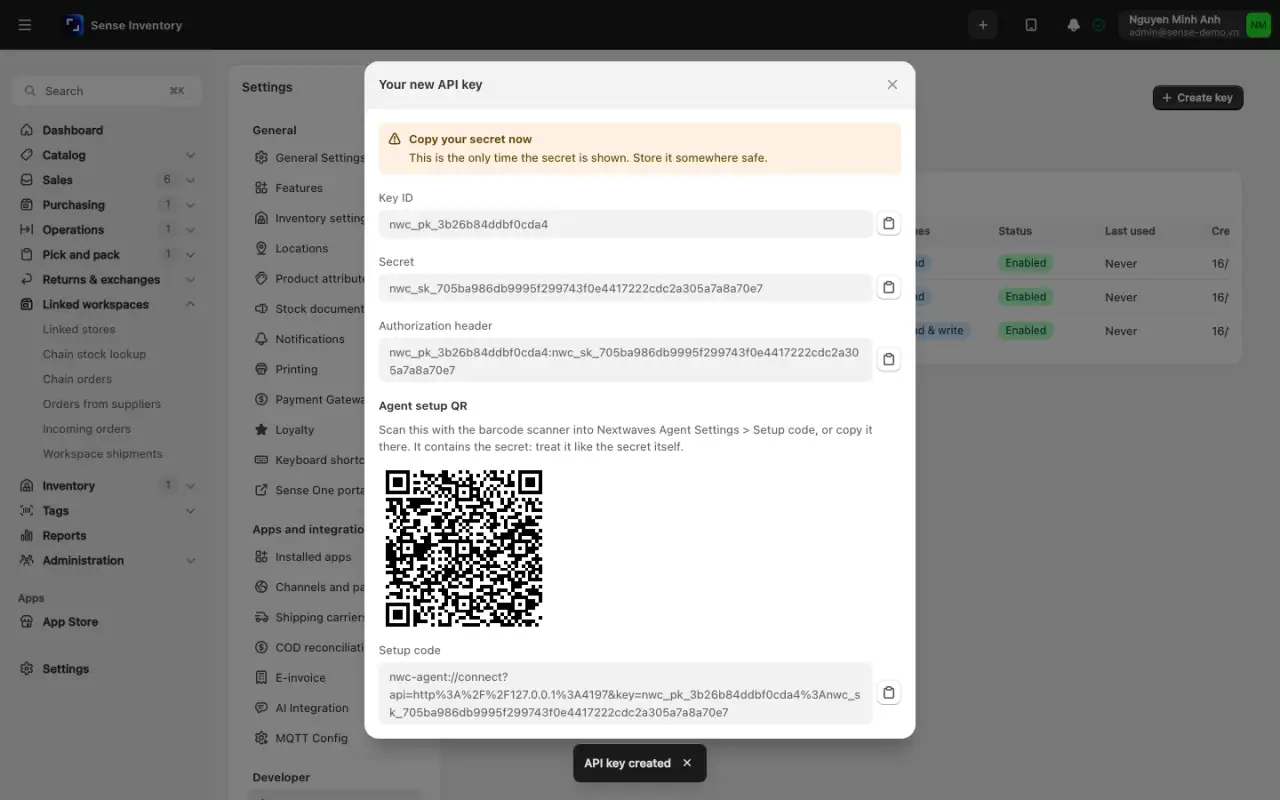
Open the Documentation tab for the base URL and a link to the interactive API documentation.
To rename a key or change its scope, open the Keys tab, use the row menu, edit, and save. The secret stays the same, and the change applies from the next call.
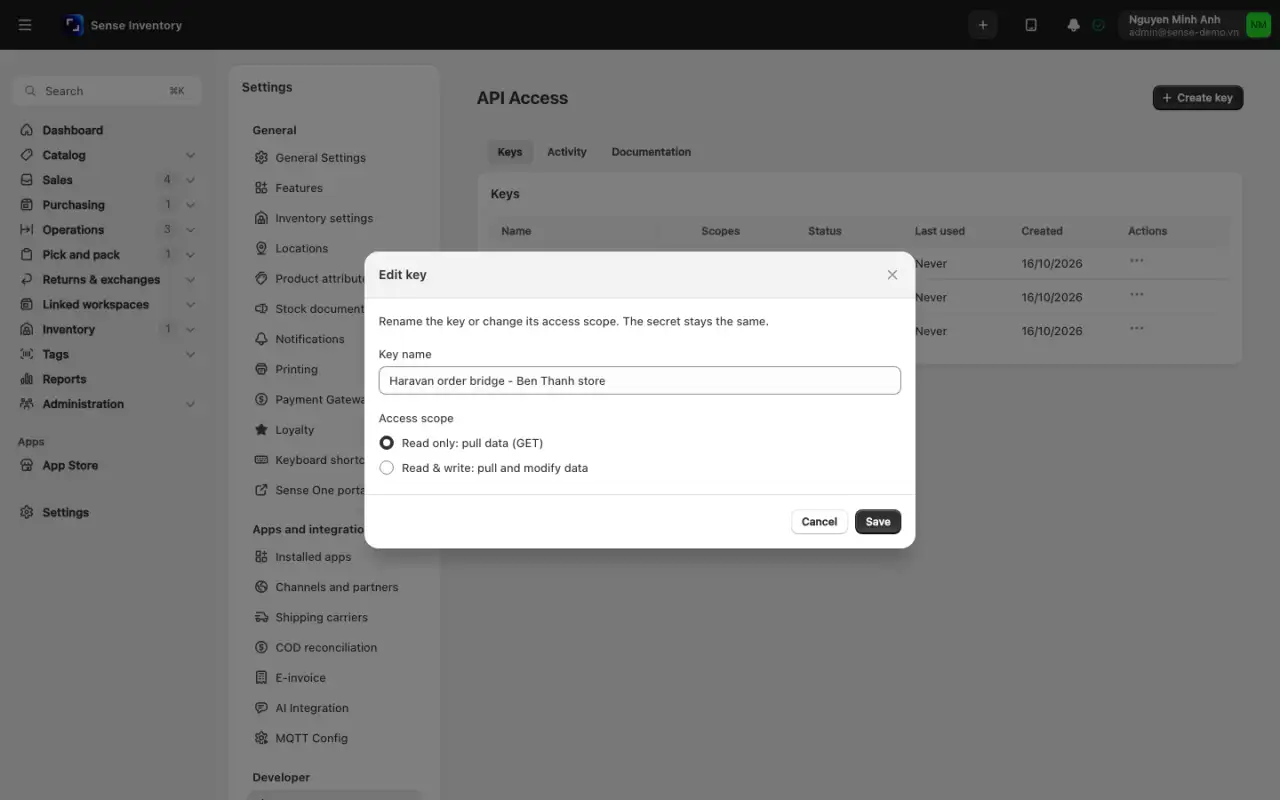
A lost secret cannot be shown again. Create a new key, switch your system over, then revoke the old key. Each key is limited to 600 requests per minute. Writes made with a key act as the person who created it, so writes are refused once that person is deactivated.
Check calls, or disable or revoke a key
Open the Activity tab (Recent API calls) and click a row to see the request and Response headers and body.
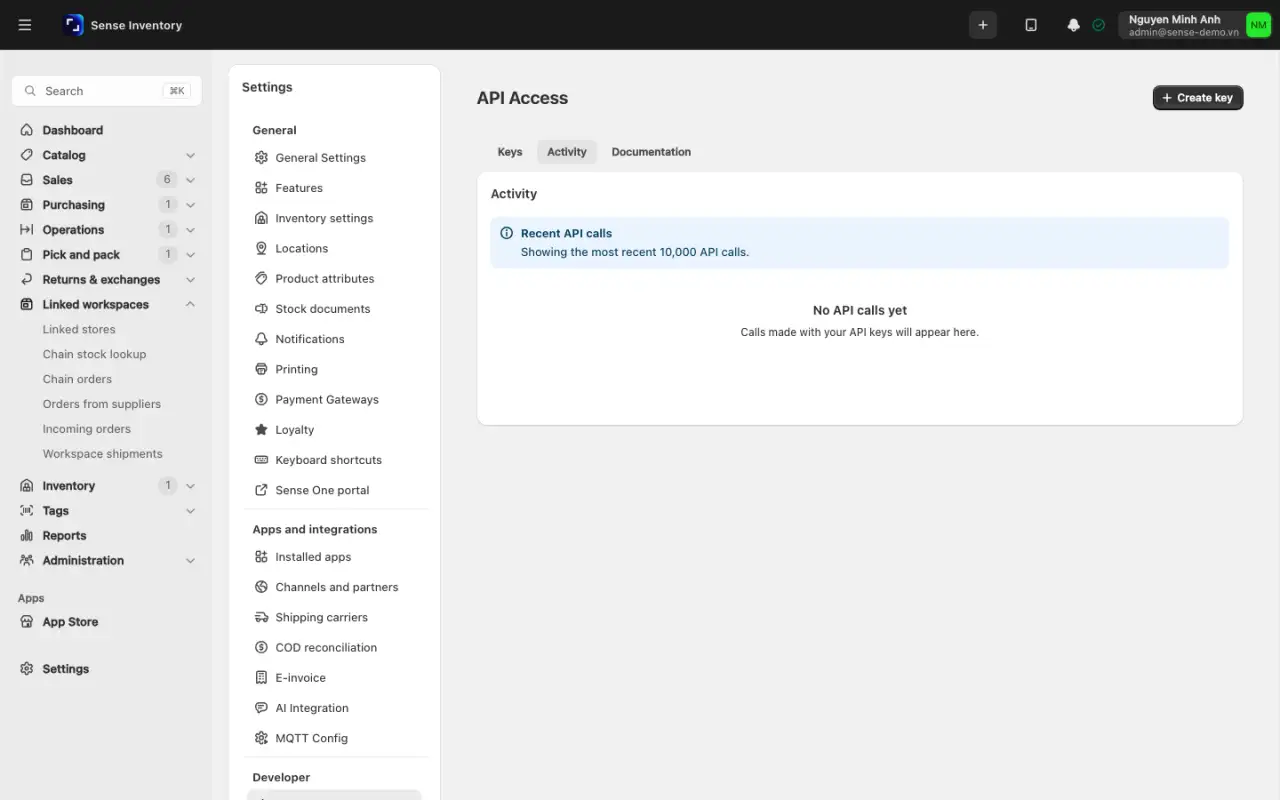
To stop a key, go to the Keys tab, open the row menu, and choose Disable. Choose Enable to bring it back. Calls with a disabled key fail at once with error 401.
To remove a key for good, choose Revoke and confirm Revoke API key?.
Add a webhook endpoint and test it
Open Settings → Developer → Webhooks and click Add endpoint.
Fill in the Name, the Endpoint URL (https, reachable from the internet), and the Events (all events by default). Under Skip changes from, you can exclude sources so a system does not receive its own changes. Create the endpoint.
Copy the Signing secret now. Your system uses it to check the
X-Nwc-Signatureheader.Select the endpoint and click Send test. You see "Test delivery queued".
Watch Recent deliveries for the status, HTTP code, and attempts.
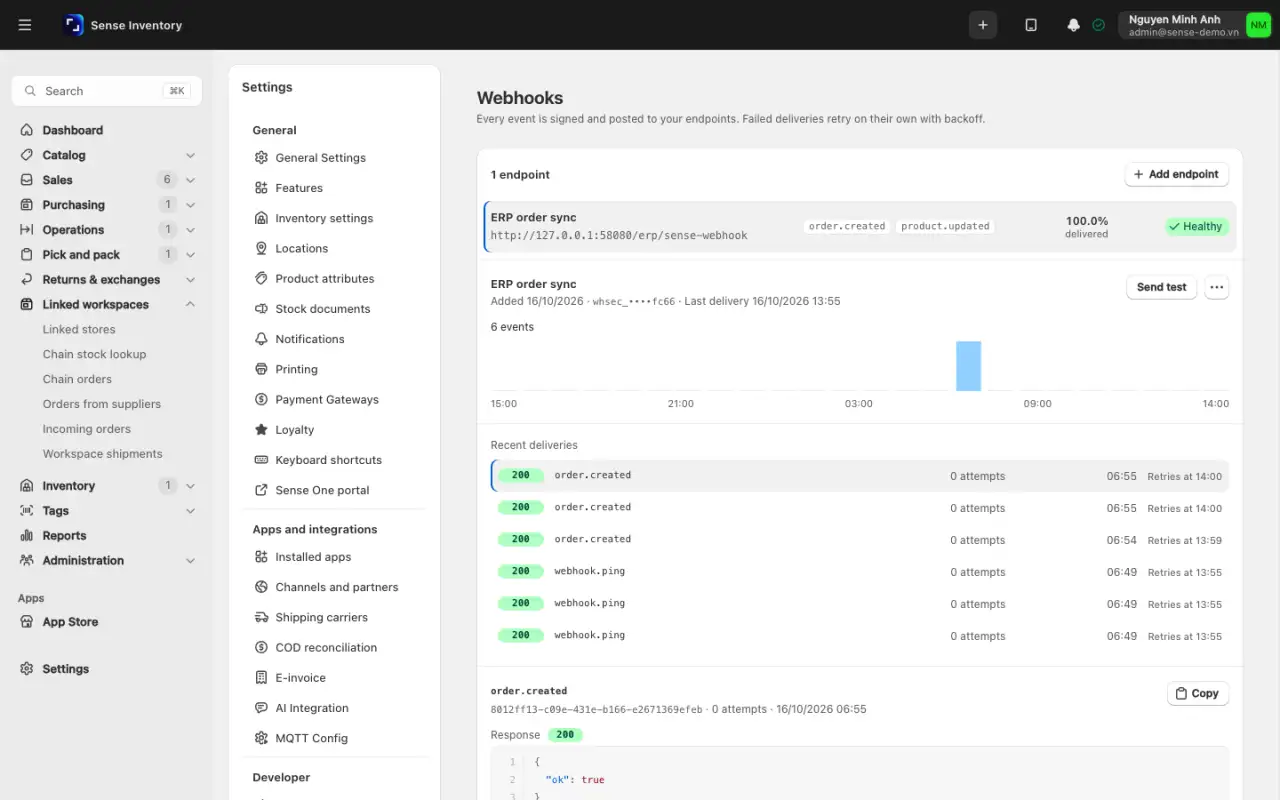
A failed delivery is retried after 2, 4, 8, and 16 minutes, then marked Failed after the fifth attempt. After 50 failures in a row, the endpoint switches itself off and its deliveries pause until you turn it back on. An event can arrive twice, so your system should drop duplicates by X-Nwc-Event-Id.
Edit an endpoint, rotate its secret, or resend a failed delivery
Select the endpoint on the Webhooks page.
To edit, change the Name, Endpoint URL, Events, or Skip changes from, and save.
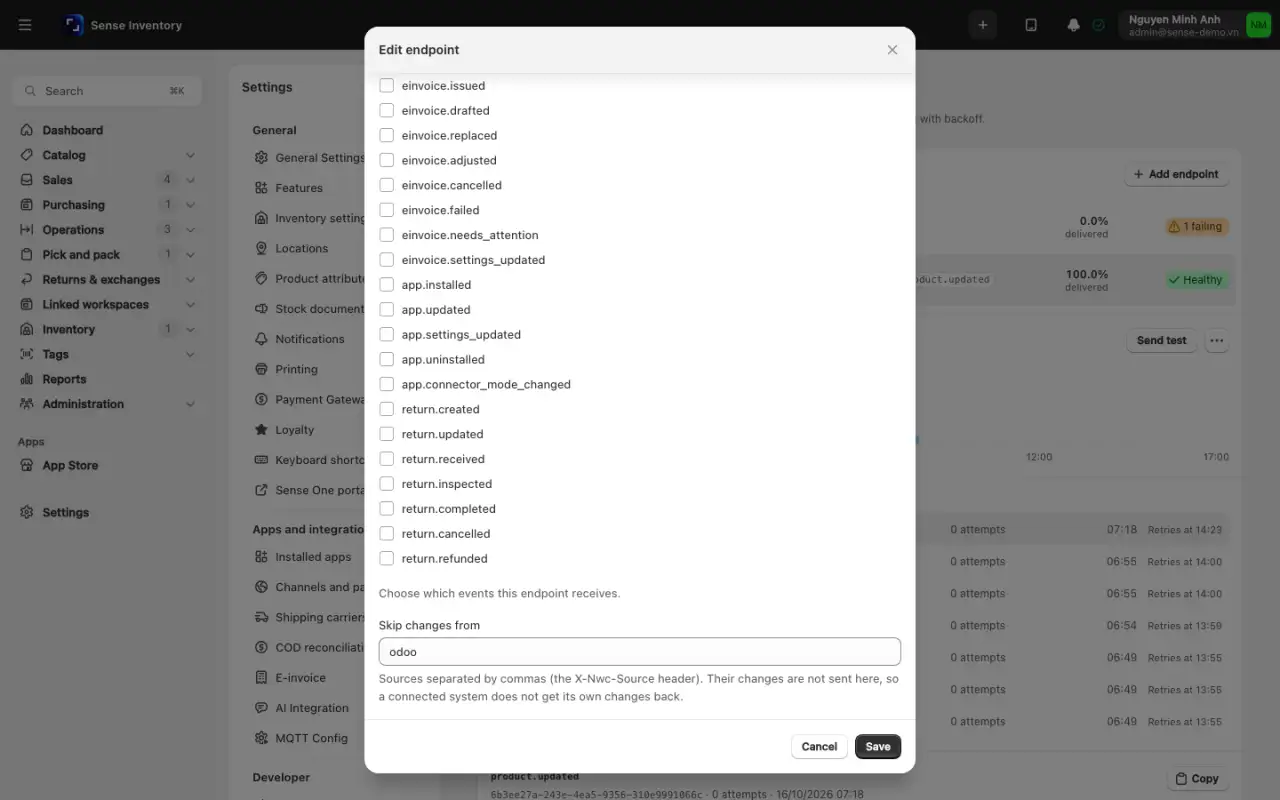
To get a new signing secret, click Rotate secret, copy the new secret at once, and update your receiving system.
To send a failed delivery again, find it under Recent deliveries and click Resend. The button appears only on Failed deliveries. The same event is sent again with 5 new attempts.
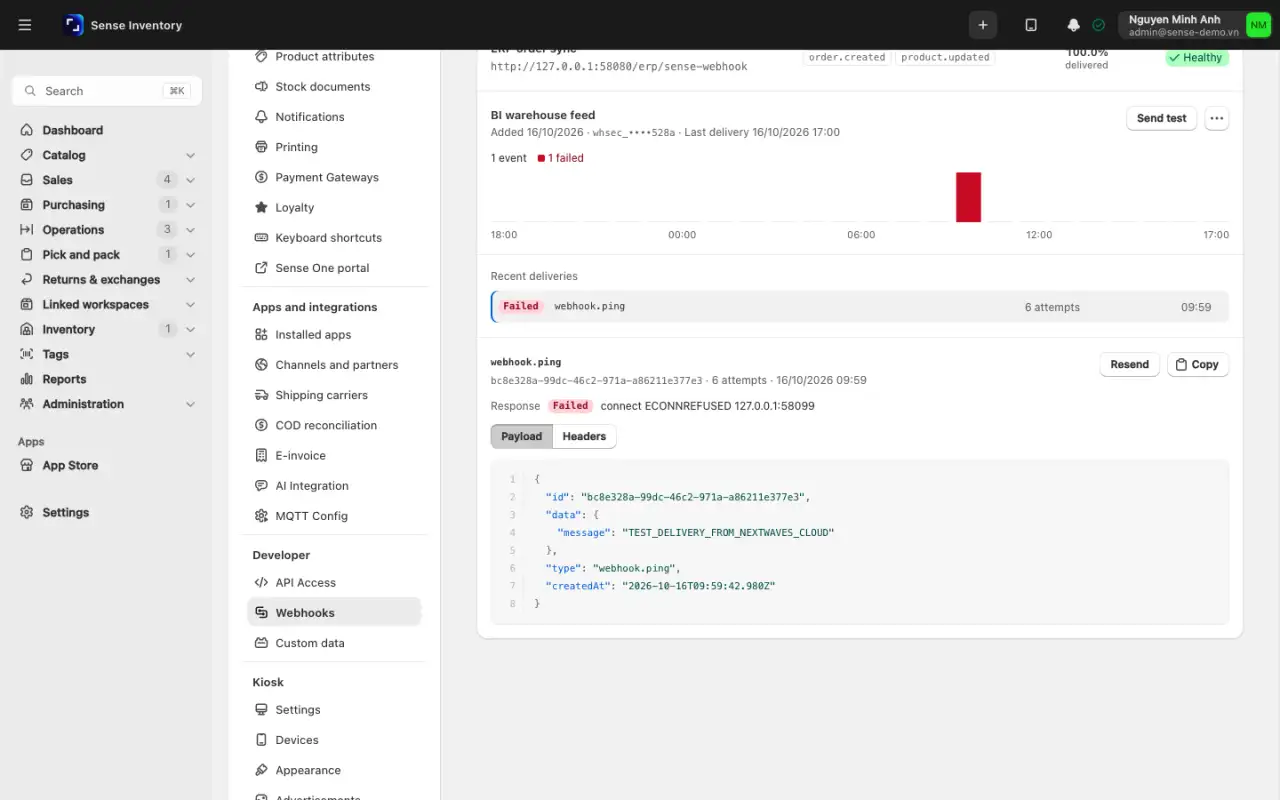
Endpoints that belong to an installed app can only be turned off or on here.
Apps and custom data
Apps add channels, payment methods, carriers, or screens to Sense Inventory without changing the core product. The plan must include apps. To install a private app, open Settings → Apps and integrations → Installed apps, click Install app, paste or drop the manifest file, click Review access, read the list under "This app will be able to:", then click Agree and install. Copy the API key and App secret now, because they are shown only once. For an app from the App Store, pick it, click Install, and agree to the access it asks for. You can turn an app off or uninstall it. If an update asks for more access, you review it first. An administrator must approve app charges on the billing tab.
Custom data adds your own fields to products, customers, and orders, or your own record types:
Open Settings → Developer → Custom data.
On the Custom fields tab choose the owner (Products, Customers, or Orders) and click Add field.
Set the Name, the Key, and the Type, and tick Required if needed. The key uses only lower-case letters, digits, and underscores, and cannot be changed later.
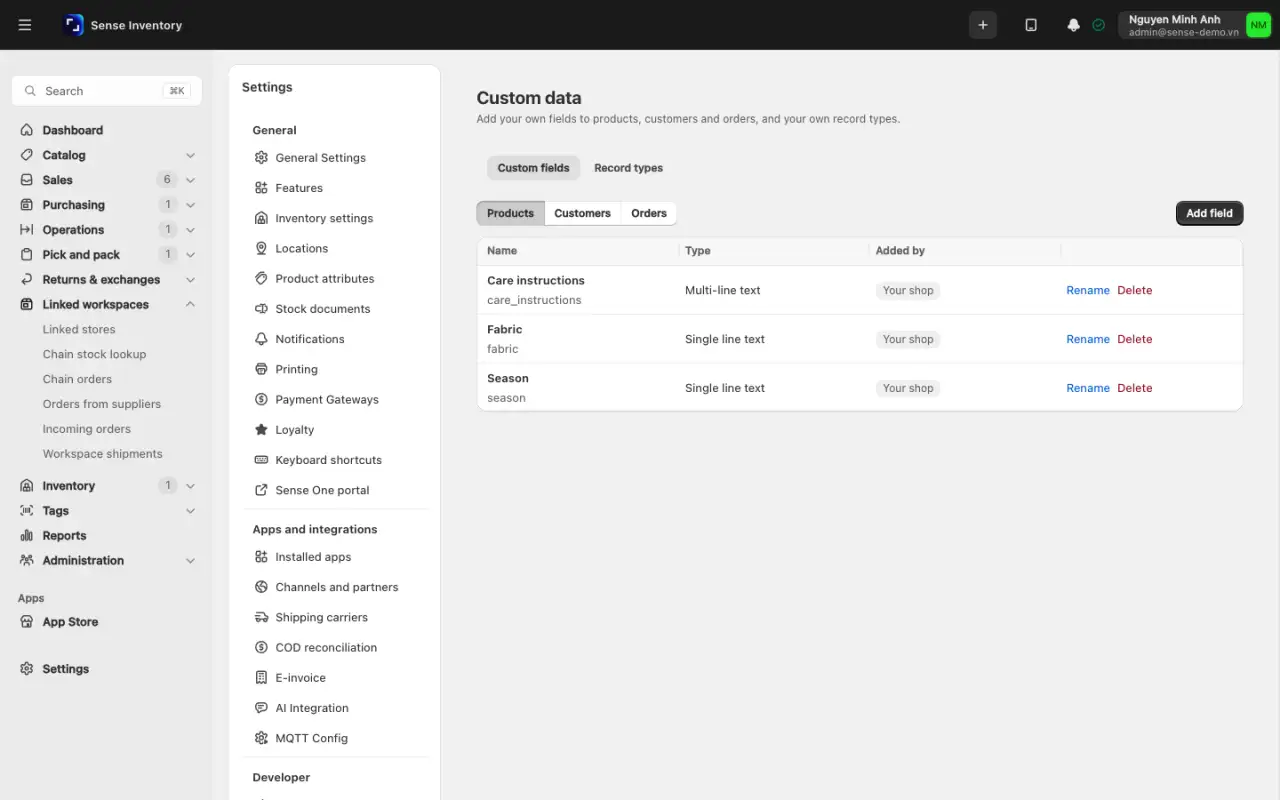
Fill in values on the Custom fields card of the product, customer, or order page.
The Avalon assistant and outside AI tools
Avalon is the AI assistant built into Sense Inventory. It answers in plain language from the workspace's own data, and sees only what the asking user's account may see. Three conditions apply: the plan includes Avalon, the AI assistant module is on, and an administrator has turned Avalon on.
- Open Settings → Features, find the Avalon AI section, and tick Turn on Avalon AI. Within seconds the Avalon button appears in the top bar and Avalon AI appears in the sidebar.
- A user opens Avalon, types a question in Ask Avalon…, and presses Send. The first time, preparing a private workspace can take up to about 2 minutes. Answers based on real data are marked Live Inventory data. Conversations and files are private to each person.
- Avalon can fill in a form on the page you have open. Each time it wants to press a button, a Confirm Avalon action box appears. Click Allow or Decline. No answer within 55 seconds counts as declined.
Turning Avalon off hides it for everyone and stops running tasks. Reading live data needs the data-tools feature in the plan. Avalon can never change workspace settings or payment gateways.
Separately, the MCP connection lets outside AI tools such as Claude Code, Cursor, Windsurf, or VS Code use store data. Every call runs with the permissions of the administrator who generated the key:
Open Settings → AI Integration and tick Enable MCP server.
Under API Key, click Generate new key. If a key already exists, confirm the replacement. The old key stops working at once. Copy the new key now. It is shown only once; afterwards the page shows only its last 4 characters.
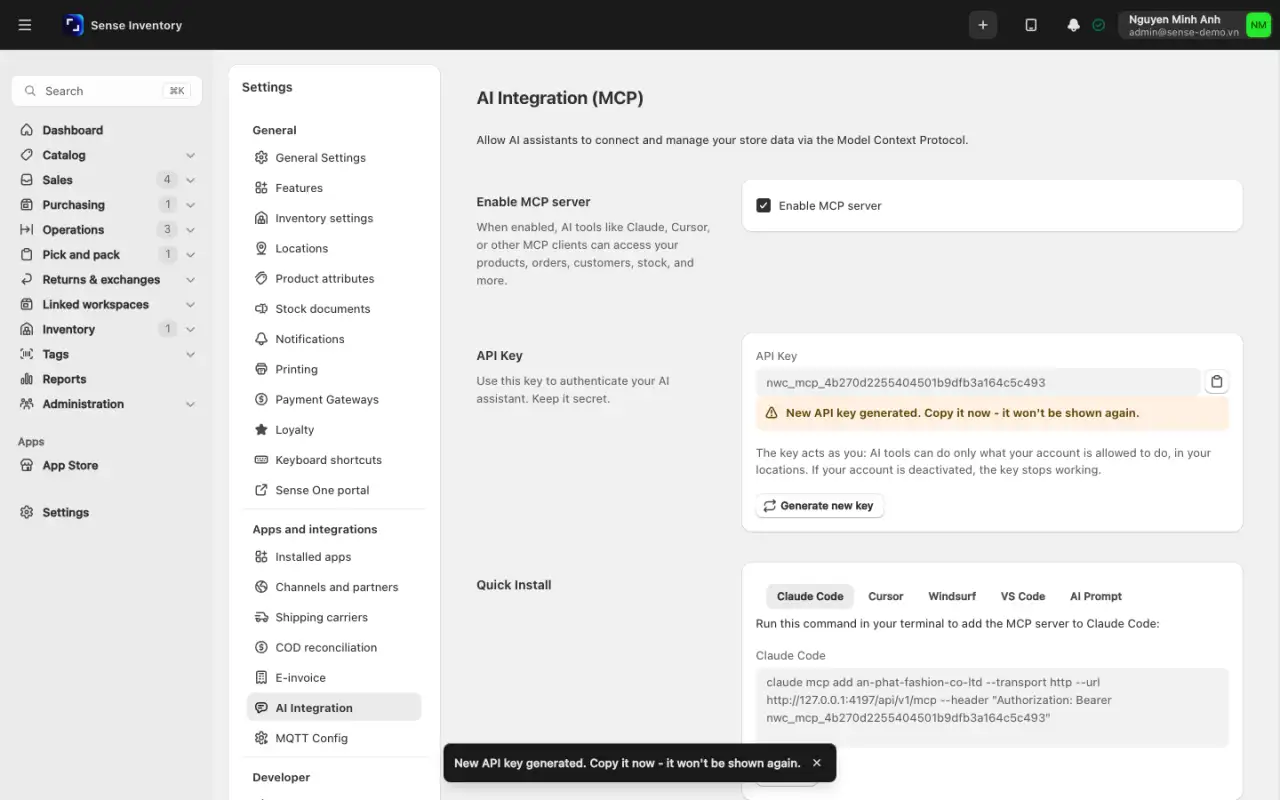
Under Quick Install, pick Claude Code, Cursor, Windsurf, VS Code, or AI Prompt, click Copy, and paste the command or config into the tool.
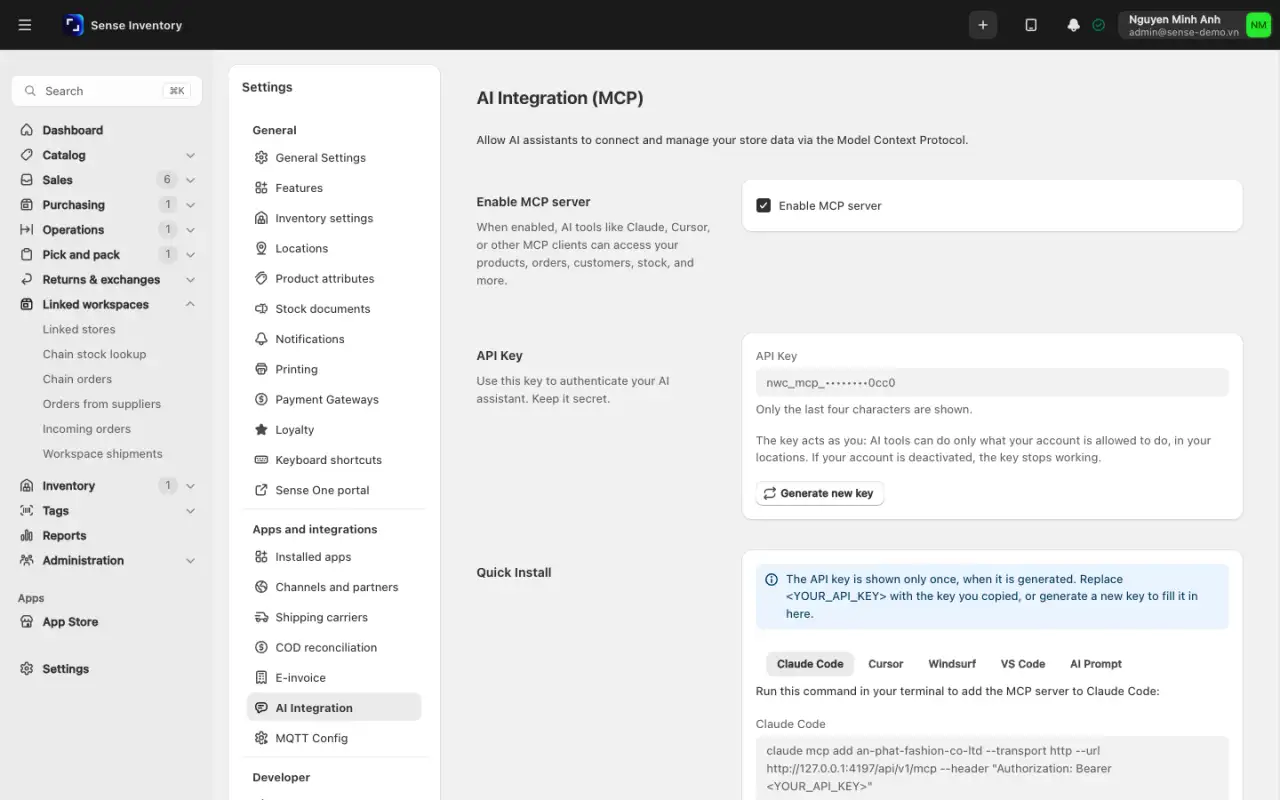
To cut off access, generate a new key or untick Enable MCP server.
Treat the MCP key like a password: an outside tool can do exactly what the key's owner can do in Sense Inventory. Old keys created before keys had owners stop working, and so does a key whose administrator was deactivated. Both need a new key. The mobile app has no Avalon or MCP.
Telemetry and sample data
Telemetry answers operations questions that business reports cannot, such as which reader fails often and which screens staff really use. Only administrators can see it. It stores counters only, never tag EPCs.
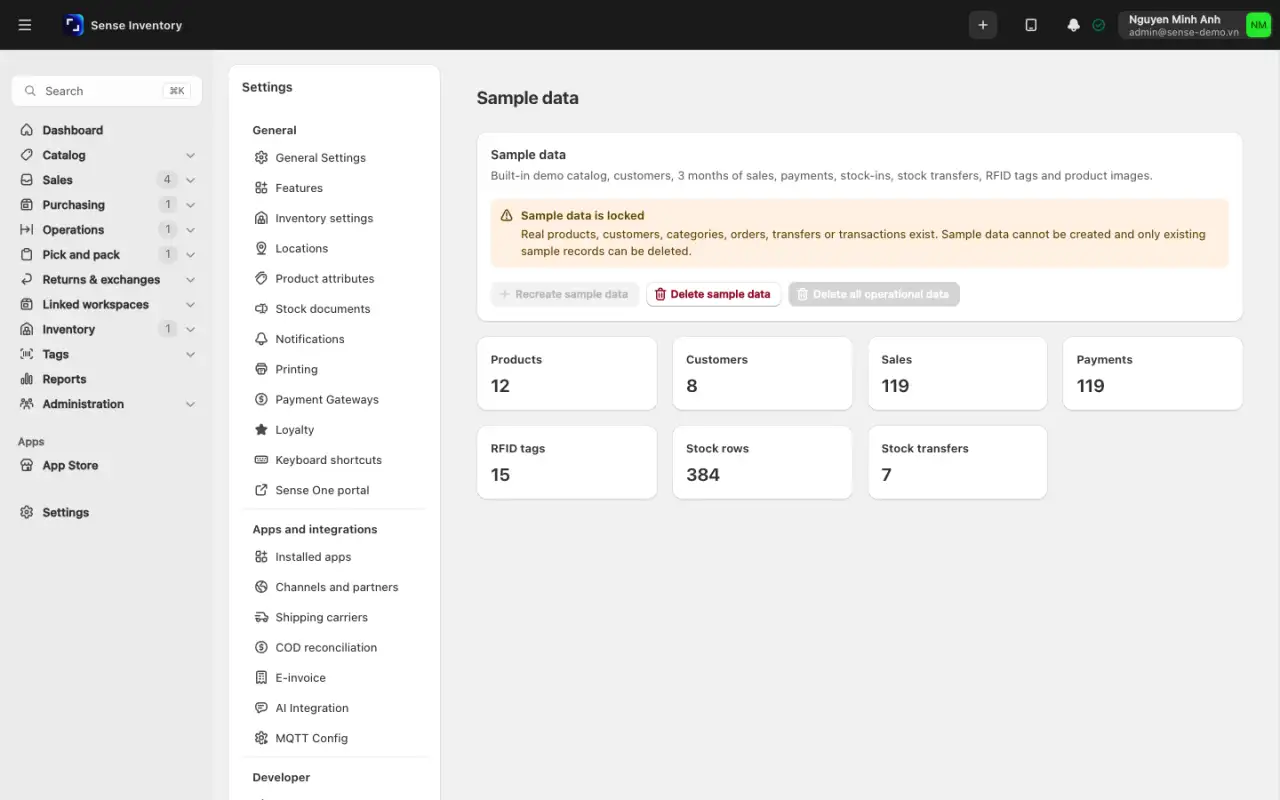
Sample Data is a set of practice records marked NWC-SAMPLE-. Delete them here before the store goes live. Any sample left behind counts straight into your real reports.
Changing configuration on a running system
Operational guidance
Do not change the time zone, tax, stock deduction rules, and integrations all at once on a system that is selling. Give each change one owner, announce the time in advance, and keep a way back to the old configuration.
Change one group, save, check it with a real transaction or a real report, and only then move to the next. If you change several at once and something breaks, you cannot tell which change caused it.
When something looks wrong
| Symptom | Likely cause | What to do |
|---|---|---|
| A Settings entry is missing | Missing permission, module off, or plan lacks the feature | Check in that order, see Users and security |
| "The {provider} integration is not enabled for this workspace" | The connection is not enabled | Click Enable under Settings → Channels and partners, even if the message points to Features |
| "Not included in your plan" | The plan lacks the connection | Contact Nextwaves |
| Channel orders imported but stock did not drop | Expected: stock leaves only when the goods issue note is submitted | See Process channel orders |
| "Sapo owns stock levels" and pushes are blocked | Sapo is the stock master | Only view differences, or change the stock owner |
| "A sync is already running. Try again when it finishes" | Another sync is running | Wait for it to finish |
| "Enter your store domain" | Private app without a store domain | Fill in the store domain |
| "Could not connect to Salework. Check the Client ID and token" | Token changed or wrong | Re-enter it; after 3 refusals in a row the connection switches itself off |
| "The Odoo URL is not valid" | Not https://, or extra parts after the path | Enter a full https:// address |
| "Map every line to a product before accepting" | Unmapped lines on a linked shipment | Map them or create products from the document |
| "Links with other workspaces are turned off" | Links feature is off | Turn it on under Settings → Features |
| "A link with that workspace already exists or is waiting for an answer" | One live link per pair | Use the existing link |
| "When accepting, you can only narrow the requested terms" | Widened the modes | Untick the extra modes |
| "Integrity error" blocks accepting a shipment | The document changed on the way | Reject, ask the sender to cancel and send again |
| Webhook buttons are missing | Only administrators manage webhooks | Ask an administrator |
| "The webhook URL must start with https" or "must be reachable from the internet" | An http or private-network address | Use a public https address |
| A webhook endpoint turned itself off | 50 failures in a row | Fix the receiving system, then click Enable |
| 429 "Too many API requests" | Over 600 requests per minute on one key | Wait for the time in the Retry-After header |
| "The API key is not valid" or 401 | Wrong, disabled, or expired key | Check it or create a new key |
| "This API key is read-only" | A write with a read-only key | Change the scope to read and write |
| Avalon says "AI is not connected yet" | Nextwaves has not set Avalon up | Contact your administrator or provider |
| "You have used your AI allowance" | Allowance used up | Wait for it to reset |
| An MCP tool says the key is no longer linked to a user | Old key, or its owner was deactivated | An administrator generates a new key |
| Label refused: "This label does not match one active product and unit" | The scan does not lead to exactly one product and unit | Scan the variant's or product's own code |
| "This UID already has a label. Use print history to reprint it" | Print each UID only once is on | Reprint from the label print history |
| A label print job shows Needs review | The send was interrupted or uncertain | Check the printer; it is never retried automatically |
| A QZ certificate is refused | Not RSA 2048 bits, expired, key mismatch, or uploaded twice | Use a valid certificate, once each |
| No gate alert for a tag | The tag is unregistered or covered by an Ignore rule | Check Ignored tags & products |
| Gate event recorded but no siren | Paid goods, Silent mode, outside armed hours, a smart-suppress rule still counting, or no GPIO or Reader Client ID | Check each condition |
| Test email says "SMTP is not configured" | Host, port, or From address missing | Fill them in and resend |
| Telegram says "Telegram is not configured" | Bot token or chat id missing | Fill in both |
Read next
- Set up the system: the meaning of each foundation choice at rollout.
- Channel orders: connecting and running marketplace integrations.
- RFID management: readers, tags, labels, and the scanning screens.
- Users and security: roles, 2FA, and the activity log.
- Troubleshooting: when a configuration change causes trouble.